Pinkfresh Studio July 2022 Stamp, Die, Stencil, Washi, and Hot Foil Release

Today I’m excited to be blog hopping with Pinkfresh and friends! We are celebrating the July release and as usual, there is a load of gorgeous and versatile products coming out.

You should have come from the fabulous Emily Midgett and the next stop is the incomparable Heather Hoffman. If you get lost along the way you can find the entire lineup on the Pinkfresh blog post, as well as via the InLinkz link.

I have mixed and matched some older goodies with the new release. The Stitched Scallop Rectangle diecut is one of my all-time faves from Pinkfresh, it’s so pretty, so versatile and in my opinion it really elevates a simple card design without taking the focus away from the focal point on the card. I also love the Dotted Scalloped cover plate. It’s such a gorgeous pattern and was the perfect thing for this card.

The Go For It suite is new for July, and it’s such a lovely and dainty image, yet packs a punch. How is that for awesomeness? For this card I have used all but the stamp itself, and soft spring colours, despite it being a heat wave right now. I should have gone for fiery colours perhaps but I’m really drawn to yellow on cards.

After foiling the Go For It image with Matte Gold, I used the layering stencils over it to add colour. Don’t try and diecut first and then ink blend, always ink blend first and then cut it out.

I am so happy to have a coordinating diecut for this image as I’d never manage to cut this all out without chopping off a stem or leaf.

The ink colours used are Lemon Whip, Sunshine, Sweet Mustard and Grassy Knoll. I used the same yellow inks for the sentiment, which is from the Fall Leaf Border suite. The sentiments are all ink blended with the Fall Leaf Border Stencils for a really gorgeous look, and they all have coordinating diecuts too.

To put the card together I have layered up a lot of the pieces for that lovely dimensional look. The background is propped up, the sentiments are stacked, the frame is layered with a white one under the yellow, and the flower heads are raised up with foam tape. The final touch were some dainty clear crystals, for a morning dew or raindrop look.

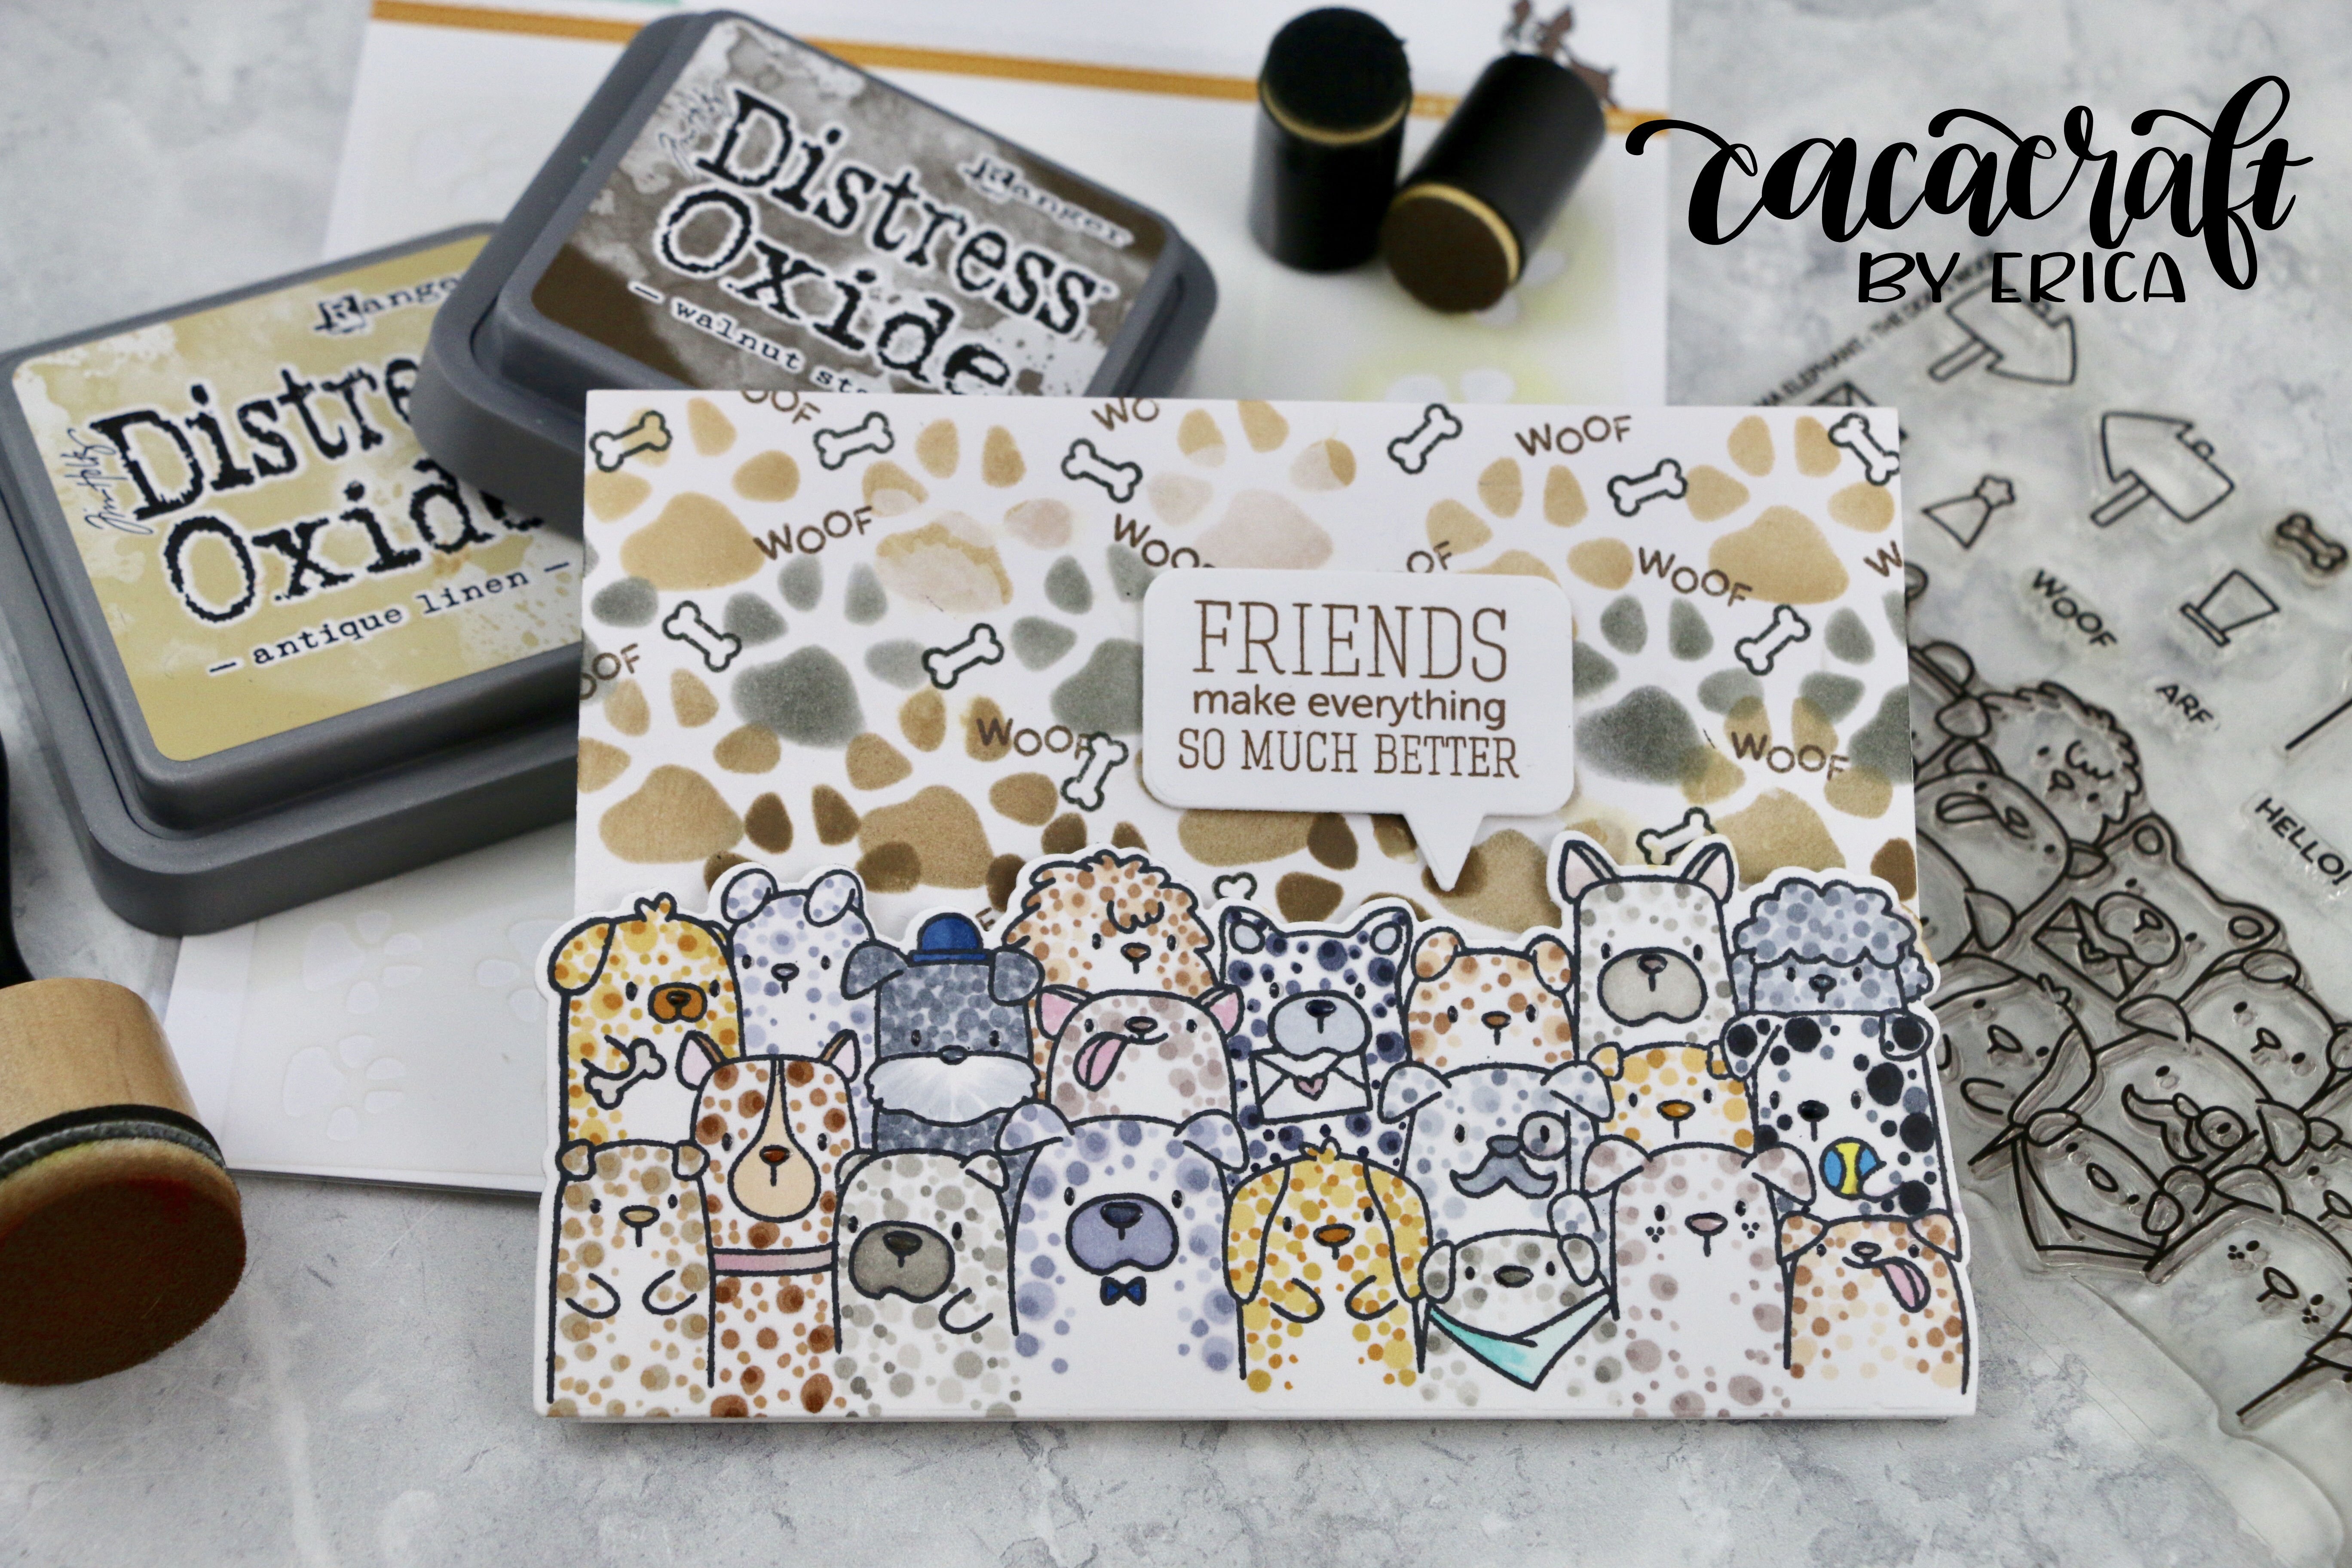
My second card is done in a similar way, with a cover plate to add texture on the background and the Stitched Scallop Rectangles to add in a delicate touch. This cover plate is the Floral Backdrop and I used it on Soft Stone card stock from Gina K Designs.

The pattern in created with the Fall Leaf Border stencils, and bright happy ink colours. Once I had ink blended the pattern, I fussy cut along the border of them to cut off the excess white space.

I picked another sentiment from the set, Thank you, this time and used yellows and apricot colours to create the look before cutting them out with the coordinating diecut. These are also raised, but with foam tape this time.

To keep with the colour scheme I used Sunshine Jewels for this card, and quite a restrained amount, for me.

That is it from me for today, but I hope you have found some inspiration here with me and along the hop. The next stop is Heather Hoffman, and you can also find the entire hop list via the InLinkz list here.

As it’s a blog hop, there are of course giveaways and prizes!

GIVEAWAYS:
-You can win the full release on the Pinkfresh blog & YouTube channel! All you have to do is leave comments on both new release posts, and that’s it!
-There are also a total of TEN $25 gift cards to be won along the hop. Winners are drawn randomly from all the comments left on the blogs, so the more you hop and comment, the better your chances to win!

Winners will be announced on August 5, 2022 on the Pinkfresh GIVEAWAY PAGE. Please note that you must check that page and claim your prize within 2 weeks, so mark your calendars and check back!

For transparency, I have used compensated affiliate links all throughout this post, for your convenience, and at no extra cost to you. If you shop via these links I get a small commission from Pinkfresh directly as a thank you for directing you to them. Everything I earn from these links are currently going to the ‘Forever Craft Room Renovation Fund’ as I have a lot of work to be done on the room that will be my craft room in the house we bought a couple of months ago.

Here is a photo of it, and I will be making sure to share lot of updates as it comes to life. Thank you so much if you chose to support me by shopping with these links, I appreciate it a lot!!

Thanks again for stopping by, lots of love and happy crafting from Erica

Pinkfresh Studio Seamless Floral Pattern Cards

Hello, hello!

I’m back again with another few projects using the Pinkfresh Studio December Stencil and Die release. There is also a video on my YouTube channel for these!

For these I have used the Seamless Floral Pattern stencils, with two very different colour schemes and finishing touches, to show how versatile these stencils are.

On the first card I picked out some pastel colours from the Big Ink Pad Bundle, which is 30% off until the 17th! Perfect timing to treat yourself to a great colour selection of fabulous inks. I picked out Lemon Whip and Sunshine from the yellows, Ballet Slipper and Sparkling Rose from the pinks, Sky Blue and Summer Shower from the blues, Ocean Breeze and Aquamarine from the teals and finally Mint and Meadow from the cool greens.

I’ve used a light spray of Pixie Spray on the stencils, but if you don’t have that, there are marks for card bases sized 5.5″x4.25″ which makes it really easy to line the layers up.

I have used my Taylored Expressions Blender Brushes for this ink blending session, where I usually use Life Changing Blender Brushes from Picket Fence Studios. I’ve let them all get a bit too inky from previous ink blending sessions, and wanted to make sure that there was no contamination from any other ink pads for this project. A spa day for the brushes are on the horizon for sure.

It’s somewhat difficult to explain in words how I did the ink blending over the different layers, so if you prefer to watch the how-to, hop on over to my YouTube channel. I have basically gone over the same area on each one of the stencils with the same colours, to create a soft pastel rainbow look. With the last two I have gone in with darker inks, as mentioned above, and the final layer I used Moonstone Glimmer Paste from Nuvo.

Whilst waiting for the Glimmer Paste to dry, I tried another few colour combinations. I started with Soft Lilac and Lavender Candy Violet, as well as Coral Reef and Passion Fruit for the flower petals. I also used Warm Buff and Doe for the leaves. The final layer was actually heat embossed in Copper from WOW! Embossing powder, after dabbing the Embossing Pad all over the last stencil.

I love the look of the copper heat embossing as a final touch. Because I hadn’t waited for the ink to dry 100%, there was some stray bits of heat embossing powder in places where I didn’t really want it, but oh well. It did sort of add to the vintage soft look I was after.

I finished this one by trimming down the panel and adhering it to a brown textured card stock from Lawn Fawn, and that whole thing got adhered to a card base. The last thing I did was stamping up a sentiment from the Through The Trees stamp set, with Gathered Twigs ink, directly on the background panel.

The first panel was also trimmed down, but this one was adhered to a black panel. Before I adhered this one to the card base, I actually used the ‘awesome’ die cut on it in the middle. It’s going to be covered up by the flower panel anyway so why waste that paper? I did cut out both the word and the shadow bit, and also cut out one more shadow part in white. These are layered up with black, white and then the black ‘awesome’ on top. The reason I did this is to add a little bit of interest with the black at the bottom.

A sentiment needs something more than just ‘awesome’ so I stamped up part of a sentiment from Thankful For Friends stamp set, on a super skinny banner. The original sentiment says Our Friendship Is Amazing, and now with the diecut it says ‘Our Friendship Is Awesome’.

Well, that’s it from me for today but I will be back tomorrow. Yep, again. Sorry, not sorry!

I have used some compensated affiliate links in this post, at no extra cost to you. Some of these products were sent to me as part of being a guest designer, but don’t worry, I only ever create with stuff that sparks my creativity. And I don’t think there is any doubt that this release has my mojo humming with excitement. Oh boy.. that kind of came out a bit wrong, didn’t it? But you know what I mean, I hope!

Right, before I put my foot in my mouth again, I’m going to sign off but I’ll see you soon again.

Lots of love and happy crafting from Erica

Studio Katia Blog Hop Giveaway Winner and Birthday Cards + video!

Hi everyone!!

Oh my goodness, I’m so excited! I have so much fun stuff to share today: the winner of the recent Studio Katia Blog Hop giveaway, two fun and colourful cards AND another video to my brand new YouTube channel!

If you missed the blog hop post, CLICK HERE to check it out. It’s obviously too late to enter the giveaway but it’s there in case you want to check out the card I made for the hop.

Now, without further ado, the winner of the $25 gift certificate is Mary-Anne V! Congratulations!! Email studiokatiagiveaway@gmail.com with the subject Erica Blog Hop Winner to claim your prize!

Now for the two cards I have done for this post. I used the It’s Your Birthday stamp (at the time of writing it’s unsurprisingly out of stock, but make sure to sign up for in-stock notifications) from Studio Katia.

img_2088

The two cards are basically the same, except for the colour of the embossing powder and some of the sizing. One is white and the other is gold. I can’t really pick a fave myself, I keep switching back and forth between them.

If you aren’t a blog reading kind of crafter, CLICK HERE to go to the YouTube video showing how I made these. I’d love it if you’d subscribe to my channel and like my video while you are there!

Ok, back to the written word! The backgrounds are done with the fun Radiating Star Stencil from Neat & Tangled, and an assortment of Catherine Pooler inks. Clockwise from 12 o’clock we have Bellini, Coral Cabana, Party Dress, Flirty Fuchsia, Something Borrowed, Aquatini, Lime Rickey and Limoncello.

To help keep the stencil in place and get clean, crisp lines, I used Pixie Spray (seriously a life saver when it comes to stencils with fine details!) on the stencil a few minutes before I placed it on the card stock. Which is Strathmore Bristol Vellum by the way. I also added some PostIt tape along the edges to get that white frame around it and for extra stay-in-place power. That’s totally a saying now.

Each section was blocked off with sheets of paper and held in place with PostIt tape. Then, with the help of my Life Changing Blender Brushes from Picket Fence Studios, I blended each colour, one by one. You might notice that the centre bit is darker and then the colour goes lighter towards the edges. I think it helps draw the eye in and create some dimension, in an otherwise rather flat design.

The white embossing powder is from Wow! Embossing Powder and the other one is done with Antique Gold from Altenew. Before doing any heat embossing I use my pillow like anti-static tool very generously over the panels. Then, with the help of my Mini MISTI, I stamped the big sentiment ‘Happy Birthday To You’ from It’s Your Birthday, in the middle with VersaMark ink. A generous sprinkling of embossing powder later, a tap-tap to get the excess off and then it was go-time with the heat gun.

I didn’t wait long enough between the ink blending and the stamping with the gold one though and ended up having to clean it up a little with a small paint brush before heating up the embossing powder. I’d like to be able to say that’s the last time that will happen but it’s very, very likely it will happen again and again. Eh, whatcha gonna do?

With both of the panels ink blended and heat embossed, they got trimmed down a little bit to leave a white frame on the card base. Then, with the help of foam sheets cut to size, I adhered them to their card bases. Aaaaaand almost *ALMOST* left them as they were. But, I couldn’t resist adding some fabulous sequins from Studio Katia. These are called Crystal Clear Fusion and I used them all the time, they are amongst my all-time favourite embellishments.

Well, my friends, that’s it! Except to mention that I have used affiliate links in this post for everything I have used in case I have inspired you to pick up a thing or tw… elve (no judgement) for yourself. Using Affiliate links cost you absolutely NOTHING extra but I get a small commission from the companies directly if/when you do. I use anything I make towards the running of my blog and now my YouTube channel so thank you from the bottom of my heart if you use mine. I do not take it for granted and every little helps!

Thank you so much for stopping by today!

Lots of love and happy crafting from Erica


A card making fail and remake with Picture Perfect stamps from MFT Stamps

Hi guys!

How are we all? I hope you are better than I am. I’m battling a cold that has given me a red raw nose, wiped me out and left me feeling really quite sorry for myself. My little chicas aren’t being the best nurse maids either. I catch them sleeping on the job several times a day.

For my birthday this year I got some lovely goodies from MFT Stamps, courtesy of The Man. One of the sets I got was Picture Perfect and I loved it from the minute I saw sneak peeks of it. It’s full of funny selfie looking images featuring animals and I have such a soft spot for cute critters. I also got the Polaroid Shaker Frame and #Captions dienamic.

The first card I made with the set, was full of rookie mistakes… I forgot to colour in the entire image and the background. I also messed up the first Polaroid dienamic cutout I made with the help of #Captions dienamic. Also, the Polaroid was put on wrongly too and ended up covering too much of the doggies. Oh well. Things happen and doesn’t always go the way you plan but I think it’s important to show the fails along with the winners. Just in case someone gets discouraged with their own work and thinks ‘oh, she never messes up’. Oh yes, I do.

As I liked the idea I had in my head for this card, I decided to redo it from scratch and fix all the mistakes I made.

First things first, and I started with the Polaroid Shaker Frame and the #Captions dienamics. This time I did it the right way, i.e. did it the way I had intended to before I messed up. In the photo you can see the failed one (the left) but the bit that’s messed up, is actually under the dienamic here so you can’t see it. I only changed up the colours a little.

Next step was to stamp up the image from Picture Perfect and colour it in. I use Ink On 3 Blackout Ink for most of my Copic colouring these days and Neenah Solar White 110# card stock. It’s a brilliant ink. The amount of Copics it took to colour this tiny image is almost laughable, the number is up there in the 30+ figures.

Another product I have recently gotten my hands on is Pixie Spray from Therm O Web. Something that has always annoyed me is getting smudged lines when doing inkblending and using embellishment mousses and I have been dreaming of a product like this for a long time! The trick to using this is patience. Spray the stencil, and then let it sit for at least a couple of minutes before adding it to the thing you want to stencil. It’s very important to let it dry out for a little bit to let the tack develop. If you use it too soon, it won’t stick to your project. Go on, ask me how I know this! *slaps forehead*

This stencil is also new, it’s called Lots Of Hearts, another MFT Stamps knock out! Anything with cute critters and hearts = I’m sold. Oh and ombré or rainbows. Because of the colouring of the image, I decided to use yellow, through greens to blue on it. I usually use masking tape when it comes to masking off things but here I’ve used Post-It tape.

These luscious inks are from Catherine Pooler. Not only do they stamp beautifully, they work for ink blending and water colouring! From top to bottom is Something Borrowed, Aquatini, Lime Rickey, Garden Party, Tiara and Limoncello.

I use the Life Changing Blender Brushes, from Picket Fence Studios, pretty much exclusively these days. I get much better results with these brushes than I ever did using the foam pad ink blending tools. I still have them, but I reach for my brushes 9 times out of 10.

One little tip I have for adding foam to an intricate diecut, such as the ‘Friend Duodienamic I used for this card, is one I use a lot. It takes out some of the fiddly work and makes things a lot easier. So step one is to cut it out of the foam but leave it in the negative bits. Cut the same shape out of your choice of card stock. Then pull off the cover from the self-adhesive foam and layer the card stock over the foam one.

This little trick has saved my sanity many a times when I have tried to layer up the pieces and they have been separated. Now, this looks very almost black here but it’s actually dark gray. It’s a Lawn Fawn card stock called Narwhal.

Before putting all the pieces together on the card, I took a moment to make sure I didn’t repeat the same mistakes I made on the first card.

I really like how this came out! But then it has doggies and bright colours. LOL! I can see myself using this Picture Perfect set a lot. MFT Stamps does it again!

I hope you like the card as much I do. I have used some compensated affiliate links in this post. What that means is I get a small commission from the company directly, one of them being MFT Stamps, at no extra cost to yourself, if you click on any of these links and end up getting a little something-something for yourself.

Don’t you think the two doggies to the left look like my little chicas by the way? That one in the front looks like Gem-Gem to me and the little one in the corner has that same ‘what??’ look on her face, is Mar-Mar to a T. They just crack me up!

Thank you so much for stopping by today! If you want to see more of my daily crafting shenanigans, follow me on Instagram. That’s where I share most of projects, cards and little Insta stories. If you are a dog person, those little sass monsters The Cheeky Chicas have their own page. Yep, I’m one of those dog moms! 🙋‍♀️

Pink Monochromatic card with lots of glimmer and shimmer for a glamorous birthday girl!

Hello, hello! 

Today’s post is a quick one to show you a card I made for this week’s Simon Says Stamp Wednesday Challenge, where the cue is ‘Sparkle and Shine’. 

3E4BBA52-B528-4B3B-92AD-8CC511332982

I used an A2 panel cut out of Tonic Studios Black Velvet card stock which I stencilled with Peony Pink Nuvo Embellishment Mousse. The stencil is Tim Holtz Gothic Layering Stencil and I used it just along the side of the panel. The shimmer you get from the Nuvo Embellishment Mousses is amazing, if you like shimmer, you will love these! Tonic Studios also have a stunning collection of mirror, metallic and shimmer card stock. I’m a big fan!

8395F904-36CD-4FDA-861A-B70804D1D15D

The idea I had was to show a sentiment through a diecut so I cut out a stitched circle using a SSS diecut. I didn’t end up using that idea, instead I put a glimmery pink card stock behind it and adhered all this to a white card base. 

I stamped up ‘Friend’ from the SSS Stained Glass Love Stamp set on Neenah Classic Crest #110 card stock and coloured then in with pink Copic markers. This I cut out using the coordinating diecut and set aside. 

B8286783-713C-44A9-B65B-A12B5AF1E54D

On a slim strip of white card stock I stamped up ‘It’s Your Birthday’ with VersaMark ink, after dusting this card stock with my anti-static tool. The embossing powder I used is Altenew’s Rose Gold embossing powder and I set this with my heat gun. 

This card came together pretty easy after all these bits were done, it just took a quick minute to decide where they were going to go and then adhering them to the card base. I also added a few puffy heart stickers from Doodlebug Design Inc’s , the ones I used are called Tiny Hearts ,to the card and with that I was done. 

F5208570-E77C-4EE6-9391-E1E8FF04579E

I hope you like it and found some inspiration here. As always, I’ve used compensates affiliate links where possible. What that means is that I get a small commission directly from the company itself, one of them being Scrapbook.com, if you purchase something using these links, at no extra cost to you. Thank you so much for supporting me like this if you do use these links. It really does mean the world to me and every little helps! 

For more crafting adventures, you can follow me on my various social medias: Instagram is where I’m most active, but you can also find me on Facebook, Pinterest and Flickr.

435A2E99-2C88-4402-87AC-242168E9C2D3


That’s really it from me for today, thanks for stopping by and happy crafting!

Lots of love,

Erica 


Always Here For You, Friend

Hello and happy Wednesday!

I’m popping in today with another card I made for the Simon Says Stamp Wednesday challenge. The cue ‘Add some Texture’ was very inspiring to me. If you know me and my crafting style it’s usually all about layers, dimension and textures so this was pretty much the perfect challenge.

2089EAE1-A667-444D-9D97-D0C0090A486F

I started out by blending some Distress Oxides inks on some Bristol Vellum water colour card stock. The colours I used are Fossilized Amber, Spiced Marmalade, Abandoned Coral and Picked Raspberry from bottom to the top. These colours just look divine together, don’t you agree?

F81D53E2-F2BE-401D-A550-4EF41BD8E1B4

To get that lovely dotted look I also splattered some water on it and lifted it with a towel. Whilst that was drying, I settled on a sentiment and I went for SSS Stained Glass Love, using the ‘friend’ image. Because I couldn’t decide on exactly what colour I wanted it, I did two. One with pink Copic markers and black in and the other one I heat embossed it with Ranger Ink Gold Tinsel embossing powder and coloured it with Zig Clean Color markets in yellows. In the end I went with the yellow one.

FED75A01-59B7-423F-8392-292C881C69AE

Using the coordinating diecut, I cut it out and also stamped up ‘Always here for you’ with black ink on a piece of white card stock. This bit I trimmed down to fit behind the Friend bit. While I was at it, I also cut out a piece of foam sheet to raise it up and add even more texture and dimension.

A171CD72-5280-4223-B787-5198969C1D05

To add the actual texture bit I used a Tim Holtz stencil called Gothic Layering Stencil and a mixture of Ranger Ink white texture paste and Nuvo Embellishment mousse in Lemon Sorbet.

0277FC98-607D-4EF0-9F0B-DF8A20F97326

When that was dry I put all the pieces together and added some clear sparkly sequins to it as well.

8D0F1556-78EF-4448-89F6-BD201BE141EA

I love how this came out and might try it in different colours to make a set. Now that would make a great present, wouldn’t it?

As always, I’ve used compensated affiliate links in this post, at no extra cost to you. That means I get a small commission from the company directly if you end up buying something using these links. Thank you in advance if you choose to support my crafting journey like that, I really appreciate it!

Have a great day and happy crafting! Lots of love from Erica

B-O-L-D Birthday card with Nuvo Embellishment Mousses and SSS Circluar Lace stencil

Hello everyone!

Today I’ve got a very textured card for you as I made it with the cue for this week’s challenge over at Simon Says Stamp Wednesday Challenge: Add some texture. I was very inspired by my friend Tracy’s card, where she’s used a stencil and glitter amongst other goodies. You should definitely check it out, it’s gorgeous!

I decided to try a very bold look and used my new favorite matte black card stock from Tonic Studios called Black Velvet and Nuvo Embellishment Mousses in different colours. The ones I have used for this card are Royal Aubergine, Peony Pink and Lemon Sorbet.

ADEDDE51-368D-4A0C-A6A0-F9F0923C71D8

This was my first real try with these colours and I didn’t really know just how shimmery they are so I also added some Nuvo Glimmer Paste in Amethyst Purple, just in case they dried less vibrant than they are in the jars. That turned out to be an absolutely needless worry, these mousses dry even more shimmery than when they are wet I think. I’m sold and am already prioritising the order of the next ones I’m getting!

A1A1C084-F057-47EC-9173-635E1E908FA0

Usually when I use stencils I tape them in place with masking tape but for some reason or another, I didn’t with this panel so it’s not as sharp and clean-looking as it normally is. I still loved it though and decided to go ahead and use it.

189D372B-70BC-425A-9157-48DBCE855A57

The stencil I have used is called Circular Lace from Simon Says Stamp and I used a little spatula to spread the embellishment mousse this way and that. There was no real plan to this, I just used all three and covered the panel. Once all the mousse was on, I added a bit of the glimmer paste in a few select places before setting that aside to dry.

903A36BD-F75D-410A-8169-9E7CDDC61329

As the background is like ‘in your face wow’, if I’m allowed to say that myself, I decided to keep the sentient simple and straight to the point. Using another Simon Says Stamp set called Big Birthday Wishes, I got one stamp out that says ‘It’s your birthday’ and stamped that in black ink on a skinny strip of white card stock.

The finish off the sentiment I got out my big ‘Celebrate’ from MFT Stamps and I use this one a lot! I adore the font and the size of it. To add even more texture and dimension to the card, I cut it out of foam sheet, more Black Velvet and also MFT Stamps Brushed Gold card stock. These three I layered so that the gold was on top and the black created a shadow to it, then the final layer was the foam tape to raise it up.

2CD1A683-822F-41E1-8330-C828BA702E4F

The little strip with the sentiment was added to the card and the ‘Celebrate’ was strategically placed so that it covered the end on the left side, to bring it all together.

As this card has so much going on, it was easy to walk away from it at this point and just admire the shimmer. I can absolutely see myself adding more of these Nuvo Embellisment Mousses to my stash! In all honesty, I was less keen on the glitter paste BUT it was my first try with this so it might grow on me.

AF21C523-DDA2-4D5E-A36C-A71E236E3261

I’ve used compensated affiliate links in this post as always, at no extra cost to you. I get a small commission from the company directly if you use one so thank you for supporting me in this way! I really appreciate it!

C9FFFEE1-88FF-45E0-B292-338E36333192

Lots of love and happy crafting from Erica

Dog Crazy Lady gone doggone mad over Mama Elephant’s The Dog’s Woof

Hello fellow dog and craft lovers!

Today I’m going to completely unleash my inner dog crazy lady on you. In fairness, I don’t usually leash her very much and I make sure to let her out to play regularly, or she goes bonkers and chews someone up. See what I did there? Lol, I can feel lots of dog related puns and jokes coming up!

I’ve long been a fan of Mama Elephant and their cute stamps and diecuts but my fan girl status went straight ‘I adore them’ to ‘stalking the website on a daily basis’ when they announced they were going to do a dog stamp like The Cat’s Mieow and So Many Snowmen! I went so far as marking the date in my calendar and setting a reminder. As soon as The Dog’s Woof was available, I was there clicking like a mad-woman on a mission and bam! Purchased! Then I nearly made the postman mad by giving him the evils every day he drove past the house without stopping….! LOL, it’s an understatement to say I was excited and once they finally arrived, I shared my excitement in a little video on my Instagram. If you watch it, you might want to turn the volume down towards the end. There might be a high-pitched squeal or two…

I couldn’t wait to ink that stamp up! Out came all my Copics, some chocolate, other yummies and Sam Cooke playlist. It was colouring time!

IMG_1141

It didn’t take long and my craft desk was as absolute mess again. I had tidied it just the day before! Oh well, a little craftermath hasn’t hurt anyone. So far anyway..

51653981-3910-4AE0-84BF-E2BC5CFF2F47

I think I ended up using practically all my E, W and C coloured Copics for this. I tried mixing and matching but still making sure that each dog was quite unique and I had such a great time colouring this one, I went ahead and did another four! Oh yes. Once the steam train that is Erica with colouring gets going, there is little chance of stopping it. Like a dog with a bone or a mole hill!

EB51376D-7609-46E5-936A-2C56CC96A1A4

My first card came together really quickly once the colouring was done (I also added some detailing with a white gel pen) I simply used the coordinating diecut to cut the doggies out, got a dark grey card base out, heat embossed ‘woof woof’ on it with Altenew Antique Gold Embossing Powder and added them to it using foam tape.

6530B58B-888D-4592-8E16-C639839EAA2E

To finish off the sentiment, which I thought was a pawsome idea if I may say so myself, I added the ‘Hooray’ diecut from Neat & Tangled to finish off the sentiment. Woof, woof, hooray. If that isn’t doggone funny, I don’t know what is. Big paw anyone?

99416CD3-B101-460F-9CBD-5624C8EB3D70

The Hooray bit is cut out of MFT Brushed Gold card stock for the word bit and the shadow bit is vellum, to frame it nicely on the dark grey background. I adhered it to the card base with foam tape cut out with the word part of the diecut to raise it up. I added just a few clear sequins to the card with Glossy Accents and then stepped away.

56E8F1A1-7BAB-4D4F-9E4B-5E22A050C951

I really like the dotted look on the doggies and decided to do one with just that technique and it came out super adorable! The background I decided on for this one was a bit more busy. I got Simon Say Stamp Paws Background print stencil and some Distress Oxide inks out; Black Soot, Walnut Stain and Vintage Photo. I blended them all over the card base using the different colours to make a patterned paper and then also stamped the little bone and the ‘woof’ sentiment in-between the paw prints. These are in the stamp set.

99A5F681-5808-4089-87CE-95EAFDA69A9E

I managed to spill water on this, as I am a big klutz, but I mopped it up quickly and despite the fact it messed up my card base a bit I decided to use it anyway.

35B35116-67C5-4DAF-ABBE-A0B69754D424

It kind of reminded me of how our floor looks more often than not, with muddy paw prints all over it. Life with a dog is not always a walk in the park but muddy paw prints are not the end of the world.

011E5561-580C-479E-ADE9-080755765AE8

On a little speech bubble diecut, I used one from Altenew’s Speech Bubbles Die Set, I stamped the sentiment ‘Friends make everything so much better’ from Mama Elephant’s Ella & Friends in Walnut Stain.

1F5B561B-CA03-4079-B42B-B3E22728BAF2

The doggies got cut out with the coordinating diecut and added to the card base using foam tape, as did the speech bubble with the sentiment. I also decided to add little details to the doggies using Glossy Accent, on their eyes and noses to make them stand out a bit more.

D1A60976-054D-4288-9658-275EEA071CAD

My third card is kind of a mix of the first two. There are some solid dogs and some dotty ones. I had some feedback from my crafty friends that the mix was the best look but you know, I like all three to be honest. It is fun that you can mix and match and get so many different looks.

28DBD2E4-52D8-40ED-A9FA-867B34592702

The background is stamped but not as busily as the second card, it’s also a lighter grey the the first card. I added some extra doggies to this one using the ‘loose’ dog head in the stamp set. These I piled up so it looks like a giant puppy pile. I am a crazy dog lady after all, there can never be enough dogs, lol!

9273F55E-A916-4213-A461-093AE1713179

Sentiment wise I kept it rather simple by heat embossing the words ‘You are Pawsome!’ in Altenew Platinum embossing powder on as off-white strip of card stock. This sentient comes from a Simon Says Stamps set called Paws-itivity.

9DCCB534-2BF1-4EB5-8738-976622D91B13

I added this to the card using foam tape as usual and the big dog image was added using my thickest foam tape, and the loose dog head were added using various other thicknesses.

AA0EFBA1-DE6C-49C1-851C-64C35800FD47

The last card I made is a really fun one! I did another one of the dotted dogs in party colours for The Man’s birthday card but I have already blogged it though so I’m not going to bore you with all the details again, I merely wanted to show it because I do adore how it came out. You can have a look at that blog post right here if you haven’t seen it already.

F71D0706-C3AD-4866-B9C4-3738F9FFB5AF

I am almost all done but I do need to let you guys know that I have used some compensated affiliate link in this blog post. If you end up buying something after clicking on these links, I get a small commission from the company directly, at no extra cost to you. So it’s a win-win really! Thank you in advance if you choose to support my little blog and I this way, I really do appreciate it a lot! Now as I mentioned, some of the links are affiliate link but not all of them, for transparency reasons it’s Altenew, MFT Stamps and Neat & Tangled. Anything that isn’t from them, is not an affiliate link, I have added the links for your convenience in case you want to purchase any of the stuff I have used for these cards.

Right, with that I’m all done. I hope you have enjoyed this post and if you did manage to hang in there to the end, well done!! You definitely deserve a little something-something so go treat yo’self!

Thanks for stopping by! Lots of love and happy crafting from Erica


Friendship card with Altenew Build-a-Flower Gardenia

Hello, hello!

I’m back home after a fabulous weekend trip to Berlin to meet up with some friends I’ve not seen for almost 2 years. We have walked, talked, eaten and laughed until our bellies hurt! It was a spur of the moment thing, we put the whole trip together in less than 2 weeks and considering we all live in different countries, that’s no small feat! But as two of them are moving out to Canada on a posting in less than a month, this was the only weekend available so it was a case of ‘ok, let’s just do it!’ and I’m so glad we did!

Things are a bit stressful for the two moving, as you can imagine, so today’s card has a friendship theme as a reminder they can always count on me to help them out if need be. Right, before I go and get all soppy and teary because they are moving so bloody far away, I’m gonna get on with the card. This is a sneak peek of my regular Monday blog post over at Butterfly Reflections Ink blog by the way.

I’ve used Altenew’s Build-a-Flower Gardenia set and coloured it in with the red Artist Markers from Set A, which can also be purchased separately. The leaves are stamped with three colours from the Tropical Forest Oval inks set, which can also be found in handy mini cubes if you are short on space in your craft room. The colours I used are Bamboo, Parrot and Olive.

Untitled_Artwork 26

For the background I’ve used a stencil called Sketched Lines and Nuvo Mousse in Spring green.  To read about the whole process and see more photos, head on over to the BRI blog where the whole blog post is.

From today there is also a giveaway going on over at Altenew! Place an order from the Build-A-Flower Collection from 2/26/2018 until 3/2/2018 at 11:59 p.m. EST, and you will automatically be entered into a raffle for a chance to win a big prize! One lucky winner will be chosen to win a prize pack valued at over $120 including one Original MISTI stamping tool, Artist Markers Set C, and Soft Pastel 6 Mini Cube Set. A winner will be announced on March 4th on the Altenew Blogs.

Altenew_BAF_CollectionGiveaway_BlogPost

I’ve used affiliate links in this post, which means that if you click on one of them and end up buying something from Altenew, I get a small commission at no extra cost to you. Thank you in advance if you do this, I really appreciate it

Happy crafting and lots of love from Erica

Wintery card for SSS last Wednesday Challenge of 2017

Hi!

Today I’ve got a sweet little card made with some Simon Says Stamp goodies and I am also going to submit this to the current Simon Says Stamp Wednesday Challenge which is ‘Anything Goes’. For a chance to win a $50 gift certificate to a shop I frequent more often than I should (and tell my husband), why not??

58A97BB4-4E24-4377-823A-613935EC4DEB

One of my little presents for Christmas was the absolutely AH-dorable Picture Book Secret Penguin wafer die. I’ve done my usual thing of cutting out loads and making a whole herd of them, trying different colour combinations and just having fun. I used both coloured card stock and Copic markers to add colour to the various feet, beaks, cheeks, eyes and even bodies of some of them.

247AD58B-322B-4D38-A848-A99BFA614D37

For the actual card, I only ended up using one so I have a spare 11 for other projects at a later date. Nothing like being prepared, right? You never know when you are going to need a penguin on short notice.

As it’s technically winter, although we have zero snow despite living in Poland and I gotta admit that I thought we might have to dig our way out of the house due to snow by now, I’ve created a wintery scene with the help of the SSS Snow Falling stencil and some white texture paste from Ranger ink. The falling snow texture paste I tinted with some Tattered Angels Glimmer Mist in Gold to add a subtle hint of shimmer. Snow can be so magical and I thought a bit of shimmer would add that magic to the card.

8783374F-E05A-4D9D-AED9-A4A6482188BC

The background piece I added the falling snow to is a piece of Kraft stock, sized at 3.75”x5”. I also added some pure white texture paste to the bottom to make it look like the “ground” was covered in snow. This part I didn’t want to look too neat so I simply spread it around a bit with my spatula and wiped off the edges.

I absolutely adore  the stamp and die set from SSS called Love, you can also get it in separates (clear stamp here and Wafer die here) and I used it for this card. I cut out the “shadow” part of Love in 3 pieces of black card stock as well as one in this gorgeous Brushed Gold card stock  from MFT. I also cut out a background piece, 4.25”x5.5”, to add to a card base. The other part of the Love die, I cut out in black linen textured card stock. Using a liquid glue I glued all the pieces together and set aside. On a very thin strip of white card stock I stamped the sentiment ‘You to pieces’ from the clear stamp set, in black ink. When the card is finished it will read ‘Love you to pieces’.

7D0401A5-052F-4073-B076-5F98573EA246

Putting the card together was really quick once I had all the little bits and pieces ready (and dry!) and with the help of foam tape, it only took a minute or two before it was done but I thought it needed a little something else though (shocker, I know…!) so I added a small snowflake for the penguin to hold. This is from one of the very first die cut sets I got from Lawn Fawn, called Stitched Snowflakes. It looked really cute but STILL needed a little something-something. A single heart cut out of a lovely vivid red card stock, using the little heart dies in the MFT Deer Love Die-Namics was just the icing on the cake. And with that, I think it’s done. I’d better step away now before I start adding a little bit of this, and a little bit of that… I have been known for going overboard every now and again. On rare occasions.

58A97BB4-4E24-4377-823A-613935EC4DEB

That’s it from me today but I hope you have enjoyed this little post as much as I enjoyed making the card! None of the links in this post are affiliate links but I always want to enabl… I mean, being helpful (sounds much better, doesn’t it??) in locating the products I have used for my projects just in case you need/want/will perish without them.

Happy crafting and lots of love from Erica