All About Rainbows! Joining Pinkfresh Studio’s June Challenge!

Hi everyone!

Today I’m popping in with a couple of cards that I made for the June Pinkfresh Studio Challenge. The theme for this month couldn’t be a better fit for me: it’s Rainbows!!

How gorgeous is that graphic? And not just because that lower right card is mine!! We are not going to be talking about that one though, we are going to be talking about these two:

I have used the ever-so-lovely Garden Roses stamp set, and the coordinating layering stencils and the diecut for the main focal. I have also used some newer goodies, including the Modern Script Hot Foil sentiments, plus coordinating dies, and the Nested Hexagons Hot Foil with their coordinating dies.

As I was going to heat emboss the images, I started out by using the Cottontail Embossing Tool from The Rabbit Hole Design, all over my card stock. With the help of my Mini MISTI, I stamped up two images to ink blend on. Both of these are heat embossed with Opaque Bright White Super Fine embossing powder from WOW! Embossing, and I also used the WOW! Embossing ink pad.

With the Garden Rose layering stencils, a big bunch of blender brushes (one for each colour, to avoid colour contamination) and inks from the inspiration graphic: Candy Apple, Clementine, Sunshine, Key Lime, Aquamarine and Lavender, I went to town!

This one is mostly done with the leftover inks from the super bright one. Pretty amazing, right? It does help to get more definition and depth if you go slightly lighter than you think you might need to, on the first layer.

The key to the rainbow layering is to ink blend the same colour over the same parts of the stencils, on each and every layer.

With more of the leftover ink, I created the soft background on another panel I had also heat embossed with the Garden Rose image. This one was a bit of a mishap, as I actually forgot to ink up the image before pouring on the embossing powder, so it was only the tiniest bit of embossing ink on the paper.. that’s what happens sometimes when you are engrossed in a true crime podcast and forget where you were in the card making process.

The card with the white background is also heat embossed with the same Garden Rose stamp, with the help of a big MISTI, so I could get the whole piece covered. This one I left white though.

With the floral images and backgrounds ready, I simply puzzled the cards together with the Hexagon Hot Foiled pieces and the Modern Script sentiments, that were all already made.

OK, OK, I did use some bling on each one of the cards too… those Metallic Matte Gold Pearls were the perfect finishing touch as the foil used on that Hexagon, was the Matte Gold Foil.

The Jewels I used on the white card are the Glacier ones, and they are probably my faves out of the entire Essentials Jewels Mix.

Well, that’s it from me for today, but I hope you enjoyed this post and will consider entering the Pinkfresh Monthly Challenge yourself. Just by entering you are in with the chance to win a $50 gift card to the Pinkfresh Studio shop!! Winners are drawn by random so you really have nothing to lose by entering.

I have used compensated affiliate links all throughout this post, for your convenience and they will not cost you a penny extra if you use them to shop. Thank you so much if you chose to support me by using these links, I really appreciate it!

Lots of love and happy crafting from Erica

You can find me on various social media platforms, by clicking the links below.
My blog
Instagram
My YouTube channel
CaCaCraft on Facebook

Pinkfresh Studio February 2022 Stamp, Die, Stencil, and Hot Foil Release

Hello, hello, and welcome to one of the stops on the Pinkfresh February release blog hop! If you have come here from the amazing Emily Mydlowski, you are in the right spot, and the next stop on the hop is the awesome Heather Hoffman!

I have been really sick with shingles, for the second time in two years!!, for most of February so I haven’t had the energy to make a boat load of cards, like I usually do. However, the cards I have made I really like, and I hope you will too. I did manage a YouTube video too, but just a heads-up, I do look rather sickly still.

Now, let’s get to it! Clean and Simple, or CAS cards, are not something that comes easy to me. I love the look, but yeah, I usually end up over embellishing them to make up for the white space. It was, surprisingly, the look that I ended up with, for both of my first two cards though. Maybe the shingles took pity on my frazzled brain, and I didn’t over-think it even half as much like I normally do. Or maybe I just ran out of steam? Either way, TWO CAS cards coming up!

I started out by heat embossing the lovely Spark Of Goodness Floral Frame stamp on two card panels, one with Opaque Bright White powder from WOW! Embossing powder.

The second one was done with Rich Gold powder, also from WOW! Embossing. The gold definitely stood out more, for obvious reason.

The white embossing one I coloured in with green and fuchsia coloured Copics, and then used the coordinating diecut to cut out the middle. On the back I built it up with spare card stock to create some dimension.

For a bit of extra interest and texture, I used the Color Block Diagonal Stripes diecut on white card stock, and added the pieces to a card base. Probably as zero surprise to anyone, I also added some bling in the form of clear crystals, as well as a straight to the point sentiment.

The second card was also coloured in with Copics, but in peachy/orange tones, and greens. This was also cut out with the coordinating diecut and I did a similar thing to add texture and interest to the background. On this one I used the new Heart and Stars Coverplate, and it’s so sweet!

This one was finished off with a Fancy Script Hot Foil sentiments, that was foiled with gold foil, and then cut out with the coordinating diecut. I naturally cut out another two to layer them up so they would stand out a bit more. Oh, and Matte Gold pearls were added too.

I also have a little sneaky peek of one of the cards I will be sharing for tomorrow’s Instagram hop, with the absolutely stunning Chrysanthemum Slimline stamp, coordinating diecut and coordinating layering stencils set!

Now for the fun stuff!!

Pinkfresh is giving away the entire release on their blog post and their YouTube post, so don’t forget to comment there! There are also TEN $25 gift vouchers up for grabs along the blog hop, all you have to do is leave a comment to be in with a chance to win, so the more you comment, the bigger chance to win!

InLinkz lineup can be found via THIS LINK

Winners will be announced on March 8th, 2022 on the Pinkfresh GIVEAWAY PAGE. Remember that you must check that page and claim your prize within two weeks.

Thank you so much for stopping by today! Lots of love and happy crafting!

You can find me on various social media platforms, by clicking the links below.
My blog (that’s here)
Instagram
My YouTube channel
CaCaCraft on Facebook


Stamp of Goodness rubber stamp

Stamp Of Goodness coordinating die

Coordinating Layering Stencil

Hearts And Stars Coverplate

Fancy Script Word Hot Foil

Fancy Script Word coordinating diecuts

Matte Gold Pearls

Chrysanthemum Slimline stamp

Chrysanthemum coordinating diecut

Chrysanthemum coordinating layering stencils

Easy, Breezy Holiday Cards with Pinkfresh Goodies!

Hi guys!

I’m back with some more Pinkfresh flowery cards today. For these cards I have used the colour scheme from the December challenge but mixed it with the Blooming Branch set. I’m slightly in denial about Christmas being so close so any excuse to use flowers and blooms, I’m in.

First of, I heat embossed the Blooming Branch stamp set with Opaque Bright White embossing powder on one panel, and with Rich Gold embossing powder on a second. Both of these are from WOW! Embossing.

First off I used the Cottontail Embossing Tool from The Rabbit Hole Design, all over my card stock. Then I stamped the Blooming Branch outline stamp with WOW! Embossing ink, with the help of my Mini MISTI.

The idea was to get a softer look on the white and more vivid on the gold. The opacity of the ink blending is actually about the same, but it does make the colours pop or soften up, with the different colours. My fave is the Rich Gold.

To add colour I have used the Blooming Branch layering stencils and the inks I used are Sparkling Rose, Berrylicious (the colour in the graphic is closer to Candy Apple, but I went slightly lighter) Sunshine, Meadow and Aquamarine.

All of these have been ink blended with blending brushes, because that is the blending tool that works best for me to get a smooth blend.

I wanted a bit of a rainbow look still (surprise, surprise, I know… ) so I started with the Sunshine in the middle, and then went pink and red towards the top and the teal and turquoise towards the bottom.

You don’t actually need that many colours to get a rainbow look, as by blending the colours together you get more than the actual numbers of inks you use. For example, yellow and red/pink, will make orange and yellow and blue makes green, and so forth.

To get this look, you add the colours in the same areas on each layer of stencil. Think in terms of lines across your stencil, if you will. You just keep building it up as you go through your stencils, and eventually you end up with this fun rainbow look.

With the colours all added, I cut them both out with the coordinating diecut and on the back of these, I added foam tape to raise them up on the card. However, I had to make my backgrounds first and the sentiments too, of course.

I’m totally obsessed with the Abstract Triangle hot foil plate, so I used it on two panels with my Spellbinders Glimmer Hot Foil system. One with Matte Gold and one with Opal, which I at first thought I might have actually hot foiled the plate with instead of the paper…

Luckily for me, it was foiled to the paper, but the Opal hot foil is very subtle. It looks more like an embossing folder, than hot foiling. Which is another use for your hot foil plates! You can actually use them to add dry embossing, and add pattern to your card stock as well as use them for hot foiling.

While I had the Glimmer Hot Foil system out and hot, I decided to use the Thrill Of Hope hot foil plate for the sentiment. On these I used gold foil, and then I cut these out with the coordinating diecut. I also cut out an extra piece to layering up the hot foiled piece to make them slightly sturdier.

The background pieces were trimmed down a little and then directly adhered to a card base each. On top of these I added the Blooming Branch pieces, the sentiments and then I just had to add some Jewels to add even more pizzazz! I can’t help myself, I love these Jewels and they are such a perfect finishing touch.

The colours I have used are from top to bottom: Ballet Slipper, Sunshine and Ocean Breeze. If you like jewels like these, you might as well grab the Essentials Jewels Mix, which has 12 different colours in it.

That’s it from me for today, but I hope you found some inspiration here and don’t forget that you can still take part in the December challenge. You can win a $50 gift card to the Pinkfresh Studio shop just by taking part, so what are you waiting for? Go on, have some fun and play along. The deadline is December 28th, so plenty to of time and you can enter 5 projects!

Right, I will stop jibber-jabbering now and let you go. Thank you so much for stopping by, lots of love and happy crafting from Erica

You can find me on various social media platforms, by clicking the links below.
My blog
Instagram
My YouTube channel
CaCaCraft on Facebook

Pinkfresh October Challenge + Hot Foil + Ink Blending + Heat Embossing

Hi everyone, and welcome back!

I’m popping in today with a quick card I made with mostly “leftovers” from previous crafting sessions, for the Pinkfresh Studio new monthly challenge. Each month there is a new theme and colour scheme, and this month it’s Fall/Fall Holidays and this is the inspiration graphic.

My interpretation is more based on the colour scheme than the theme, but that’s ok. If you think you have to be super literal with your interpretation, don’t worry. That’s not the point at all. The point is to get your creativity humming and going! Don’t forget to upload your project to the InLinkz album before Nov 2nd, for your chance to win a $50 gift card to Pinkfresh Studios!

While I was preparing to be on the Craft Hour last month, I foiled so many of the Thankful for Friends image. It’s slightly addicting, especially when you have zero willpower like I do.. I really need to get a grip with using up everything I prep and make while on a roll, so this card was an effort to do just that.

Below you can see some of the cards I ended up finishing after the Craft Hour.

I also had an Thankful For Friends image heatembossed, so I thought I’d use that with the coordinating Layering Stencils. That way I could use up one more piece but still add colour to it. Using the stencils I have ink blended a bit of Misty Coast and Rocky Slope with blender brushes, over the stem and for the flowers themselves I used only Tidal Pond. This soft look is achieved by picking up the ink from the lid, where I tap off excess ink and get it covering the brush evenly, rather than from the ink pad directly. It’s one of my better ideas for sure!

The last layer of the stencil I did use, but not with more inks, but rather Nuvo Glimmer Paste in Moonstone. I think I did learn something with this though. You see, I did this before cutting it out, which flattened the Glimmer Paste a little. The better way to do it would be to cut it out first, and then add that afterwards. You can use a little bit of washi tape to hold the image in place.

When I was happy with the ink blending and glitz (and that had dried), I used the coordinating diecut and cut it out. Previously, I had cut out a ton of extra pieces for layering up, and I used one of these extra pieces to add some height. I also used one of the Hot Foiled images. This one is done with Matte Gold on Stormcloud card stock.

These pieces I set aside while I decided on the background. I also had a load of Abstract Triangle Hot Foiled panels, and I grabbed one of these. It turned out this is Matte Gold too, so that coordinated perfectly. It did need a little something though, so I added a light touch of Apricot and Clementine ink around the edges. It really made the gold foiling pop even more! The middle was left white so that the flowers would look like they glowed, sort of.

The final thing to do was to heat emboss one of the sentiments from the Thankful For Friends set, in Rich Gold embossing powder from WOW! Embossing powder. This was adhered with a little bit of foam tap and with that the card was done!

So, there is a lot going on with this card, but despite the colours not being my first colour combo choice, I do think it works.

Ok, now it’s your turn. Make a card with the challenge graphic as inspiration and upload it to the album for your chance to win $50 gift card to the Pinkfresh Studios shop!

I have used some compensated affiliate links in this post, at no extra cost to you whatsoever. Any earnings I get from these links go directly back into the crafting shenanigans so thank you so much for the support. I really appreciate it!

Lots of love and happy crafting from Erica

Exciting news and a bold floral card

Hi everyone!

I’m very excited to announce that I am joining the Crafty Meraki design team! The lovely Bindu asked me to join their 1st Merakiversary in May, and I loved it so I was thrilled when she asked for more videos. It’s always thrilling to be asked for more work, it’s such a confirmation that what I do is well-received. (picture me doing a crazy dizzy emu dance here)

I have used the exclusive Crafty Meraki stamp set called Elegance, and I’ve water coloured it with Inkon3 Atelier ink re-inkers mixed with Liquid Pixie Dust. I used my MISTI to stamp it with Fadeout Ink. The Atelier inks are available from the Crafty Meraki shop, but the re-inkers are not, at this time.

After colouring the image in, I have used the coordinating Para-dies to cut it out. I have also used the dies to cut out one of the sentiments that I had heat embossed in Rich Gold embossing powder from WOW! Embossing. The embossing ink I use is also the one from WOW!

The card base is cut out of Storm Cloud coloured card stock from Lawn Fawn, and I have also splattered this with white gold water colour. This is from the Kuretake Starry Night palette, and is one of my absolute go-to for gold and metallics.

The floral image and the sentiment have been propped up with foam tape, and I didn’t trim off the bits sticking out because I couldn’t bring myself to do it. I like the wild look of it.

There is a YouTube video on the Crafty Meraki YouTube channel for this card, and I’m mainly going to be doing videos for Crafty Meraki so make sure you subscribe to their channel if you want to see what I will be getting up to!

That’s it from me for today, but before I go I’ll just mention that I have used some compensated affiliate links in this post for your convenience. Shopping with affiliate links does not cost you anything extra ever, the company it’s affiliated to pays me a small commission directly, thank you so much if you chose to support me by shopping with these links! I really appreciate the support! 

Lots of love and happy crafting from Erica!
If you want to see more of my work, I have linked to my social media accounts below. I’d love it you’d give me a follow there!

My Blog
Instagram
My YouTube channel
CaCaCraft on Facebook

Pinkfresh Studio July Stamp, Die, Stencil, and Hot Foil Release

Hi and welcome back to my little blog!

Today’s post is an exciting one: it’s my first release blog hop as a design team member for Pinkfresh! *insert giddy dance here*

Unsurprisingly, it’s another fabulous release and full of fun products. If you remember the washi tapes with coordinating dies and stamps from earlier release, they now also come with layering stencils, in case the washis aren’t for you. How cool is that??

The Anemone Magic washi tape is super gorgeous, and so handy when you need a quick card, but don’t have time to colour. Now another handy addition to that range has been added with the Anemone Magic layering stencils!

Anemone Magic Layering Stencils

I went with a very different colour scheme compared to the Anemone Magic washi tape. Mostly to show how versatile the products are, and how you get gorgeous results every time. The coordinating dies make cutting them all out quick work too.

These colours are Peach Fuzz and Apricot for the Anemone Magic flowers, and Doe and Gathered Twig for the leaves. The outline stamp is heat embossed with Rose Gold embossing powder from WOW! Embossing. I used the coordinating dies and set aside the pieces.

I used the same Rose Gold embossing powder on an entire panel and then used the Stitches cover plate to add texture to it. This card was inspired by the wallpaper in my little sister’s bedroom, which later became our mother’s sewing room in our childhood home.

A few… or maybe a good sprinkling of the Espresso Jewel finished the card off. Because it wasn’t shiny or sparkly enough with all that embossing powder, clearly.

I used the same Anemone Magic stencils for the second card, but with yellows and greens, and no outline image. It created a much softer look so I left it as it was, without the outline stamp, and used the coordinating dies. The yellows are Lemon Whip, Sunshine and Sweet Mustard. The greens are Fresh Pear and Mint. On these I did

Right in the middle I stamped one of the sentiments in Black Ink, to make it stand out. It’s such a lovely one too. Who wouldn’t love getting a card with that message on it?

To finish this card I used the Diagonal Stitched Plaid cover plate on white card stock. I could have left it like this, but no. So to add more interest, I made Fresh Pear coloured card stock by dabbing the ink pad on white card stock and then I cut that with the Slim Stripes dies. These I adhered to the card, drew a thin black line on them and then popped up the flowers with a bit of foam tape on top.

Naturally I could not resist the lure of those gorgeous Stargazer Jewels, so I added a few of those too. You can get these in a box with 12 different colours too, and now also individually.

I have made more cards, but as it’s a blog hop I don’t want to take up too much of your time. I have also used compensated affiliate links in this post, mostly to Pinkfresh Studios, at no extra cost to you, for your convenience. Thank you if you shop using my links, I can’t even tell you how much it means to me.

GIVEAWAYS:
Pinkfresh will be giving away the full release on the Pinkfresh blog & YouTube channel, so you are going to want to comment on those posts and video for sure!

-We will be giving away a total of TEN $25 gift cards along the hop. As per usual with blog hops – the winners will be picked from the comments, so the more you hop comment, the bigger chance of winning!

All winners will be announced on August 3 , 2021 on the Pinkfresh Studio GIVEAWAY PAGE. Please note that it’s up to you to check that page & claim your prize within 2 weeks, if you win.

The next stop on the hop is the amazing Emily Midgett! The full blog hop list can be found below in the inLinkz link, and also on the Pinkfresh blog post.

You are invited to the Inlinkz link party!

Click here to enter

https://fresh.inlinkz.com/js/widget/load.js?id=a8b40ada7693d64e5923

You can find more of my work on various social media, and I’d love it if you’d give me a follow or subscribe on either of them
My blog
Instagram
My YouTube channel
CaCaCraft on Facebook

WOW! Embossing newest release and new goodies to play with!

Hi and welcome back to more crafty shenanigans!

In today’s post I’m showing off some new goodies from WOW! Embossing Powder, there is a new release available from the UK WOW! Shop. We have new stamps, stencils and more powders! Hopefully it will also be available in the US WOW! Shop soon.

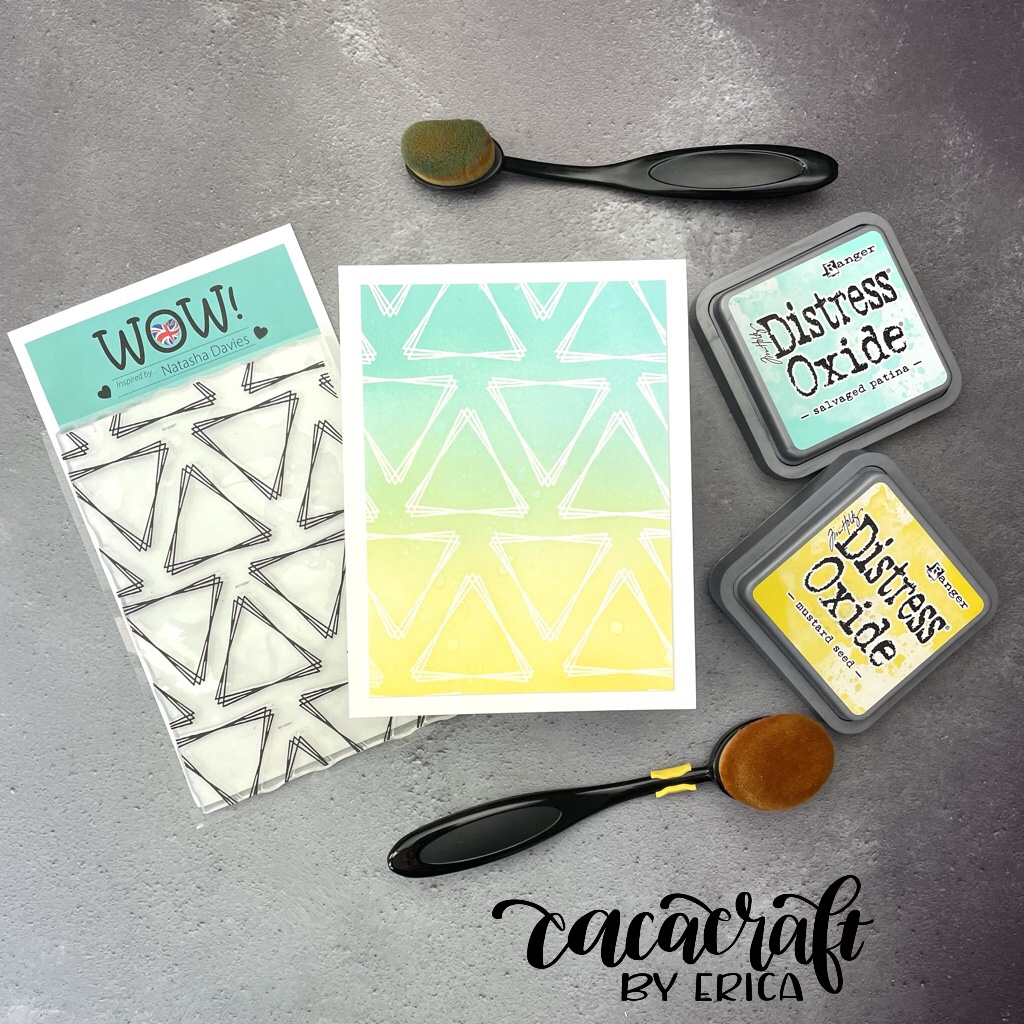
I also have some brand new to me goodies, that luckily arrived on my wedding anniversary. How fab timing is that?? Amongst other things I finally got my hands on Salvaged Patina!!

I instantly started ink blending on panels I had heatembossed with the new Abstract Triangles stamp, designed by my friend Natasha! I used Embossing ink and Opaque Bright White super fine embossing powder on all three.

On that one I mixed Salvaged Patina with Mustard Seed. Thanks to the Life Changing Blender Brushes from Picket Fence Studios, the blends are so smooth!

Next up was a blend I’d been dying to try: Salvaged Patina with Kitsch Flamingo!! It did not disappoint!

The third blend is the only one using three colours: Salvaged Patina, Salty Ocean and Chipped Sapphire. They go so well together!

All of the panels were trimmed down and adhered to card bases, and then it was time to start working on sentiments.

Another new goodie that arrived was the Big Hugs stamp and die set from Hero Arts. I have lusted after this one since I first saw it. I cut it out of white card stock, many, many times and layered these up with Nuvo Deluxe Adhesive. I also cut out three Big Hugs out of black card stock and added these to three of the stacks.

On top of one of the black topped ones I heat embossed Midnight embossing powder, and it looks FAB!! Those flecks of gold? Oooooooh! Please note that this one comes in a TRIO.

The next one was done with Hope & Positivity, which looks freaking awesome. The photo isn’t great, though, but it really is amazing in real life. That sparkle is off the charts!

I also did one black topped one with two layers of Clear Gloss. I love that puffy sticker look!

The last one has a little of Salvaged Patina blended onto it, and then I added White Glitz on top. You can still see some of the SP under it.

A few sentiments were also stamped up on white card stock, with black ink, from the Big Hugs stamp set, to compliment the Big Hugs diecuts.

With that, I’m all done for today but I have a reel on my Instagram page for these if you want to check that out. No YouTube video but if you really want one, drop me a comment and I’ll add it to my crafty shenanigans list.

I have used some compensated affiliate links in this post, at no extra cost to you. Thank you so much if you chose to support me by shopping with these links, it doesn’t cost you anything extra at all, ever. The earnings from these links help keep my blog, YouTube channel and Instagram running, so I really appreciate the support.

Lots of love and happy crafting from Erica

Results of a craftermath: Pinkfresh Butterflies Card!

Hi everyone and happy Monday!


Today is no ordinary day, it’s my first official blog post for Pinkfresh Studio and I’m popping in here too, because why not?

In case you haven’t seen it yet, the challenge graphic for the month of July is lovely and the theme is Butterflies. If you make a card for this challenge, make sure to link it up on the Pinkfresh monthly challenge blog post as you can win a $50 gift card!

I grabbed the Butterflies stamp set, layering stencils, coordinating dies and a few *cough, cough* other little bits and bobs. Ok, quite a few other little bits and bobs, but I was excited. Can you blame me?? No, I didn’t think so, lol.

With the ink colours from the graphic, Ocean Breeze, Passion Fruit, Coral Reef, Sweet Mustard and Tidal Pond, I got to ink blending with the slim line stencils I had grabbed: Leafy Squares and Inverted Diamonds. Over the Leafy Squares one I used all the colours, blending them with my Life Changing Blender Brushes.

On the Inverted Diamond stencil, I used only Sweet Mustard, Ocean Breeze and Tidal Pond. Before I blended anything though, I taped down the pattern with some skinny PostIt tape as I’m all out of Pixie Spray...!! *Gasps of shock inserted here* Yes, it’s true. I’m all out and it’s really hard to get ahold of here! Waaaahh!!

The PostIt tape actually added to the pattern on this stencil though, so it worked but I’m still scouring the web for more of that stuff. It’s a total must have.

When it came to the butterflies, I couldn’t stop at just one or two. It seemed kinda crazy to not play while I had all my stuff out.

And did I play or what? I seem totally incapable of making just ONE card or ONE thing when I’m crafting. Things have a tendency of spiralling out of control more often than not. The result is always a total and utter craftermath… and sometimes a couple of cards and LOTS of spare bits and bobs.

In this case, a small army of butterflies!

All are inkblended with the help of the layering stencils, using various of the colours from the challenge graphic, and all are cut out using the coordinating diecut. Some are heat embossed with Gold Rich from WOW! Embossing, and my two favourites were the big Butterflies with the gold and the single colour, the yellow one is obviously Sweet Mustard and the other one is Coral Reef. That was a bit surprising to me, but that’s what one of the fun things with playtime and trying things out. You never know what you are going to end up with!

Putting the card together didn’t take long once I decided on the two big Butterflies and the Inverted Diamond background. A quick sentiment from the Butterflies stamp set was stamped right in the middle with black ink and then it was quick work of glueing down the butterflies with Deluxe Adhesive from Tonic Studios.

That’s the card done, and now it’s your turn! Make a card with the challenge graphic as inspiration and link up your project on the Pinkfresh Studio blog for your chance to win a $50 gift card!

As always, I have used some compensated affiliate link in this post, at no extra cost to you whatsoever! If you shop using these links I get a small commission from the company directly, and bonus, it doesn’t cost you anything extra at all. Any earnings I get from these links go directly back into the crafting shenanigans over here at CaCaCraft by Erica. Including the boring stuff like paying for blog hosting, upgrades, themes and all that stuff that unfortunately cost a lot of money. I couldn’t do it without your help so thank you so much for the support, I really appreciate it a lot more than I could ever express with words.

Lots of love and happy crafting from Erica

You can find me on various social media platforms, including
YouTube
Instagram
Facebook

p.s. I also want you to know that the Card Maker Success Summit is coming up, and Pinkfresh Studio is one of the sponsors of the event. The mission of the summit is to help you get a game plan for your holiday card making project. I’ll be speaking on Friday the 16th of July about using Paper Glaze to add fun and unique shimmer to your cards. Get all the details and grab your free ticket here!

The event is free, all you have to do is SIGN UP and mark your calendar. The summit is on for FOUR days! There are 25+ classes and some of my crafty friends are taking part as well, such as
-Verity Biddlecomb
-Natasha Davies
-Jo Herbert
-Justine Hovey
-Laurel Beard

You can also sign up for the VIP All-Access Pass at the early bird price of $59, until the 14th, and with that you can start watching the classes right away! You also get over $2000 worth of extra content, including classes, svg cut files and digi stamps amongst other! It’s such good value for money, and you can watch the classes over and over and over!

Fluttering by for the Pinkfresh Studio July Challenge

Hi everyone, and welcome back to my blog!

As some of you might have already seen, or heard about, I’ve joined the Pinkfresh Studio design team for the rest of the year! I’m SUPER EXCITED about this as I’m such a huge fan of Pinkfresh Studio!

Just look at this collection of amazing crafters, and then spot little ole me in there too! It’s such a dream come true!

Pinkfresh Studio run monthly challenges, both for the scrapbooking side of things and the card making side of things, so no matter what your preferred way of crafting and creating is, you can join in!

For the month of July the theme is ‘Butterflies’, and you can interpret that however you like. Below you can see the challenge graphic, maybe glean some inspiration from that or just let your creativity loose and see what happens!

For my card, I decided to first make a flowery background, something for the butterflies to be attracted to, so to say.

I absolutely adore the Miss Your Smile stamp and coordinating layering stencils set, so I really wanted to use them. My first impluse was to make yellow flowers, with turquoise/teal leaves.

The colours of ink used are Lemon Whip, Sunshine and Sweet Mustard for the blooms. On the leaves it’s Ocean Breeze and Aquamarine. At the top of the card I used a little bit of Sky Blue to soften all that white space, and give a summery sky look to the card.

I toyed with the idea of using Black Ink for the outline stamp, but in the end I heat embossed it with Gold Rich from WOW! Embossing. I’m really glad I went this route, as it gives the petals and stems more definition, without being too harsh.

For the butterfly part, I used, no surprise, the biggest from the Butterflies stamp set. I heatembossed it on vellum, again with Gold Rich embossing powder. After using the coordinating diecut, I adhered it to the card with a bit of foam tape to create the illusion of it hovering above the flower.

To keep the card cohesive, I used a heat embossed sentiment from the Perfect Sentiments set. I made a ton of these as the stamp set is so clever, and you get the whole bunch in one go. The coordiating diecut for these is equally brilliant!

That’s my card for the challenge, and over on my Instagram you can find a reel for this card too. Or, well, you would have, if I hadn’t managed to delete it, like a total IDIOT!!!

Now it’s your turn! Hop on over to the Pinkfresh Studio blog and enter your card in the July challenge for a chance to win a $50 gift voucher to the shop!

I have used compensated affiliate links throughout this post, for your convenience, at no extra cost to you. If you shop using these links, I get a small commission from the company it’s linkted to, and it doesn’t cost you a single penny/cent/öre/ruble extra. Any earnings I get from these links go directly towards the running of my blog, YouTube channel and Instagram. If you are shopping anyway, I’d be so grateful if you’d chose to support me by using mine.

Lots of love and happy crafting from Erica

PS There is still time to sign up for the Card Maker Success Summit! You can attend it completely free, and watch all the presentations for 24hrs after they have gone live. If you want to get a whole load of extra content, I’d highly suggest you sign up for the VIP All-Access Pass! Currently the total value of the VIP All-Access Pass surpasses $2000, and there is more content being added all the way up until the summit kicks off on July 14th! It’s yours for $59, or if you sign up within 15 minutes of clicking the link it’s only $39!!

It’s four days of Christmas In July EXTRAVAGANZA, you are not going to want to miss it! Sign up now by clicking HERE!

5K Subscribers Together | Rainbow Hop |video hop winner announcements!

Hi *waves sheepishly*

Back in June my friend Maria Willis, AKA CardBomb, and I hosted a YouTube video hop together, celebrating (a bit early) reaching 2.5K subscribers each. At the time of the hop, neither one of us had actually made it there, and we are still a bit short. We are also very late with the winner announcements. Apologies about that, life happened at a rapid pace for both of us and we couldn’t get it done in time.

If you want to skip straight to the VIDEO CLICK HERE.

If you missed the Rainbow themed video, and the entire hop, you should definitely check it out as we roped in some of our fabulous crafty friends to hop along with us!

For that video I only managed one card, but of course it was a sparkly-licious rainbow card! It was so fun to make and I love that extra pop of the sparkle on the rainbow. If you want to read all about it, you can find that BLOG POST HERE.

I used an array of the companies that sponsored the hop, including Pinkfresh, Picket Fence Studios, Concord&9th, Hero Arts and WOW! Embossing.

For this video I decided to use another mix of sponsors, to highlight them a bit too. They so generously offered prizes and the hop would definitely not have been the same without them.

The first card I made with a gorgeous stencil from Gina K Designs, called Mandala Burst. Stencils are one of my fave items to work with, they are so versatile and affordable! After spraying the stencils with Pixie Spray, I set those aside to cure for a few minutes (this is a critical step, do not skip this!) while I got out the rest of the stuff I wanted to use.

First off I inkblended some Atelier Inks, from Ink On 3, through the Mandala Burst stencil with my Life Changing Blender Brushes, from left to right Peacock Blue, Goddess Green, Bee Sting Yellow, Marigold Orange and Sweet Petunia Pink.

Over this I stamped the Love Is Love Bold Print from Hero Arts, in black ink with the help of my MISTI. Thanks to having just re-inked my Black Hybrid ink pad I only needed to stamp once but better safe than sorry, right??

With the background panel done, I trimmed it down with a stitched rectangle die from Lawn Fawn. While I had my Diecutting machine out I cut out three ‘thinking of you’ out of white card stock and one out of black card stock. These I layered up with Nuvo Deluxe adhesive, and then on the top (black) layer I heat embossed Clear Gloss embossing powder to give it a nice shiny look. I did two layers of it, for that puffy sticker look. I love that, and it’s one of my fave ways to elevate word dies.

A sentiment from the Thinking Of You stamp set, the coordinating stamps to the word die, was stamped up in black ink on white card stock and trimmed down. This was addhed to the card, and the word die right underneath it. With that, the first card was done. Without a single sequin on it too!! Whaaaaa??

The second card was done with a rainbow stencil from Erin Lee Creative. This one was part of a kit, and isn’t available now, BUT she has a load of other super fun rainbow stencils and rainbow dies. You defintely want to check out her shop and support a small business!

Instead of ink blending, I used my beloved Paper Glazes from Picket Fence Studios. I absolutely LOVE these, not only are they fun to play with but they look fan-freaking-amazeballs-tastic too. That shimmer and shine is enough to mesmerize me, every time!

From left to right, I’ve used Agapatha Purple, Peony Pink, Daffodil Yellow, Lime Zinnia, Ocean Poppy and Cornflower Blue. I actually did this right after I had done the ink blending for the first card, and while the Paper Glaze was drying I worked on all the other bits and pieces for the first card. Multi tasking and all that, right?

I used the same stitched rectangle die on this panel and then it was simply finished off with a sweet sentiment in black ink. The one I chose is from a Gina K Design stamp set, called Watercolor Flowers. Super simple, but with a pop of colour and a sweet sentiment, you don’t need much else sometimes.

That’s it from me for today, but don’t forget to check out the WINNER ANNOUNCEMENT VIDEO to see if you are one of the many winners!! Also, Maria wrote a blog post on her blog and made a video for her YouTube channel, so make sure to check out those as well.

Some compensated affiliate links have been used in this post, for your convenience, at no extra cost to you. Any earnings I get from these links go directly back into the running of my blog, Instagram and YouTube channel so thank you so much if you chose to support me by shopping with these links. I really appreicate it!

Lots of love and happy crafting from Erica