Today I’m excited to be blog hopping with Pinkfresh and friends! We are celebrating the July release and as usual, there is a load of gorgeous and versatile products coming out.
You should have come from the fabulous Emily Midgett and the next stop is the incomparable Heather Hoffman. If you get lost along the way you can find the entire lineup on the Pinkfresh blog post, as well as via the InLinkz link.
I have mixed and matched some older goodies with the new release. The Stitched Scallop Rectangle diecut is one of my all-time faves from Pinkfresh, it’s so pretty, so versatile and in my opinion it really elevates a simple card design without taking the focus away from the focal point on the card. I also love the Dotted Scalloped cover plate. It’s such a gorgeous pattern and was the perfect thing for this card.
The Go For It suite is new for July, and it’s such a lovely and dainty image, yet packs a punch. How is that for awesomeness? For this card I have used all but the stamp itself, and soft spring colours, despite it being a heat wave right now. I should have gone for fiery colours perhaps but I’m really drawn to yellow on cards.
After foiling the Go For It image with Matte Gold, I used the layering stencils over it to add colour. Don’t try and diecut first and then ink blend, always ink blend first and then cut it out.
I am so happy to have a coordinating diecut for this image as I’d never manage to cut this all out without chopping off a stem or leaf.
To put the card together I have layered up a lot of the pieces for that lovely dimensional look. The background is propped up, the sentiments are stacked, the frame is layered with a white one under the yellow, and the flower heads are raised up with foam tape. The final touch were some dainty clear crystals, for a morning dew or raindrop look.
The pattern in created with the Fall Leaf Border stencils, and bright happy ink colours. Once I had ink blended the pattern, I fussy cut along the border of them to cut off the excess white space.
I picked another sentiment from the set, Thank you, this time and used yellows and apricot colours to create the look before cutting them out with the coordinating diecut. These are also raised, but with foam tape this time.
To keep with the colour scheme I used Sunshine Jewels for this card, and quite a restrained amount, for me.
That is it from me for today, but I hope you have found some inspiration here with me and along the hop. The next stop is Heather Hoffman, and you can also find the entire hop list via the InLinkz list here.
As it’s a blog hop, there are of course giveaways and prizes!
GIVEAWAYS: -You can win the full release on the Pinkfresh blog & YouTube channel! All you have to do is leave comments on both new release posts, and that’s it! -There are also a total of TEN $25 gift cards to be won along the hop. Winners are drawn randomly from all the comments left on the blogs, so the more you hop and comment, the better your chances to win!
Winners will be announced on August 5, 2022 on the Pinkfresh GIVEAWAY PAGE. Please note that you must check that page and claim your prize within 2 weeks, so mark your calendars and check back!
For transparency, I have used compensated affiliate links all throughout this post, for your convenience, and at no extra cost to you. If you shop via these links I get a small commission from Pinkfresh directly as a thank you for directing you to them. Everything I earn from these links are currently going to the ‘Forever Craft Room Renovation Fund’ as I have a lot of work to be done on the room that will be my craft room in the house we bought a couple of months ago.
Here is a photo of it, and I will be making sure to share lot of updates as it comes to life. Thank you so much if you chose to support me by shopping with these links, I appreciate it a lot!!
Thanks again for stopping by, lots of love and happy crafting from Erica
Today’s post is an exciting one: it’s my first release blog hop as a design team member for Pinkfresh! *insert giddy dance here*
Unsurprisingly, it’s another fabulous release and full of fun products. If you remember the washi tapes with coordinating dies and stamps from earlier release, they now also come with layering stencils, in case the washis aren’t for you. How cool is that??
I went with a very different colour scheme compared to the Anemone Magic washi tape. Mostly to show how versatile the products are, and how you get gorgeous results every time. The coordinating dies make cutting them all out quick work too.
I used the same Rose Gold embossing powder on an entire panel and then used the Stitches cover plate to add texture to it. This card was inspired by the wallpaper in my little sister’s bedroom, which later became our mother’s sewing room in our childhood home.
A few… or maybe a good sprinkling of the Espresso Jewel finished the card off. Because it wasn’t shiny or sparkly enough with all that embossing powder, clearly.
Right in the middle I stamped one of the sentiments in Black Ink, to make it stand out. It’s such a lovely one too. Who wouldn’t love getting a card with that message on it?
To finish this card I used the Diagonal Stitched Plaid cover plate on white card stock. I could have left it like this, but no. So to add more interest, I made Fresh Pear coloured card stock by dabbing the ink pad on white card stock and then I cut that with the Slim Stripes dies. These I adhered to the card, drew a thin black line on them and then popped up the flowers with a bit of foam tape on top.
Naturally I could not resist the lure of those gorgeous Stargazer Jewels, so I added a few of those too. You can get these in a box with 12 different colours too, and now also individually.
I have made more cards, but as it’s a blog hop I don’t want to take up too much of your time. I have also used compensated affiliate links in this post, mostly to Pinkfresh Studios, at no extra cost to you, for your convenience. Thank you if you shop using my links, I can’t even tell you how much it means to me.
GIVEAWAYS: Pinkfresh will be giving away the full release on the Pinkfresh blog & YouTube channel, so you are going to want to comment on those posts and video for sure!
-We will be giving away a total of TEN $25 gift cards along the hop. As per usual with blog hops – the winners will be picked from the comments, so the more you hop comment, the bigger chance of winning!
All winners will be announced on August 3 , 2021 on the Pinkfresh Studio GIVEAWAY PAGE. Please note that it’s up to you to check that page & claim your prize within 2 weeks, if you win.
The next stop on the hop is the amazing Emily Midgett! The full blog hop list can be found below in the inLinkz link, and also on the Pinkfresh blog post.
As much as I love colouring (she says whilst the inner child is jumping around with joy) sometimes I just don’t have the time or the energy to colour, but I still want colour on my cards. What a conundrum, right? This is where ink blending comes to the rescue and oh, how I love that technique too! It’s one of my go-to for a blast of colour FAST!
It’s fun, fresh, and you can mix and match colours to suit occasions, themes and preferences of the recipient of the card. What’s not to love?
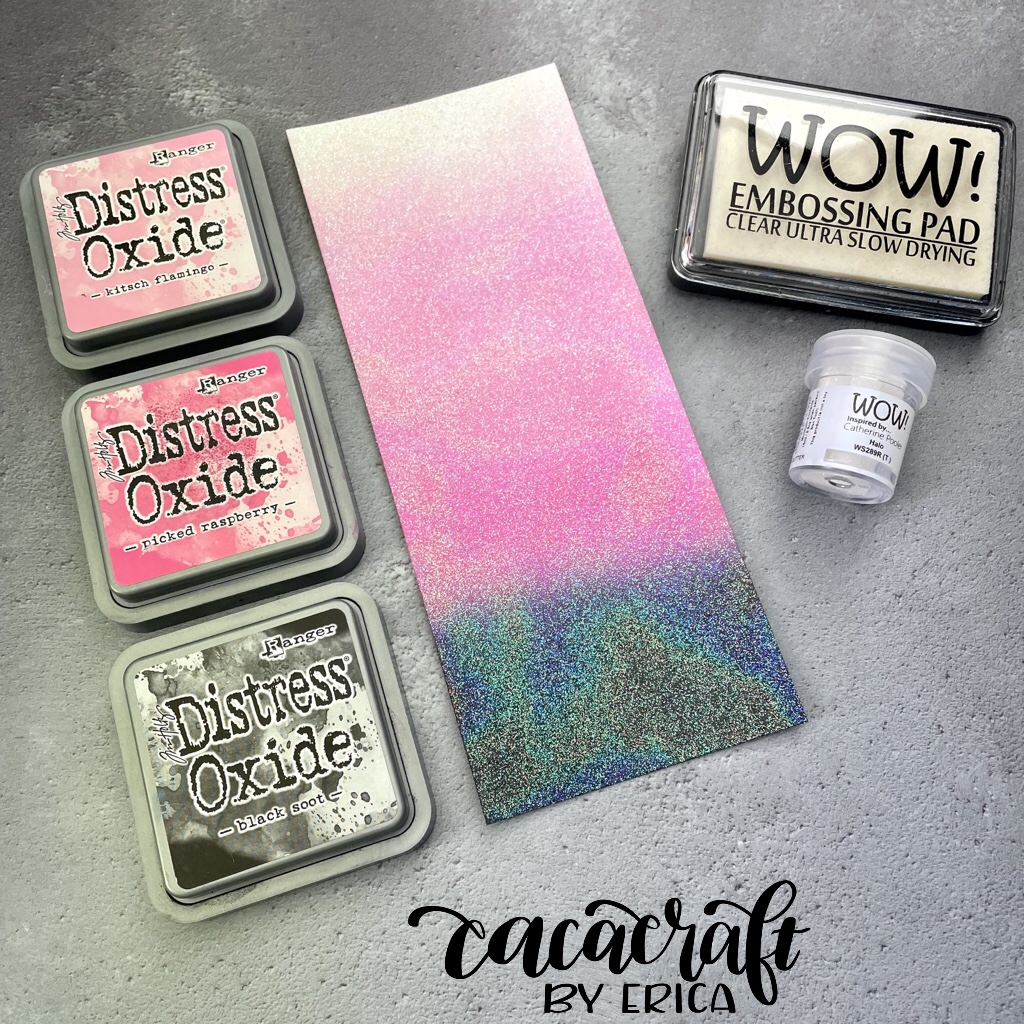
If you don’t want glitter card stock, you can add Clear Gloss on top for shiny card stock. Super simple and high impact! Plus it’s quick and easy to make more when you run out. Win-Win!
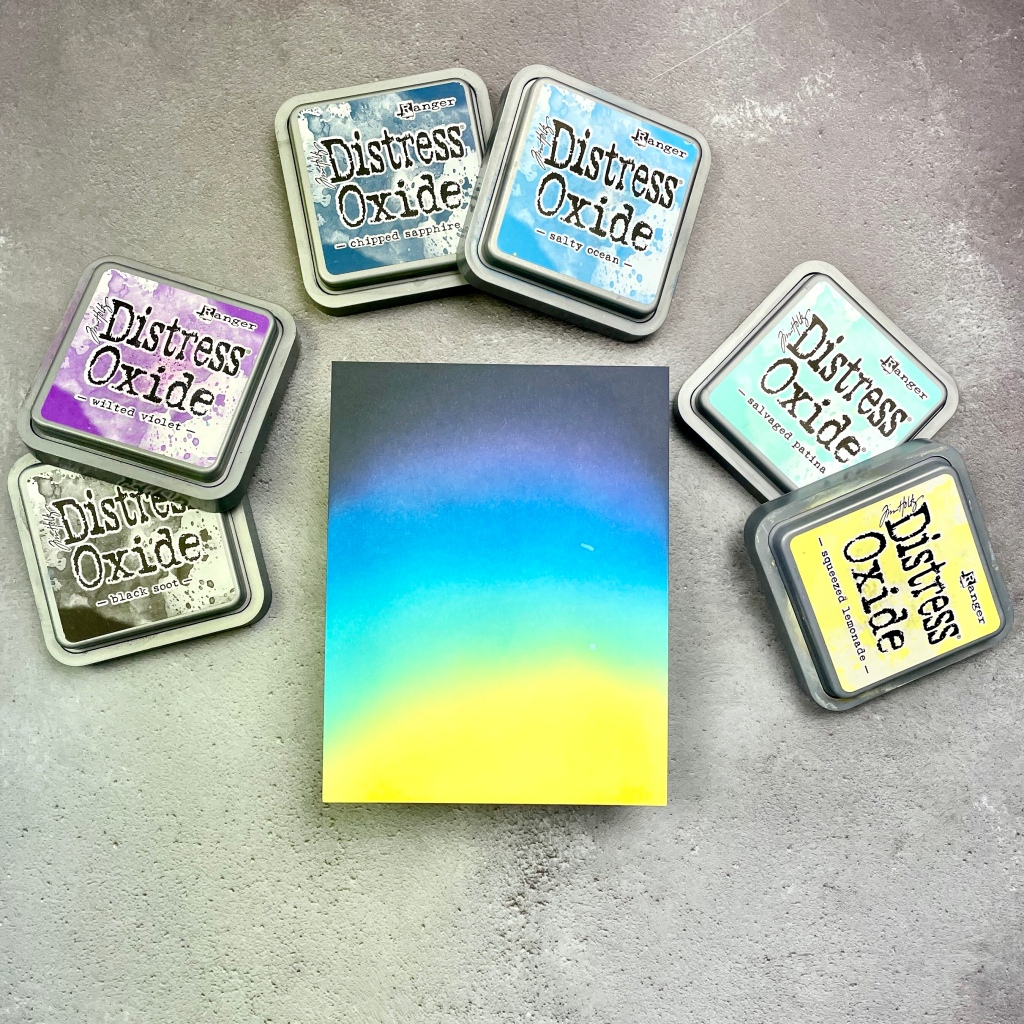
Other ways of adding interest to an ink blended background is to splatter some water, coloured or gold water colour, shimmer sprays, white paint or something like Distress sprays. I’m particularly loving gold splatters myself. It’s such a simple, yet wow-factor way of adding a little something extra.
These cards in this post are done with Distress Oxide inks, blended with my go-to blending tools: the Life Changing Blender Brushes from Picket Fence Studios. I can not stress enough how important it is to have a tool for ink blending that works for you. The brushes might not be for you, you might prefer the Tim Holtz ink blending tool, or the domed version from Scrapbook.com, or maybe the hexagon brush from Honey Bee Stamps. Whatever works for you is what you should stick to, no matter the opinions of someone else, me included. I’m merely saying that for me, the Life Changing Blender Brushes really live up to their name, and they have helped elevate my ink blending game to a whole new level!
As the idea was to have the Scarecrow Cover Plate Die from Picket Fence Studios on top of this, I have gone from light to dark, almost as if there is a fire behind it, or candles in the Jack-o-lanterns.
I didn’t get a photo of that before I cut it up, but here is the second piece I made with Autumn Persimmon Paper Glitz.
When this was dry, I cut out the Scarecrow using my diecutting machine. Depending on your machine and how much Paper Glaze you use, you might need to run it through twice to get clean, sharp lines.
The second card was done in a similar fashion, with the same colours on the background, including the gold splatters. This is the one I used that second shimmer card stock for, and I used the Scarecrow diecut again. I also cut out the word BOO with the Seeing Double Alpha dies.
Instead of gold splatters on the first one, I opted for black and yellow by using Distress Oxide sprays in Mustard Yellow and Black soot. I tried to not overdo it, but I think a few more wouldn’t have been amiss.
Similarly, the shimmer card stock was done with black card stock, and some Ocean Poppy and Lime Zinnia Paper Glaze. These colours are kind of glow-in-the-dark-esque on the black card stock, which looks really quite cool.
Once that was dry, I cut out the scarecrows and again, adhered it straight to the background with the Nuvo Deluxe Adhesive. For the second card, I also cut out the word BOO with the Seeing Double Alpha dies from the shimmer card stock made with the Paper Glaze.
Sentiment wise I used one from the So Franken Cute for the card on the right, but this one was heat embossed in Opaque Bright White on black card stock. It was also adhered on an angle, with more Nuvo Deluxe Adhesive, rather than straight across. The second card was done with the BOO glued down and the same sentiment from A Spooky Day with Black Hybrid ink.
With four cards in total done, all that was left to do was adhered them both to a card base and that’s it. What do you think? Not a bad pop of colour for no-colouring cards, right?
I am working on a YouTube video for these as well, it’s very long at the moment so I’m thinking of doing one full-length version and one more condensed, so you can chose which one you want to watch. Keep an eye out on my YouTube channel and click that notification button so you don’t miss any uploads!
Lots of the goodies for these cards are from Picket Fence Studios, and the rest are from various online shops. I have used compensated affiliate links in this post, for your convenience, at no extra cost to you. Any earnings I get from these go towards paying for things like blog hosting, technology faff-stuff, import duties and new stuff to keep things fresh, fun and free for you! Thank you so much for supporting me while shopping using these links, I really appreciate it!
You can find me on various social media platforms if you want to see more of my work, click the links below and click follow or subscribe to come along on more crafty shenanigans adventures! Instagram YouTube Facebook
Below you can find affiliate links to Ellen Hutson, as well as some suitable alternatives to the products used for these cards.
Today is no ordinary day, it’s my first official blog post for Pinkfresh Studio and I’m popping in here too, because why not?
In case you haven’t seen it yet, the challenge graphic for the month of July is lovely and the theme is Butterflies. If you make a card for this challenge, make sure to link it up on the Pinkfresh monthly challenge blog post as you can win a $50 gift card!
I grabbed the Butterflies stamp set, layering stencils, coordinating dies and a few *cough, cough* other little bits and bobs. Ok, quite a few other little bits and bobs, but I was excited. Can you blame me?? No, I didn’t think so, lol.
On the Inverted Diamond stencil, I used only Sweet Mustard, Ocean Breeze and Tidal Pond. Before I blended anything though, I taped down the pattern with some skinny PostIt tape as I’m all out of Pixie Spray...!! *Gasps of shock inserted here* Yes, it’s true. I’m all out and it’s really hard to get ahold of here! Waaaahh!!
The PostIt tape actually added to the pattern on this stencil though, so it worked but I’m still scouring the web for more of that stuff. It’s a total must have.
When it came to the butterflies, I couldn’t stop at just one or two. It seemed kinda crazy to not play while I had all my stuff out.
And did I play or what? I seem totally incapable of making just ONE card or ONE thing when I’m crafting. Things have a tendency of spiralling out of control more often than not. The result is always a total and utter craftermath… and sometimes a couple of cards and LOTS of spare bits and bobs.
All are inkblended with the help of the layering stencils, using various of the colours from the challenge graphic, and all are cut out using the coordinating diecut. Some are heat embossed with Gold Rich from WOW! Embossing, and my two favourites were the big Butterflies with the gold and the single colour, the yellow one is obviously Sweet Mustard and the other one is Coral Reef. That was a bit surprising to me, but that’s what one of the fun things with playtime and trying things out. You never know what you are going to end up with!
Putting the card together didn’t take long once I decided on the two big Butterflies and the Inverted Diamond background. A quick sentiment from the Butterflies stamp set was stamped right in the middle with black ink and then it was quick work of glueing down the butterflies with Deluxe Adhesive from Tonic Studios.
That’s the card done, and now it’s your turn! Make a card with the challenge graphic as inspiration and link up your project on the Pinkfresh Studio blog for your chance to win a $50 gift card!
As always, I have used some compensated affiliate link in this post, at no extra cost to you whatsoever! If you shop using these links I get a small commission from the company directly, and bonus, it doesn’t cost you anything extra at all. Any earnings I get from these links go directly back into the crafting shenanigans over here at CaCaCraft by Erica. Including the boring stuff like paying for blog hosting, upgrades, themes and all that stuff that unfortunately cost a lot of money. I couldn’t do it without your help so thank you so much for the support, I really appreciate it a lot more than I could ever express with words.
p.s. I also want you to know that the Card Maker Success Summit is coming up, and Pinkfresh Studio is one of the sponsors of the event. The mission of the summit is to help you get a game plan for your holiday card making project. I’ll be speaking on Friday the 16th of July about using Paper Glaze to add fun and unique shimmer to your cards. Get all the details and grab your free ticket here!
The event is free, all you have to do is SIGN UP and mark your calendar. The summit is on for FOUR days! There are 25+ classes and some of my crafty friends are taking part as well, such as -Verity Biddlecomb -Natasha Davies -Jo Herbert -Justine Hovey -Laurel Beard
You can also sign up for the VIP All-Access Pass at the early bird price of $59, until the 14th, and with that you can start watching the classes right away! You also get over $2000 worth of extra content, including classes, svg cut files and digi stamps amongst other! It’s such good value for money, and you can watch the classes over and over and over!
As some of you might have already seen, or heard about, I’ve joined the Pinkfresh Studio design team for the rest of the year! I’m SUPER EXCITED about this as I’m such a huge fan of Pinkfresh Studio!
Just look at this collection of amazing crafters, and then spot little ole me in there too! It’s such a dream come true!
Pinkfresh Studio run monthly challenges, both for the scrapbooking side of things and the card making side of things, so no matter what your preferred way of crafting and creating is, you can join in!
For the month of July the theme is ‘Butterflies’, and you can interpret that however you like. Below you can see the challenge graphic, maybe glean some inspiration from that or just let your creativity loose and see what happens!
For my card, I decided to first make a flowery background, something for the butterflies to be attracted to, so to say.
The colours of ink used are Lemon Whip, Sunshine and Sweet Mustard for the blooms. On the leaves it’s Ocean Breeze and Aquamarine. At the top of the card I used a little bit of Sky Blue to soften all that white space, and give a summery sky look to the card.
I toyed with the idea of using Black Ink for the outline stamp, but in the end I heat embossed it with Gold Rich from WOW! Embossing. I’m really glad I went this route, as it gives the petals and stems more definition, without being too harsh.
For the butterfly part, I used, no surprise, the biggest from the Butterflies stamp set. I heatembossed it on vellum, again with Gold Rich embossing powder. After using the coordinating diecut, I adhered it to the card with a bit of foam tape to create the illusion of it hovering above the flower.
To keep the card cohesive, I used a heat embossed sentiment from the Perfect Sentiments set. I made a ton of these as the stamp set is so clever, and you get the whole bunch in one go. The coordiating diecut for these is equally brilliant!
That’s my card for the challenge, and over on my Instagram you can find a reel for this card too. Or, well, you would have, if I hadn’t managed to delete it, like a total IDIOT!!!
Now it’s your turn! Hop on over to the Pinkfresh Studio blog and enter your card in the July challenge for a chance to win a $50 gift voucher to the shop!
I have used compensated affiliate links throughout this post, for your convenience, at no extra cost to you. If you shop using these links, I get a small commission from the company it’s linkted to, and it doesn’t cost you a single penny/cent/öre/ruble extra. Any earnings I get from these links go directly towards the running of my blog, YouTube channel and Instagram. If you are shopping anyway, I’d be so grateful if you’d chose to support me by using mine.
Lots of love and happy crafting from Erica
PS There is still time to sign up for the Card Maker Success Summit! You can attend it completely free, and watch all the presentations for 24hrs after they have gone live. If you want to get a whole load of extra content, I’d highly suggest you sign up for the VIP All-Access Pass! Currently the total value of the VIP All-Access Pass surpasses $2000, and there is more content being added all the way up until the summit kicks off on July 14th! It’s yours for $59, or if you sign up within 15 minutes of clicking the link it’s only $39!!
It’s four days of Christmas In July EXTRAVAGANZA, you are not going to want to miss it! Sign up now by clicking HERE!
Back in June my friend Maria Willis, AKA CardBomb, and I hosted a YouTube video hop together, celebrating (a bit early) reaching 2.5K subscribers each. At the time of the hop, neither one of us had actually made it there, and we are still a bit short. We are also very late with the winner announcements. Apologies about that, life happened at a rapid pace for both of us and we couldn’t get it done in time.
If you missed the Rainbow themed video, and the entire hop, you should definitely check it out as we roped in some of our fabulous crafty friends to hop along with us!
For that video I only managed one card, but of course it was a sparkly-licious rainbow card! It was so fun to make and I love that extra pop of the sparkle on the rainbow. If you want to read all about it, you can find that BLOG POST HERE.
For this video I decided to use another mix of sponsors, to highlight them a bit too. They so generously offered prizes and the hop would definitely not have been the same without them.
The first card I made with a gorgeous stencil from Gina K Designs, called Mandala Burst. Stencils are one of my fave items to work with, they are so versatile and affordable! After spraying the stencils with Pixie Spray, I set those aside to cure for a few minutes (this is a critical step, do not skip this!) while I got out the rest of the stuff I wanted to use.
With the background panel done, I trimmed it down with a stitched rectangle die from Lawn Fawn. While I had my Diecutting machine out I cut out three ‘thinking of you’ out of white card stock and one out of black card stock. These I layered up with Nuvo Deluxe adhesive, and then on the top (black) layer I heat embossed Clear Gloss embossing powder to give it a nice shiny look. I did two layers of it, for that puffy sticker look. I love that, and it’s one of my fave ways to elevate word dies.
A sentiment from the Thinking Of You stamp set, the coordinating stamps to the word die, was stamped up in black ink on white card stock and trimmed down. This was addhed to the card, and the word die right underneath it. With that, the first card was done. Without a single sequin on it too!! Whaaaaa??
The second card was done with a rainbow stencil from Erin Lee Creative. This one was part of a kit, and isn’t available now, BUT she has a load of other super fun rainbow stencils and rainbow dies. You defintely want to check out her shop and support a small business!
Instead of ink blending, I used my beloved Paper Glazes from Picket Fence Studios. I absolutely LOVE these, not only are they fun to play with but they look fan-freaking-amazeballs-tastic too. That shimmer and shine is enough to mesmerize me, every time!
From left to right, I’ve used Agapatha Purple, Peony Pink, Daffodil Yellow, Lime Zinnia,Ocean Poppy and Cornflower Blue. I actually did this right after I had done the ink blending for the first card, and while the Paper Glaze was drying I worked on all the other bits and pieces for the first card. Multi tasking and all that, right?
I used the same stitched rectangle die on this panel and then it was simply finished off with a sweet sentiment in black ink. The one I chose is from a Gina K Design stamp set, called Watercolor Flowers. Super simple, but with a pop of colour and a sweet sentiment, you don’t need much else sometimes.
That’s it from me for today, but don’t forget to check out the WINNER ANNOUNCEMENT VIDEO to see if you are one of the many winners!! Also, Maria wrote a blog post on her blog and made a video for her YouTube channel, so make sure to check out those as well.
Some compensated affiliate links have been used in this post, for your convenience, at no extra cost to you. Any earnings I get from these links go directly back into the running of my blog, Instagram and YouTube channel so thank you so much if you chose to support me by shopping with these links. I really appreicate it!
Today’s post is for a collaboration between Inkon3 and My Sweet Petunia, the company behind the MISTI. If you know me, you know I’m useless without my MISTI, I’m a forever fan, that’s for sure.
For the stems and leaves I used Goddess Green with a touch of Trinity Teal and Bee Sting Yellow. I’m not 100% happy with the result though, I should have just used the green and teal I think.
After letting this dry a little, I used an anti-static tool all over the panel before popping it into my MISTI. As I wanted to heat emboss the My Sweet Petunia stamp over it, I am so glad I had the MISTI on hand. NO waaaaaay I would have been able to get it right with a stamping block.
That gold goes so well with the colours, but then it does work with everything in my opinion. I love this gold, it’s so classy and elegant. Apparently there wasn’t enough gold on it already though, so I splattered some gold water colours, from the Gansai Tambi Starry Colors palette, all over it as well.
Sentiments wise I didn’t want to take away too much from the flowers, so I kept it simple with a sentiment from the Here For You set, stamped up in Sweet Petunia Pink, on a slim banner.
I have a video on my YouTube channel too, as well as a reel for almost the same card, but with different colour ratios (and no yellow on the stems) as well as Platinum embossing powder, on my Instagram, if you want to see snippets on how the card was made.
Well, that’s it from me for today but I hope you enjoyed this and if you wanted to get a few of these yummy goodies for yourself, I have used compensated affiliate links in this post. If you shop using these links, I will get a small commission directly from the company at ZERO extra cost to you! Yes, that’s right. It’s basically a win-win! Any and all earnings I get from these links go directly back into the running of my blog, YouTube channel and Instagram, so THANK YOU if you chose to support me by using these links. I really appreciate it so much!
Today’s post is a little celebration for myself and a dear crafting friend, Maria Willis, for sort of reaching a milestone of 5000 subscriber combined. I didn’t quite make it to the 2.5K subscribers as I had hoped, as I haven’t been so active recently due to a stressful family situation. If you haven’t heard anything about it, my FIL is not doing well and will have a very risky operation on Monday, after over a month in hospital. The Man flew out this morning and it was quite stressful and hectic to get it all sorted and organised. Hecking pandemic, eh??
If you want to skip right to the hop, start over at Maria’s YouTube video, and go from there. I am the last stop on the loop, but if you want to go to my video, you can click on THIS LINK to get there.
Life is tough at times and I think it’s important to celebrate and cherish the happy times as you never know when the tide will turn. Hence this little hop! Maria and I roped in some of our crafty friends to make the hop bigger than just two stops, and you are not going to want to miss their projects! The full hop list can be found below, and we also have some super generous companies sponsoring prizes for a massive giveaway to celebrate us.
I have a couple little projects to share today, and as the theme for the hop is ‘Rainbow’ I’ll start with that one:
Once they were all colourful and pretty, I glued them down with the Nuvo Deluxe Adhesive onto the second, intact, rainbow, and this in turn was adhered to another piece of card stock for sturdiness. The excess was trimmed off with scissors. I needed it very sturdy as I wanted to heat emboss Halo Glitter Powder from WOW! Embossing on top for shimmer.
This process is very simple: dab your embossing ink pad all over the rainbow, make sure it’s nice and juicy first though. Then sprinkle the Halo Glitter on top and set that with your heat tool. The simmer is insane and I love it!
Sentiment wise I used ‘Believe in yourself, like I believe in you’ from the Hero Arts and Honey Bee Stamps collaboration set Stronger Together. This is stamped directly onto the card base, with Hybrid Black Ink, with the help of the MISTI and the rainbow as a guide where to place the sentiment. I also added lots of hearts from the set, these are also stamped up with black ink.
Unfortunately I made a boo-boo with the hearts, so I HAD TO bring out the sequins to cover that up. Had to. There was simply no other option. I added a few… -ish… to the card, these are Sparkling Clear from Pretty Pink Posh, and they are adhered with Nuvo Deluxe adhesive. It’s become my new staple in liquid adhesives arsenal.
It’s coloured very simply with some copics in yellows and greens, and a tiny bit of purple on the stamens. The coordinating diecut was used to cut it out, as well as another two layers. These three pieces were adhered together with more of that Nuvo Deluxe adhesive. This is such a clever way to add some interest to clean and simple cards!
It was trimmed down to a mini-slimline size, this one is just a tad bigger than 3”x6” and the scalloped black card base was cut out using the Scallop Frame Slimline Diecutting System from Picket Fence Studios. I customised the size by running the diecut and the card stock through my diecutting machine twice to get the scalloped frame and the correct size.
The sentiment is from the Pressing Thoughts stamp set, and the ‘thanks’ was stamped directly onto the background and the ‘for everything’ was done on a slim strip of card stock. This was adhered with a little bit of foam tape to make sure it didn’t sag on the sides. And that was it!
Well, that’s it from me for today but I really hope you enjoyed this post and will get a chance to hop along with us over on YouTube! That’s where you need to leave your comments to be in with a chance to win one of the fab prizes. We can not thank the sponsors of this hop enough!
I have also used some compensated affiliate links in this blog post, for your convenience and at no extra cost to you, in case you want to shop! If you shop using my links I get commission directly from the company, and as I mentioned, it doesn’t cost you anything at all. This is a great way to show support for your favorite content creators.
Thank you so much for stopping by, and if you want to get hopping, the full hop list is down below. I’m 100% sure it will blow your mind so don’t miss it!!
May is the month of Mental Health Awareness and it’s high time that the stigma around mental health is removed, so that everyone who has been affected, and WILL BE affected, can get treatment.
Unfortunately mental health issues are so very common, as many as 1 in 5 are suffering from some form of if, from phobias, to anxiety, to eating disorders, to panic attacks, to OCD, to chemical imbalances just to mention a few. The umbrella that covers mental health issues is a very, very big one and it’s sadly very underfunded.
Over on Instagram there is a hop going on now, where lots of crafty people are banding together to spread awareness and hopefully help others feel less alone in their struggles with mental health. You can find the hop by following this graphic.
Today’s post is very uncomfortable, probably for you as a reader and me for talking about difficult stuff and I’d like to make a trigger warning announcement right now: I’ll be talking about bullying, and the resulting issues that comes with that. I’ll also be talking about my struggles with depression and obsessive compulsive tendencies. As I have never been diagnosed officially with OCD I’m going to call it ‘my obsessive compulsive tendencies’ rather than actual, diagnosed OCD.
I also made a video, and I ask that you be kind when you watch it. Anyone who leaves a negative or derogatory comment will be permanently banned from my YouTube channel. It took a lot of courage to share all this, and it’s only part of it. There is so much more, and I simply will not let anyone shame me, or anyone else, for sharing what they have/are going through.
My story is complicated, and long. So long. From almost as early as I can remember I have felt anxious, painfully shy and different. As I started school, I almost immediately was singled out by ‘the popular girl’ and she made my life hell for nine straight years.
I made these grungy backgrounds to sort of illustrate how I feel sometimes, on the inside. Outwardly colourful, as I’m also a very positive person (which is such a juxtaposition at times) but with a dark and messy side inside and underneath.
When I look back now, I realise that she wasn’t popular because she was nice, fun to be around and a lovely person. She was popular because of her family’s social standing in the village I grew up in, and she based her own self-importance on that, and she thought she was VERY important. In actual fact, she was mean, spoilt and downright nasty.
So much so, that one day her best friend decided to give her a taste of her own medicine and banded all of the other girls in the class together to freeze her out, like she had done to so many of us. I vividly remember that day, and when I was told she was crying in the bathroom after one day of being treated like i had been treated for years, I finally found the courage to tell my other classmates that I had spent many, MANY days crying in the bathroom because of her and her behaviour towards me. Clearly having had no idea about this, some were sympathetic but things didn’t really get much better after that. She got her power back and she kept on misusing it, even after feeling as bad as she made me feel. Even though for her, it was just for one day.
Having seen this, I shrank back even more and tried to make myself so small that she wouldn’t notice me, because surely she wouldn’t pick on me if she didn’t notice me? I also started having thoughts like ‘if I can make it to that spot before that car passes me, it will be ok today’. It’s funny when you look at things from an adult perspective, on things you didn’t understand as a child. Now it’s very obvious to me where a lot of my anxiety, insecurity and impostor syndrome come from, but back then? Those weird thoughts could induce a full-on panic.
On the way home from school I had to cross a river, and there were times I stood on that bridge watching the water flow wondering how long it would take to drown. Looking back on those days I am full of rage that someone managed to make me feel so worthless that I actually were thinking along those lines. The only reason I never did anything stupid like jumping the railing, with the intent of not coming back up, was fear it would hurt, love for my little sister, who was also bullied, and my cat.
It wasn’t until I started at a new school, and met new friends (who actually wanted to be friends with me!) that I started to find some confidence in myself and believing that maybe everything she had told me, sometimes on a daily basis, wasn’t true. I wasn’t stupid, I wasn’t fat and ugly, I wasn’t a waste of space, the clothes I wore didn’t reflect my value as a human being, etc etc.
I decided to use this word die because it says it all, and it’s layered up with white and black card stock, as well as heat embossed with clear embossing powder.
It took a while, but as I spent a year in the US working as an au pair, I really found my feet and let my personality blossom. It turns out that I wasn’t half-bad, after all, people wanted to be friends with me and thought I was fun! Imagine that. After having spent so many years feeling so small and insignificant, it was truly wonderful and that year I spent in the US is still one of the best ones of my life.
After I got back to Sweden, my family unexpectedly imploded. I was 20, but all of a sudden I felt like I was 5. My father walked out on us, with very little indication of what he had planned, and left us in the dust to pick up the pieces. That was extremely traumatic and left us all shell-shocked. I didn’t know how to deal with the onslaught of emotions and responsibilities, so I ran. I’m not proud of it, but I ran. I packed my bags and left, never to move back to Sweden, ever again.
This sudden departure of my father left me with trust issues and a lingering depression, but luckily for me I met The Man that very same year and he did everything in his power to prove to me that he was staying, he was supportive, understanding and patient. Most of all, he simply loved me. Still to this day, some 20+ years later, he’s the same. He’s stood by me through all of my emotional wobbles, my manic cleaning and tidying episodes, all of my depression lows, all of my obsessive tendencies.
The cleaning thing he never really understood, and I have hidden some of the worst from him, which was easy at one point as he worked away from our home during the week and was only home on the weekends. As my trust in him was growing, I entrusted him with more and more of ‘my crazies’ as I call them. Whilst he doesn’t fully understand how cleaning and order could make me feel calm, and would mess with me by moving stuff, he accepts that it’s part of me.
I also added sparkles to the card to represent all the different facets of our personalities. The black sentiment almost disappears but the whole point is that it’s supposed to be a bit difficult to see it. It IS difficult to see that we are loved, especially when we feel unworthy of love.
When I have my depression lows, the first thing that goes is my personal hygiene. Gross as that is, it’s the truth. The next thing that goes is the need for cleaning. As I mention in the video, at one point the cleaning and the cleaning routines were almost the very thing that structured my day. I could feel it getting worse, but I also couldn’t see what the problem was with me wanting to have a clean and tidy home. As my compulsions grew stronger, my lists grew. I had one for things I had to do daily, another for weekly tasks, a third for things that needed to be done once a month, and lastly a list for things that only required doing every three months. These lists were laminated and I’d obsessively tick off the things I had done, and then calculate how long it would take me to achieve the rest. There were days where I had to stay up late to get it all done, but going to sleep without having ticked off all the things? Close to impossible.
My obsessive compulsive tendencies started out with a traumatic incident in my life, and ironically, it was another major tragedy that helped me overcome some of it. When we lost both of our dogs within six weeks of each other, I stopped functioning for a while. All I could do to get through the day was by one breath to the next, the grief was so bone deep and devastating that I felt like I was drowning in it.
It took me a little while to get my head above water again, and when I surfaced I realised a lot of time had passed and I had done absolutely no cleaning whatsoever. That need for it had disappeared almost like a switch had been flicked. Like my brain had short circuited and been somewhat reset. I couldn’t hear those voices telling me I ‘had to do this or that, this way, not that way’, over the deafening roar of heartache and grief. Those very voices that had made me believe that if I did what they said, nothing bad would happen. Well, talk about a wake up call that that was a big fat lie.
Don’t give up on someone who’s resisting your love and support. Even when someone says ‘I don’t want it’ on the inside they could be screaming ‘please don’t go, don’t leave me alone, I need love but I’m scared’.
I still have some of these obsessive compulsive tendencies today, I’m not going to lie. I am a bit of a basket case some days, for sure. If I’m feeling stressed, anxious or sad I will very often clean and tidy stuff. I think the difference now is that those voices aren’t telling me something bad will happen or someone will die if I don’t do this, it’s almost like a trade ‘if you do this, I will tamp down on those anxiety feelings for you’. I don’t even know if that makes any sense to anyone other than me, but there you have it. It does help most of the time, and those times it doesn’t help, at least I will have accomplished something. That’s how I try looking at it these days.
For instance, recently I have had a lot of stress from a family situation, and at first it left me feeling like nothing matters so why bother? I spent three days on the sofa with my chicas and books, and then all of a sudden, I cleaned the kitchen until it was spotless. The next day I moved on to the bathrooms. We have two, so there is always something that can be done there. Admittedly, the levels of anxiety I have had about filming the video for this Mental Health Awareness hop, meant I needed to clean those bathrooms two days in a row, but ok. Sometimes I wonder if it’s the physical, as well as mental, tiredness I need, rather than the order? It’s really too bad I’m not focusing these energies on doing squats. I’d have buns of steel!
Like everyone else, my issues are very personal to me, and everyone is affected differently. Just because someone else has the same issue as you do, doesn’t mean it affects you both the same way, which is why understanding and acceptance are so important. By sharing my story, and opening the door to my inner crazy, I’m hoping that it will help someone out there feel less alone. Know that there are people out there who know what you are going through, and how you feel.
If you are struggling, please know that there is help. Know that people care. You are NOT alone. Ignore those voice that tell you it’s not worth it, why bother, nobody cares etc. They are wrong, they lie and they do not get to tell you you are not worthy, loved and needed in this world. You are not alone.
So much love, and big hugs if you made it all the way to this point.
Today is release day for Alex Syberia’s March release of digital stamps, and as always, she has some amazing designs for us!
I started out with the Fabulous Floral slim line flowers and printed it on vellum. The upside with having a laser printer is that I can foil the images, which always looks fab! This one I foiled with white Minc foil, using my Minc machine.
To add some colour, I turned it over and used Copics, on the back. When using this technique, you do have to add quite a lot of colours, or strong ones, in order for it to show through the vellum.
When the colouring was done, I gently wrapped the vellum piece over a white slim line card base, and glued down the sides to the back so it wouldn’t show.
To finish this off, I used a discontinued, but loved, word die from Neat & Tangled that says ‘love you’ in a gorgeous font. The paper I used is homemade shimmer paper! You can make your own by smearing Paper Glaze from Picket Fence Studios on card stock, let it dry and voilá!
I cut out another two layers and added these together with liquid glue, before adhering the whole thing to the card. Layering word dies up is such a simple but effective way of taking your card designs up a notch, with little effort. This word die is sold out in a LOT of places, and the only shop I found it actually in stock is Foiled Fox, so if you want it, GRAB IT FAST!!
To celebrate the release the design team are doing an instagram hop, where you can see some fantastic inspiration and hop along for a chance to win a gift voucher to the Alex Syberia shop! I have seen some of the cards, and they are AH-mazing! You are not going to want to miss it.
You can of course use skip straight to Alex’s shop if you already know you are going to want to get some of these for yourself.
Thanks for stopping by today, I hope you enjoyed this post and will enjoy some of these new stamps for yourself.