January 2023 My Monthly Hero Kit Blog Hop!

Hi and welcome to my blog, and my first post for 2023! Today’s post is part of a blog hop celebrating the first Hero Arts My Monthly Hero kit of the year, and there is a giveaway!

The next stop on the hop is my talented friend Jen Kray!

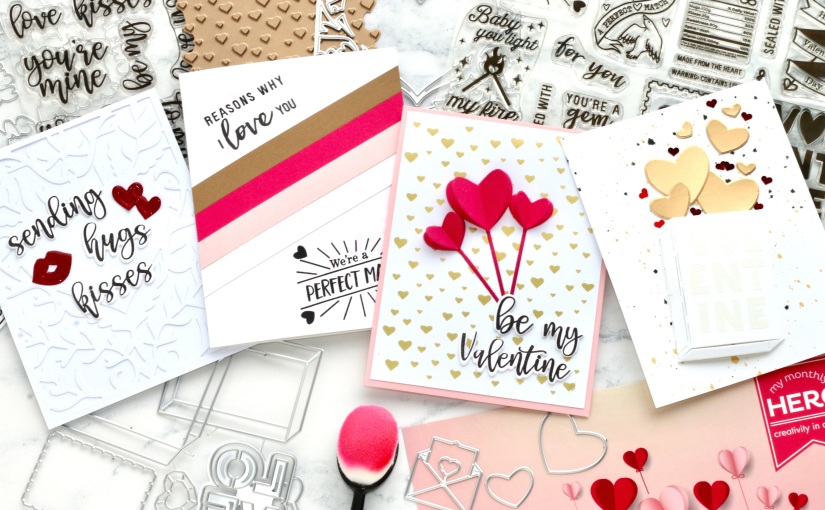
This kit is super cute and perfect for those Valentine’s Day projects! Beautiful card stock, sweet stamps and coordinating diecuts, as well as a stencil and a bit of sparkle.

This is what Hero Arts are saying about the kit: With Valentine’s Day right around the corner, the January My Monthly Hero kit celebrates the “perfect match”. The centerpiece of this kit is dies to create a faux matchbox, which lies flat on your card or project and can be decorated and filled with the numerous stamps and dies included in the kit. But don’t stop there, let your imagination go wild with all of the possibilities this kit contains! Use the images on their own, build repeating patterns, or add them to planner pages, journals, and more! There is a beautiful stencil included, perfect for backgrounds or mixed media projects. The kit is rounded out with a pack of fun heart-themed sequins and five sheets of gorgeous cardstock.

If you haven’t subscribed to the My Monthly Hero kit, you can sign up HERE. This is a pre-order, and Hero Arts will start shipping the kits on Friday the 13th of January. If you are not subscribed, and miss out on a kit, that’s it, you can not get it again. They are only available in a limited quantity and once they are gone, they are gone. It’s also a great deal as the kit is valued at $77, but it only costs $34.99!

There are also a bunch of fun add-ons you can get, as usual! There are a bunch of fun diecuts, including one that makes an actual match box. There is also a gorgeous heart cover plate, a hot foil plate, a striped stencil and really lovely sentiment stamps, on their own or with coordinating diecuts!! If you are a subscriber, you can add any, or all of these, to your kit order, before it ships, without having to pay extra shipping.

If you can’t pick and chose which ones to get, you can snag them all RIGHT HERE.

As a self-confessed hot foil addict, I love the option of adding foiling to my projects. It’s such a touch of luxury, and glam, and I will never, ever tire of it. The fun thing with hot foil plates is that you can actually use them as embossing plates AND you can dab ink on them and “stamp” as well. Yep, it’s not just for foiling.

However, for my project today I have used just the main kit, so let’s get into it!

First off I used my trimmer to cut out strips of the card stock included, they are about 1cm wide. I did cut two of each, because I wasn’t sure how many I needed, but I did just use one of each in the end.

To add some interest to the white card base, I have ink blended just a touch of left over pink ink (the colour is Taffy) over the stencil. By not adding more ink, the results are super soft and delicate, but you do have to blend for quite a while. I will say it’s worth it for this sort of result.

My second card is also done with just stamps and dies from the main kit, I did use some Distress Spray in Black Soot and some gold water colours to add some interest to the white background.

I cut out the flat matchbox out of white card stock and heat embossed ‘Valentine’ on it in white embossing powder for a subtle look. The hearts are cut out of satin gold card stock and I also used a few of the little red hearts from the embellishments, that come in the kit.

The little specks of red, matched with the gold, works really well I think!

Next up, I had to use that lovely Hearts Hot Foil plate. But not in red, that felt too on the nose, so I went with Matte Gold instead. It looks gorgeous!

This card is finished off by making a card base of out the Peony card stock that comes in the kit, stamping up a sentiment from the You’re Mine stamp and diecut set, and add some 3D heart balloons made with some of the diecuts from the main kit.

My last, and final card, is way outside of my comfort zone. It has so much white space I’m spacing out…!

I started out by cutting out a panel using the Heart Flourish Cover Plate, out of white card stock, and layering this up onto a white card base.

On this I simply added ‘Sending hugs kisses’ from the You’re Mine stamp and diecut set. Because there is no ‘and’ in the stamp set I used the double heart diecut instead of it, this and the lips are cut out of red card stock. To make these stand out a little I added a lot of Crystal Clear Lacquer Pen and set aside to dry.

That’s it from me for today, but don’t forget to check out the rest of the hop! To enter the giveaway, you only have to leave comments on the stops, and you have until January 15th to do so. The winner of the $50 Hero Arts gift card will be announced on the blog the following week, so make sure to check back to see if you have won!

I have used some compensated affiliate links in this post, to Hero Arts, and if you shop with these links I will get a small commission from them directly. At absolutely zero extra cost to you!

Income from these affiliate links are what pays for the boring stuff like blog hosting, internet security, equipment, and other tools for the creative side. I really, really appreciate it whenever someone uses my links, no matter how small the order, every single one helps, so thank you from the bottom of my heart!

Lots of love and happy crafting from Erica

Pinkfresh Studio August 2022 Stamp, Die, Stencil, and Hot Foil Release

Hi and welcome to my blog!

Today I am excited to hop along with Pinkfresh Studio and friends, to celebrate the fabulous August release.

You should have come here from the fabulous Emily Midgett, and the next stop is the amazing Heather Hoffman! If you get lost along the hop, you can find the entire lineup via the InLinkz LINK.

I have a few cards for the hop, but I also made a video! Hop on over to my Youtube channel if you want to check that out.

Click here to watch!

Now, for my actual cards I have used the fabulous Happy Dance suite, which is a gorgeous floral set. I do love my florals, in case that wasn’t obvious at this point, lol!

The first card is very simple, I heat embossed the outline stamp in white embossing powder, and used the layering stencils on top to add colours.

On top of the ink blending, I splattered some gold water colour for extra sparkle.

I also finished it off with a sentiment from the stamp set, and a hot foiled ‘bestie’ from the Phrase Builder: Hello Hot Foil set. It’s foiled with Matte Gold foil, and it worked so well with the rest of the card.

I usually use the coordinating diecut to cut out the images, but here I left it as an almost one layer card.

I did make up for the lack of layers and texture on my second card though!

On this one I heat embossed the outline stamp with gold embossing powder, and then added a rainbow look with the layering stencils.

Once I had used the coordinating diecut on the image, I cut out another two pieces to layer it up. I also used the gorgeous Dotted Scallop cover plate on a piece of white card stock, and I also cut out a Stitched Scallop Rectangle piece too.

The ‘friend‘ is hot foiled with Matte Gold foil too, and the sentiment is the same as the first card, from from the Happy Dance stamp set. Would you believe I stopped myself from adding bling, though?? Say whaaaat?

That’s it from me for today, but I hope you will enjoy the rest of the hop and don’t forget that you can win the ENTIRE RELEASE from Pinkfresh by commenting on their release blog post, and also the release YouTube video!! As always, there are also TEN $25 gift vouchers up for grabs along the blog hop, so the more you comment, the bigger chance to win!

Winners will be announced on Aug 23rd, on the Pinkfresh GIVEAWAY PAGE, so make sure to earmark that URL and the date, as you will need to claim your prize within 2 weeks.

Thank you so much for stopping by today, and have a lovely week!

Lots of love and happy crafting from Erica

Pinkfresh Studio July 2022 Stamp, Die, Stencil, Washi, and Hot Foil Release

Today I’m excited to be blog hopping with Pinkfresh and friends! We are celebrating the July release and as usual, there is a load of gorgeous and versatile products coming out.

You should have come from the fabulous Emily Midgett and the next stop is the incomparable Heather Hoffman. If you get lost along the way you can find the entire lineup on the Pinkfresh blog post, as well as via the InLinkz link.

I have mixed and matched some older goodies with the new release. The Stitched Scallop Rectangle diecut is one of my all-time faves from Pinkfresh, it’s so pretty, so versatile and in my opinion it really elevates a simple card design without taking the focus away from the focal point on the card. I also love the Dotted Scalloped cover plate. It’s such a gorgeous pattern and was the perfect thing for this card.

The Go For It suite is new for July, and it’s such a lovely and dainty image, yet packs a punch. How is that for awesomeness? For this card I have used all but the stamp itself, and soft spring colours, despite it being a heat wave right now. I should have gone for fiery colours perhaps but I’m really drawn to yellow on cards.

After foiling the Go For It image with Matte Gold, I used the layering stencils over it to add colour. Don’t try and diecut first and then ink blend, always ink blend first and then cut it out.

I am so happy to have a coordinating diecut for this image as I’d never manage to cut this all out without chopping off a stem or leaf.

The ink colours used are Lemon Whip, Sunshine, Sweet Mustard and Grassy Knoll. I used the same yellow inks for the sentiment, which is from the Fall Leaf Border suite. The sentiments are all ink blended with the Fall Leaf Border Stencils for a really gorgeous look, and they all have coordinating diecuts too.

To put the card together I have layered up a lot of the pieces for that lovely dimensional look. The background is propped up, the sentiments are stacked, the frame is layered with a white one under the yellow, and the flower heads are raised up with foam tape. The final touch were some dainty clear crystals, for a morning dew or raindrop look.

My second card is done in a similar way, with a cover plate to add texture on the background and the Stitched Scallop Rectangles to add in a delicate touch. This cover plate is the Floral Backdrop and I used it on Soft Stone card stock from Gina K Designs.

The pattern in created with the Fall Leaf Border stencils, and bright happy ink colours. Once I had ink blended the pattern, I fussy cut along the border of them to cut off the excess white space.

I picked another sentiment from the set, Thank you, this time and used yellows and apricot colours to create the look before cutting them out with the coordinating diecut. These are also raised, but with foam tape this time.

To keep with the colour scheme I used Sunshine Jewels for this card, and quite a restrained amount, for me.

That is it from me for today, but I hope you have found some inspiration here with me and along the hop. The next stop is Heather Hoffman, and you can also find the entire hop list via the InLinkz list here.

As it’s a blog hop, there are of course giveaways and prizes!

GIVEAWAYS:
-You can win the full release on the Pinkfresh blog & YouTube channel! All you have to do is leave comments on both new release posts, and that’s it!
-There are also a total of TEN $25 gift cards to be won along the hop. Winners are drawn randomly from all the comments left on the blogs, so the more you hop and comment, the better your chances to win!

Winners will be announced on August 5, 2022 on the Pinkfresh GIVEAWAY PAGE. Please note that you must check that page and claim your prize within 2 weeks, so mark your calendars and check back!

For transparency, I have used compensated affiliate links all throughout this post, for your convenience, and at no extra cost to you. If you shop via these links I get a small commission from Pinkfresh directly as a thank you for directing you to them. Everything I earn from these links are currently going to the ‘Forever Craft Room Renovation Fund’ as I have a lot of work to be done on the room that will be my craft room in the house we bought a couple of months ago.

Here is a photo of it, and I will be making sure to share lot of updates as it comes to life. Thank you so much if you chose to support me by shopping with these links, I appreciate it a lot!!

Thanks again for stopping by, lots of love and happy crafting from Erica

Pinkfresh Studio May 2022 Stamp, Die, Stencil, and Hot Foil Release

Hi and welcome back to my little blog!

Today I’m one of the stops on the Pinkfresh May release blog hop!

You should have come here from Emily Midgett’s blog, and the next stop on the hop is the fabulous Heather Hoffman! You can also find the entire lineup via the <a rel="noreferrer noopener" href="http://&lt;!– start InLinkz code –> <div class="inlinkz-widget" data-uuid="ddeeb5b228ff49a2a1c1104301d77c1a" style="width:100%;margin:30px 0;background-color:#eceff1;border-radius:7px;text-align:center;font-size:16px;font-family:'Helvetica Neue',Helvetica,Arial,sans-serif"> <div style="padding:8px;"><p style="margin-bottom:15px;">You are invited to the <strong>Inlinkz</strong> link party!</p> <a href="https://fresh.inlinkz.com/p/ddeeb5b228ff49a2a1c1104301d77c1a&quot; target="_blank" rel="nofollow" style="padding:5px 20px;background:#209cee;text-decoration:none;color:#efefef;border-radius:4px;">Click here to enter</a></div></div> <span style="display: none;">https://fresh.inlinkz.com/js/widget/load.js?id=a8b40ada7693d64e5923</span> InLinkz link here, and at the bottom of this post.

I don’t have a lot of projects finished, but I have ink blended and foiled lots of pieces so I will be sharing those as I go along. For now, let’s get to the two cards I do have.

First off, I have used the Celebrate In Style suite. It has a stamp set, layering stencils and coordinating diecuts.

I started out by heat embossing the outline stamp with WOW! Embossing powder in Rich Gold and then on top of this I used the layering stencils in Lemon Whip and Sunshine ink.

The flowers and leaves were done in Sunshine, Ocean Breeze and Aquamarine inks. I also did the word ‘Congrats’ in the teal colours.

These I then cut out with the coordinating diecuts, and while I had my diecutting machine out, I also used the new Stained Glass diecut and Hexagon Tiles cover plate on white card stock.

My second card is using the gorgeous Painted Daisies suite. It has a stamp, diecut and layering stencils also.

Here I have gone BRIGHT with the colours and I love how it turned out!

Because this is so vivid and gorgeous, I wanted to keep the background somewhat simple but still with some ka-pow, so I used the Stained Glass hot foil plate with gold foil.

I don’t think anyone is surprised that I did use bling on both of the cards, right? Those Gold Pearls are so versatile and work on a variety of projects.

I have also used the new Scripted Sentiments, because they are rather lovely! If you don’t have a hot foil machine, it comes with a stamp set as well.

This I propped up with two more pieces for dimension, and then this was all layered up and this card was finished also!

Now for the stuff you have been waiting for!!
GIVEAWAYS:
-Pinkfresh will be giving away the full release on the Pinkfresh blog & YouTube channel.
-Pinkfresh will also be giving away a total of TEN $25 gift cards along the hop. As per usual with blog hops – the winners will be picked from the comments, so the more you comment, the more chances of you winning!

You are invited to the Inlinkz link party!

Click here to enter

https://fresh.inlinkz.com/js/widget/load.js?id=a8b40ada7693d64e5923

Pinkfresh will pull the winners & post them on June 3, 2022 on their GIVEAWAY PAGE. Please make sure to check that page & claim your prize within 2 weeks. Good luck!

That’s it from me for today but I really hope you have enjoyed this, and the rest of the hop! I have used compensated affiliate links in this post, for your convenience and at no extra cost to you. Thank you so much if you support me by shopping with these links!

Lots of love and happy crafting from Erica

You can find me on various social media platforms, by clicking the links below.
My blog
Instagram
My YouTube channel
CaCaCraft on Facebook

Pinkfresh Studio February 2022 Stamp, Die, Stencil, and Hot Foil Release

Hello, hello, and welcome to one of the stops on the Pinkfresh February release blog hop! If you have come here from the amazing Emily Mydlowski, you are in the right spot, and the next stop on the hop is the awesome Heather Hoffman!

I have been really sick with shingles, for the second time in two years!!, for most of February so I haven’t had the energy to make a boat load of cards, like I usually do. However, the cards I have made I really like, and I hope you will too. I did manage a YouTube video too, but just a heads-up, I do look rather sickly still.

Now, let’s get to it! Clean and Simple, or CAS cards, are not something that comes easy to me. I love the look, but yeah, I usually end up over embellishing them to make up for the white space. It was, surprisingly, the look that I ended up with, for both of my first two cards though. Maybe the shingles took pity on my frazzled brain, and I didn’t over-think it even half as much like I normally do. Or maybe I just ran out of steam? Either way, TWO CAS cards coming up!

I started out by heat embossing the lovely Spark Of Goodness Floral Frame stamp on two card panels, one with Opaque Bright White powder from WOW! Embossing powder.

The second one was done with Rich Gold powder, also from WOW! Embossing. The gold definitely stood out more, for obvious reason.

The white embossing one I coloured in with green and fuchsia coloured Copics, and then used the coordinating diecut to cut out the middle. On the back I built it up with spare card stock to create some dimension.

For a bit of extra interest and texture, I used the Color Block Diagonal Stripes diecut on white card stock, and added the pieces to a card base. Probably as zero surprise to anyone, I also added some bling in the form of clear crystals, as well as a straight to the point sentiment.

The second card was also coloured in with Copics, but in peachy/orange tones, and greens. This was also cut out with the coordinating diecut and I did a similar thing to add texture and interest to the background. On this one I used the new Heart and Stars Coverplate, and it’s so sweet!

This one was finished off with a Fancy Script Hot Foil sentiments, that was foiled with gold foil, and then cut out with the coordinating diecut. I naturally cut out another two to layer them up so they would stand out a bit more. Oh, and Matte Gold pearls were added too.

I also have a little sneaky peek of one of the cards I will be sharing for tomorrow’s Instagram hop, with the absolutely stunning Chrysanthemum Slimline stamp, coordinating diecut and coordinating layering stencils set!

Now for the fun stuff!!

Pinkfresh is giving away the entire release on their blog post and their YouTube post, so don’t forget to comment there! There are also TEN $25 gift vouchers up for grabs along the blog hop, all you have to do is leave a comment to be in with a chance to win, so the more you comment, the bigger chance to win!

InLinkz lineup can be found via THIS LINK

Winners will be announced on March 8th, 2022 on the Pinkfresh GIVEAWAY PAGE. Remember that you must check that page and claim your prize within two weeks.

Thank you so much for stopping by today! Lots of love and happy crafting!

You can find me on various social media platforms, by clicking the links below.
My blog (that’s here)
Instagram
My YouTube channel
CaCaCraft on Facebook


Stamp of Goodness rubber stamp

Stamp Of Goodness coordinating die

Coordinating Layering Stencil

Hearts And Stars Coverplate

Fancy Script Word Hot Foil

Fancy Script Word coordinating diecuts

Matte Gold Pearls

Chrysanthemum Slimline stamp

Chrysanthemum coordinating diecut

Chrysanthemum coordinating layering stencils

Hero Arts Global Team blog hop!

Hi everyone!

Today I’m delighted to be hopping along with the fabulous Hero Arts Global Team.

You should have come here from my little brother from another mother, Daniel Diaz, and the next stop on the hop is the incomparable Ilda Dias!

I have been sick with shingles for the last two weeks so I haven’t had the energy to do much, so making the cards for this hop was the first time I played with the February My Monthly Hero kit. One of my favourite images in the stamp set is the little umbrella. I love umbrellas, which is kind of funny, seeing as I’m not a fan of rain, lol!

The add-on cover plate, Cloud Window Fancy Die, with the gorgeous pattern and swirls, is totally fabulous. I do love a good cover plate!

To start, I stamped up the umbrella five times and coloured them in, each in a colour of the rainbow. I used a silly amount of Copic Markers for this but I love how they turned out! After the colouring was done I cut them out with the coordinating diecut, and set aside.

In one of the previous kits there was a pack of white silver glitter card stock, and I cut the Cloud Window Fancy Die out of that and also white card stock. The glittery one I cut up into four pieces and glued to the back the white one, to make it more interesting. I love the glittery clouds peeking out from behind the white ones.

As I didn’t want to fill the entire panel, I left a hole in the middle, but this of course needed a little something. On a scrap piece of paper I scribbled some blue Copic markers to make a sky looking background. This needed a little something so gold splatters to the rescue!

After all the pieces were done, I stacked and adhered it all to a card base, and the final touch was a sentiment from the stamp set. The one I picked says ‘you’re magical’ and once that was stamped onto white card stock, trimmed down and adhered to the card it was all done.

So that’s my card done for today, but don’t forget to hop along the blog hop and leave comments on all the stops as Hero Arts are giving away a $25 gift card to a lucky winner! You have until the 26th of February to leave comments and the winner will be announced on the Hero Arts blog on the 27th. Good luck!!

Below you can find the whole lineup for the blog hop
Anna
Daniel
Erica (that’s me!)
Ilda
Jen
Lisa
Michelle
Sandi

Tonic Studios Stamp Club Compassion & Poppies Blog Hop!

Hi everyone!

Today I’m delighted to be one of the stops on the Tonic Studios Stamp Club release blog hops. This month’s bundle is called Compassion & Poppies, and consists of a stamp set and coordinating diecuts. They will only be sold as a bundle, and are exclusive to Tonic Studios so grab them while you can! Once they are sold out, they are gone!

This is a monthly stamp release, and will be available the last Friday of every month (with exceptions made for holidays) It’s not a club or subscription based program, so there is no commitment or forced buying, it’s simply a small, but fabulous, stamp release.

You can get it both from the UK Tonic Studios shop and the US Tonic Studios shop, but if you want it, make sure to get it fast. Don’t dilly-dally, the last bundle sold out so fast, so better safe than sorry!

There is of course a prize to be won, a blog hop wouldn’t be complete without one, right? One lucky winner will win the entire bundle, as well as a £50/$50 Giftcard to Tonic Studios! How is that for awesome-sauce? Leave a comment on this blog to a chance to win, and the more you hop and comment, the bigger your chance to win. Comments can be made until March 3rd 11.59PM PST/7.59am GST March 4th, and winner will be announced on March 5th!

The entire line-up can be found at the bottom of this post, and you next stop is my talented friend Janette Kausen!

So, full disclosure, my goodies only arrived 24hrs ago, so it has been a bit of a scramble. I only finished one full card but if I manage to make more, I will share them over on my Instagram.

I started by stamping the big flower image with Black Hybrid ink on Neenah paper with my MISTI, as I wanted to do some Copic colouring. I started out with reds, greens and cool greys, but decided to skip out on the greens in favour of colouring the leaves grey for a dramatic look.

A bit of masking here and there protected my flowers, and I heat embossed the two leaves from the stamp set in Platinum from WOW! Embossing powder. It goes so well with the grey on the leaves, and adds that gorgeous shine to the card. I made sure to use my anti-static tool generously before, as the paper was still a bit wet from the colouring.

I used my WOW! heat tool to set the powder. I love this tool, thanks to the dual settings you have so much more control over the heat and that’s always a good thing.

To add some drama to the card, I ink blended some Hickory Smoke and Black Soot around the edges, using my Blender Brushes. This not only adds drama, but also draws the eye in to the star of the show: the poppies.

The final touch was to heat emboss one of the sentiments onto black card stock. I used Platinum again, for a cohesive look, and trimmed it down to a slim banner before adhering it with liquid glue.

Well, that’s it from me for now, and it’s time to hop on. Or get your shop on! I have used some compensated affiliate links in this post, for your convenience. These links do not cost you anything extra at all, however if you use them I get a small commission from the company directly. Any earnings I get from these links go directly back into the running of my blog, YouTube channel and Instagram. I am so grateful for the support, and can’t do it without you so thank you from the bottom of my heart.

BLOG HOP LIST: 

Channin Pelletier

Dilay Nacar

Emily Midgett

Erica Andersson Burke

Janette Kausen

Jen Kray

Kelly Taylor

Maria Willis

Mindy Eggen

Seeka

World Card Making Day part 1!

Hi guys!
You read that right, this is only Part 1 of 2 today. This first one is part of the WOW! Embossing blog hop to celebrate World Card Making Day! You should have come here from the talented Verity, and the next stop of the hop is my sweet friend Daniel!


Comment along each of the Design Team member’s post for a chance to win a $25 gift card to either our UK or USA stores.(One comment per blog please.) You have until Wednesday, October 7th at 11:59PM British Summertime to leave your comments. Winners will be announced on Thursday, October 8th.

I do love me some heat embossing, that’s no secret! Card making as well. This hobby is so good for the soul and the creativity. The wallet, on the other hand, is in the corner crying most days, lol!

For this card I have used a couple of new to me stamps from Pink Fresh Studios, two of the new trios, Toteally Amazing and Summer Scoops, of embossing glitters and some matching ink colours.

With my trusted MISTI on hand, this was a breeze to make, even with all the different puzzle pieces of this stamp. This is the brilliant Pop-Out Nested Diamond and my idea was to basically use a different ink and glitter powder combination on each section.

I paired up Glided with Tattered Rose, Lemon Sorbet with Squeezed Lemonade, Orangeade with Carved Pumpkin, Razzleberry with Picked Raspberry, The Real Teal with Salty Ocean and Iced Teal with Peacock Feathers. Each colour is first stamped with the coloured ink, then with the Embossing Pad and finally sprinkled with the matching Embossing glitter. I heated the glitters with my Heat Tool from underneath to keep as much of the glitter on as possible.

Once the entire panel was done, I used a stitched rectangle die to trim it down to 5.5″x4.25″ and this I adhered to a card base. To finish off the card I also stamped up the big You and a sentiment from the Simply Sentiments-You stamp set. Both are done in black ink and I also heat embossed the You in clear embossing powder to make it pop a bit more.

It was quick work getting those two bits adhered to the card, after I fussy cut the You out, and with that the card was done! I made a video for this card too, and you can find that on my YouTube channel.

With that, I’m all done and it’s time for you to hop along the rest of the fabulous hop.

Thank you for stopping by, lots of love and happy crafting from Erica

The full line up of the hop is below. Make sure to leave comments on as many stops as possible to increase your chance of winning a $25 gift card to the WOW! shop.

WOW!

Tenia

Jenny

Karen

Amber

Jo

Jaine

Verity

Erica <——–You are here!

Daniel <———Next stop!

Dunja

Ashlee

Ericka

Rikka

History of Card Making Day: Cards have played an important role in social circles for hundreds of years, playing a role as a thoughtful gift all the way to a necessary part of proper etiquette. Consider, if you will, the calling card of the Victorian era, a term that has become so ubiquitous that the signature element of a bomb-maker or a criminal is said to be their ‘calling card’.

A small piece of paper bearing one’s name and often a decoration of some kind, the calling card (Also known as a visiting card) was presented to the servants of a household that it might be delivered to the masters of the house to announce visitors.

It was this era of propriety that also developed the concept of a dance card, a card specifically carried by women to fill out with the names of the men they intended to dance with that evening. After all, with so many interested parties it just made sense to keep track of them so that you could, in earnest, indicate that your dance card was full and thus politely decline an interested suitor.

Calling Cards, Dance Cards, Business Cards, Greeting Cards, RSVP Cards, there are a million and more types of cards and could there be anything more exciting than learning to make your own? Card Making Day encourages you to do just that.

You can find me on various social media platforms if you want to see more of my work

My blog (that’s right here)

Instagram

My YouTube channel

CaCaCraft on Facebook

Some products used are linked with compensated affiliate links in this post, the rest of them are purely for your convenience should you like to buy some of them for yourself. And why shouldn’t you treat yourself??

Papercrafters Unite Against Racism Blog Hop | BFF My Tribe

Hi everyone!

Today I’m participating in a very special blog, YouTube and Instagram hop, organised by the fabulous Justine Hovey, you can find more information on her blog. The goal of this hop is to come together to stand in union with our black and brown friends to show solidarity and stamp out racism. Not just for crafters, but for everyone who’s experienced racism. The fight to end racism and bring equality to every aspect of life is so important and we can not stop until it is reality!

I have used the BFF My Tribe stamp, from Picket Fence Studios, for my card and I think it’s so perfect as you can basically go a rainbow of skin tones. A different one for each arm, to make sure all your friends are included. I have a YouTube video too.

To begin with, I stamped it up with Black Hybrid Ink and my Hero Arts MISTI on Copic friendly paper. I kept the image at the bottom of the card panel to keep the top free for the sentiment.

I used sooooo many Copics to colour in the image, to make sure I covered as many skin tones as possible. I’m not very good at skin tones with Copics, I definitely need to practice a lot more with that. Time to crack open the Human Rainbow colouring chart from Sandy Allnock and get it down.

The top part of the card I had kept free for a sentiment and I wanted to diecut letters in skin tones and pastels to spell out ‘Better Together’. I used my long-term fave Stitched Alphabet Die-Namics from MFT Stamps. I use these so often and have loved them from the start! I used a pastel card stock from a DCVW paper pack as well as coloured card stock from Lawn Fawn. The ones from Lawn Fawn are Vanilla Malt, Paper Bag, Chocolate Bar and Ground Coffee.

To line up the letters straight, I used the grids on my work mat, a ruler and PostIt Tape, or use purple tape or even washi. I also have a magnetic work mat that comes in handy for this sort of thing. Then I glued them down with the glue tube from Lawn Fawn. I also added some gold details with a gold gel pen, to things like brackets and rings.

I almost left it like that but then I had a last-minute idea! I added a black heart with BLM, for Black Lives Matter, heat embossed in white, on top of the hands. Sort of like an extra strong message of unity.

Now it’s time to hop along, and the next stop is Angie! The full list of the hop can be found on Justine’s blog RIGHT HERE.

Thanks for stopping by today, I hope you enjoyed this post and the rest of the hop. I have linked most of the products used for this card with compensated affiliate links for your convenience. If you shop using these links, I get a small commission from the company directly, at no extra cost to you.

Lots of love and happy crafting from Erica

Picket Fence And My Sweet Petunia Collab!

Hello, hello!!

Today Picket Fence Studios and My Sweet Petunia, the genius behind the MISTI aka Most Impressive Stamping Tool Invented, are hopping to celebrate being fabulous. Or maybe it was just to collaborate with their amazing products? Either way, in my mind, it’s going to be a fabulous collaboration!! You should have come here from Karen and the next stop is Susie!

I should start this by saying ‘Hi, I’m Erica and I’m addicted to the MISTI’s‘ I am a totally self-confessed, and not ashamed about it, MISTI addict. I can not overstate how much this amazing tool changed my crafting world!

For my card today I have basically copied a recent card I made with the fabulous Botan Peony stamp, hands DOWN one of my all time favourite stamps from Picket Fence. I absolutely love it! On this one I stamped the flower at a slightly different angle and used a very different colour scheme.

This is a photo of how I coloured the images on that card I used as inspiration. To see the finished card, go to THIS BLOG POST or THIS YOUTUBE VIDEO.

As I mentioned, on this card I wanted bright colour and a real ka-pow! I went with a very un-natural colour scheme for this big peony.

My husband wasn’t sold on it at all and I must admit I had absolutely no idea how this was going to look like when I started. I had envisioned going deep teal at the bottom of the leaves but as you can see, that didn’t happen.

The above photo shows the exact markers I used, in order. The Botan Peony is stamped with the copic friendly Hybrid Black ink. After stamping it a few times with the help of my MISTI, I used a heat tool to set the ink a little before I started colouring.

I originally thought I’d use the Hello Word Die to finish off the card but after cutting out a few pieces and layering them up, I changed my mind. Instead I ended up using a previously made I Miss You Word Die piece, made out of gold mirror card stock and black card stock.

Once this was glued down with the Lawn Fawn glue tube I actually decided to leave it there. Yep, that means no sequins. *audible shocked gasps*

Well, that’s it from me for today. Now it’s time to hop along and see some more fabulous projects! Don’t forget to leave a comment on my blog here in order to be in for a chance to win some prizes! The full line-up can be found below as well as on the Picket Fence Studios blog and the My Sweet Petunia blog if you get lost along the way.