Pinkfresh November 2021 Essentials Release Blog Hop!

Hi everyone and welcome to my little blog!

Today I’m very excited to be hopping along with Pinkfresh to celebrate the November Essentials Release! It’s full of dies to help you elevate your cards with shapes, texture, layers and that delicious dimension that bring your designs to another level.

You should have come here from Emilie Chamel and the next stop on the hop is the amazing Heather Hoffman! The full hop list can be found at the bottom of this post via the InLinkz link, and of course you can also find it on the Pinkfresh Studios blog post.

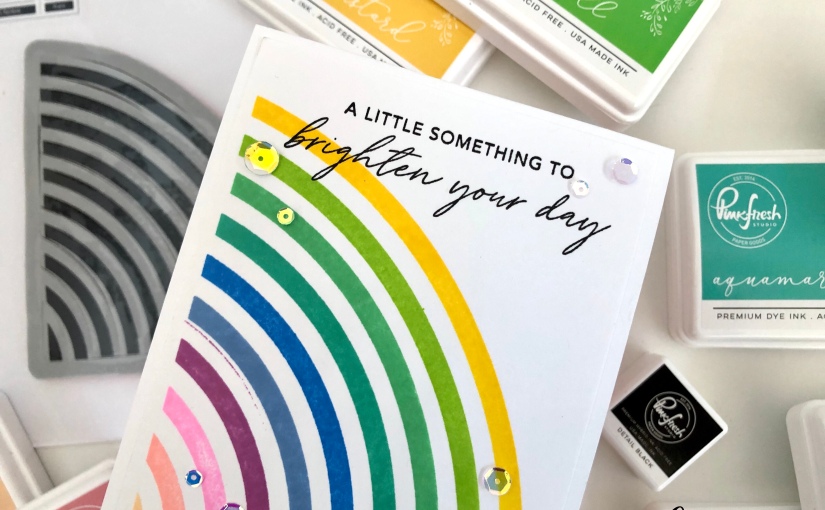
My first project is very outside of my comfort zone, as it has a lot of white space. I really struggle with white space, but one thing that helps is adding texture to it with diecuts or cover plates. That’s exactly what I have done here.

After colouring the Thankful For Friends stamp, I used the Blanket Stitched Rectangles Dies to not only add some texture around the card base, but also to cut out, and elevate a part of the card.

The card is finished off with a stacked Hello from the Scripted Greetings Dies set, and some gorgeous Metallic Pearls in Matte Silver!

Next up I played with the Foldable Shaker Tags die set. I’m not usually one to make tags but oh boy, this one I had a lot of fun with!! Using pattered paper from the Holiday Magic 12×12 paper pad, I got cutting. The four tags I made, I decorated with the Holiday Magic Ephemera pack , the colourful enamel dots and the chipboard frames.

It took barely any time at all and it was so much fun! I will definitely be making more tags with this fun set. Funnily enough though, I didn’t actually make a single shaker tag, but hey ho, you don’t have to if you don’t want to. You can also make two tags per diecut piece by cutting the tag along the crease line. It doesn’t have to have two pieces. So that’s a great time saver if you need to make loads of tags quickly.

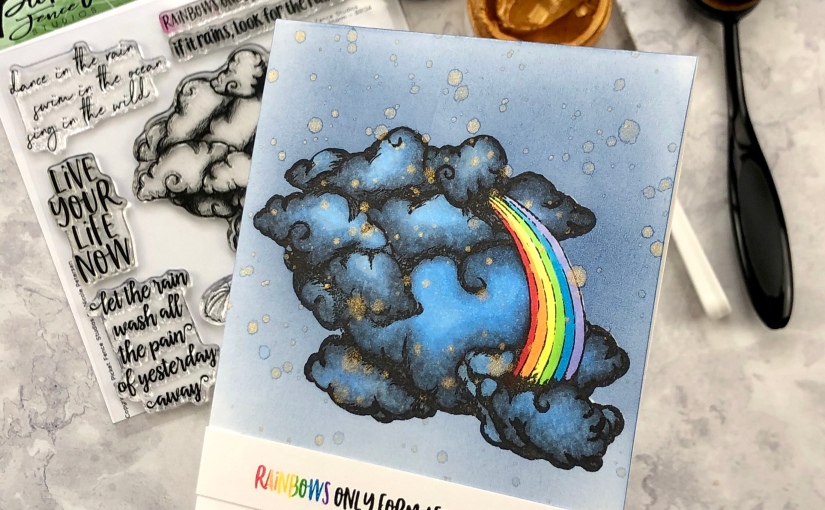
I have also used the tag another way, again not a shaker, but nonetheless very fun! After cutting out the tag with the diecut, I used the Abstract Triangle Hot Foil plate on it with Matte Gold foil.

I ink blended some Sparkling Rose ink on it over the Wintry Forest Stencils. Which is finally back in stock!! YAY!

It’s finished off with a sentiment from the Thrill Of Hope hot foil plate and the stamp set. A few Matte Gold Metallic Pearls were added, as well as a sparkly pink ribbon.

I won’t keep you for much longer, as it’s a blog hop after all, and there are prizes to win! By commenting on the Pinkfresh blog post, as well as their YouTube release video, you can win the ENTIRE RELEASE!!

You can also win one of TEN $25 gift cards to the Pinkfresh Studio shop by commenting on this post. Winners will be announced on the GIVEAWAY WINNER PAGE on Nov 30th. Make sure to check this page and get in touch within two weeks to claim your prize.

I have used compensated affiliate links in this post, at no extra cost to you, throughout this post. If you shop using these links you are actively contributing to a happy dance being performed by me, as all the earnings I get from these links go directly back into the running of the craft shenanigans here. Thank you from the bottom of my heart for the support!!

Lots of love and happy crafting from Erica

https://fresh.inlinkz.com/p/2c3c8e2dfb894c428e6f5718bfae74d5

You can find me on various social media platforms, by clicking the links below.
My blog
Instagram
My YouTube channel
CaCaCraft on Facebook

PinkFresh Studios Inks in The House!

Hello, hello!

The ink-oholic Erica here with a very colourful post! I have had the total delight of being sent the entire range of luscious big ink pads from PinkFresh Studios and I HAD to swatch them before doing anything else! Ok, so in all honesty, the first thing I did was dance around like a dizzy emu, whilst clapping like a demented seal and squealing like a happy pig rolling round in mud! Now, that’s a mental image for you, isn’t it?? LOL! Sufficient to say, I was A TAD excited.

Ok, so the swatches are not perfect but, as mentioned, I was a bit excited. And I was still excited while I was stamping them up. I mean, the idea is to see the colours, these are staying in my craft room so I’m not sending these to anyone.

The clever swatching die and stamps are from Waffle Flower. You can find the Swatch Tag Die, Color For Ink Pads and Combo Swatch stamps separate too. These were just perfect for these inks as they come in families of four shades of each colour. You can get the Big Ink Pad Bundle or if you don’t have a huge amount of space in your craft room, they also come in a handy little Mini Cubes Bundle.

For my swatches, I’ve used I cut out loads of tags out of Neenah Solar White #110 card stock, as I wanted the swatches to be sturdy. Using the Mini MISTI, I then stamped up the swatching bit with Detail Black ink from PinkFresh Studio.

The first colour family I did was the yellows: Lemon Whip, Sunshine, Sweet Mustard and Marigold. These also come in handy Mini Cubes, called Rise And Shine.

Next up we have the peachy family: Peach Fuzz, Apricot, Clementine and Persimmon. These also come in handy Mini Cubes, aptly named Indian Summer.

Oooh, these pinks and reds have me all gooey: Coral Reef, Passion Fruit, Berrylicious and Candy Apple. They also come in Mini Cubes, with the perfect name Heartbeat.

Pretty in all the shades of pink: Ballet Slipper, Sparkling Rose, Bubble Gum and Raspberry Bliss. These also come in Mini Cubes, with the magic name Fairy Dust!

The purples are stunning: Soft Lilac, Candy Violet, Lavender and Royal Kiss. Of course, these also come in Mini Cubes and I want you to read this with your very best French accent: Soul Of Provence.

As a blue kind of gal, I’m loving these: Slumber, Blue Jay, Sapphire and Stargazer. Mini Cubes are available as well, with the dreamy name Starry Nights.

I do love all shades of blue but these have me swooning: Sky Blue, Summer Shower, Seaside and Storm. These I could easily have in both big pads and Mini Cubes, Morning Sky, just because I love them.

These dreamy teals are to die for: Ocean Breeze, Aquamarine, Mermaid Cove and Tidal Pond. Of course these gems, called Island Oasis, come in Mini Cubes as well.

Ga-ga for green? No worries, these beauties have you covered: Mint, Meadow, Emerald City and Evergreen. Mini Cubes, too, of course, called Garden Stroll.

More of a spring green kind of person? Don’t feel left out, as these will surely give you your green fix: Fresh Pear, Grassy Knoll, Key Lime and Olive. Do KNOLL worry, these come in Mini Cubes too, Over The Hill.

Looking for natural neutrals? Warm Buff, Doe, Gathered Twigs and Espresso takes card of that. In Mini Cubes too, with the delicious name Wild Truffles.

No collection is complete without some steely greys, right? Misty Coast, Rocky Slope, Metropolis and Licorice cover all your bases. In big pads and Mini Cubes, naturally, with the funky name Urban Raincoat.

With all the swatches done, I added them to a ring binder to keep them all in one place. I have already consulted them to make a card, actually. Thanks to the swatches it was super easy to pick out some bright and happy colours for the Pop-Out Rainbow stamp.

With the help of the Mini MISTI, this card took less than 10 minutes to make. SO easy, and cheerful!

I finished it off with a sentiment from the Floral Notes stamp set, stamped up with Black Detail ink. That sentiment was just perfect for a rainbow card! And perhaps a sequin… or ten. Eh, I might have gone a little bit overboard but hey, it works.

Well, with that, I’m all done for today but I do have an unboxing (I bought a LOT of stuff) and ink swatching video over on my YouTube channel as well, if you want to see the swatching in action.

As I mentioned in the beginning of this post, PinkFresh very generously sent me the entire range of inks to play with but I purchased a huge amount of stuff from them as well. Including that adorable Pop-Out Rainbow stamp, which I have had my eye on for so long! I want to reassure you that I will only ever create with stuff I love and that inspires me. I don’t know about you, but I can’t work with stuff that I don’t like, it just dries up my mojo.

I have used some compensated affiliate links to (mostly) PinkFresh Studios in this post, for your convenience, at no extra cost to you whatsoever. Any earnings I get from these affiliate links go straight back into stamps… erm… (if The Man reads this, that was an auto-correct! I swear, baby!!) the running of my blog, YouTube channel and Instagram. Thank you so much if you choose to support me by using these links, I really appreciate the support and encouragement!

Lots of love and happy crafting from Erica

You can find me on various social media platforms if you want to see more of my work

My blog (that’s right here)

Instagram

My YouTube channel

CaCaCraft on Facebook

Almost At 10K on Instagram!

Hi guys and WOW! I can hardly believe it but I am getting so close to a MAJOR milestone on Instagram: 10 000 followers and that fabulous swipe up feature!

Another crafty friend, Norine, is also almost there and we have some lovely friends who wanted to celebrate/help us get there, so over on Instagram there is an Insta hop happening. With a giveaway too!

I started by making a green and also a rainbow background panel with the Artist Markers, by swiping the markers back and forth to blend them together. On top of the green one I adhered a panel cut out of white card stock with the Striped Leaf cover die.

This is one of the few progress photos I managed to remember to take. I just got on a roll after this and couldn’t stop it, but I did film it so there is a YouTube video up too.

Grabbing a whole stack of inks, including the Pocketful Of Sunshine, Cherry Blossom, Red Cosmos, Warm & Cozy, Summer Afternoons, and Rose Petal Ovals I got stamping! For the leaves I mixed Tropical Forest and Green Fields.

I have used three different stamp sets: Build-A-Flower Chrystantemum, Beautiful Day stamp set, which also comes in a bundle, and Hope stamp set. This also comes in a bundle.

The second background was done with the Layering Plaid B Cover Die on white card stock, and I kept all the bits in their places so the whole background is white, but textured.

Initially I had planned on mixing and matching the flowers and leaves, but I did actually end up keeping the cards mostly in the stamp family they came from. Which was a bit of a surprise, to be honest.

On the card with the BAF Chrysantemum flowers, I used leaves from the Hope stamp set. To get more depth, I did mix and match inks from the Tropical Forest and Green Fields ink bundles.

I finished this card off with Fairy Rocks Embellishments from Trinity Stamps, for some fun bling! The sentiment is from the Build-A-Flower Chrystantemum set.

The second card was done with the Beautiful Day flowers and leaves, and the sentiment was created with Thick and Thin Alpha. It’s been heat embossed with Rose Gold embossing powder. The sequins are from Studio Katia and are called Crystal Clear Fusion.

My third card was quite quick but it’s still very colourful and fun! I created a slimline rainbow background using the Artist Markers and then heat embossed lots of sentiments from Crafty Friends in white on it.

As this one was quite flat/one layered I felt it needed some texture with Black Eyed Baubles from Trinity Stamps. And again.. I did not hold back at all, lol!

Well, that’s it from me for today, but I hope you enjoyed this post and if you are not following me on Instagram, what are you even doing?? Just kidding, but seriously, that’s where most of my crafty action is happening.

There are compensated affiliate links in this post, as well as a few non-affiliated ones, for your convenience. If you shop using the affiliate links, I get a small commission from the company directly, at no extra cost to you. Anything I make from these go back into running my blog, YouTube and Instagram fresh and fun for you guys.

Lots of love and happy crafting from Erica

You can find me on various social media platforms if you want to see more of my work

My blog (that’s right here)

Instagram

My YouTube channel

CaCaCraft on Facebook

Picket Fence Studios October Release Is Here!

It’s the 14th and it’s time for another release from Picket Fence Studios! This month we are finally getting lots of dies again, yay! Nicole and Matt found another manufacturer to fulfil the orders so we have dies for this month AND some for stamps from previous releases too. As a non-fan of fussy-cutting, I am very pleased about this.

There are some fabu-LEAVES 🍁 🍃 🍂 stand-alone dies in this release: Maple Leaves, Oak Leaves and Ash Leaves. I have, of course, used them all. In my stash of PhDs (Projects half Done) I found a couple of sheets of water colour paper I had done ink smooshing on. With a stroke of luck, the colours were autumnal!

I did my usual thing and cut out loads of them, and then worried about what to do with them later, lol! With these, I decided to simply add them to card bases to create backgrounds. Almost like patterned paper, only with lots of texture. Because I cut out so many, I had enough for three.

One I kept really simple and added an already made word die cut that says ‘I miss you‘. Sometimes simple is all you need.

On the next I added only Oak Leaves to, and then a tray of takeaway coffee cups from the Sponsored By Coffee stamp set. These are coloured in with Copics and also had a little bit of patterned paper paper-pieced on them to add colour.

To finish this one off, I used a sentiment from the stamp set, stamped up with Ground Espresso Distress Oxide ink. There is a coordinating diecut for the Sponsored By Coffee set too!

The final card was done with just Ash Leaves diecuts. These I layered up in rows onto a card base, picked them up with Press’n’Seal, added glue to the back and adhered to the card base again.

A few gold splatters, using a little bit of Golden Rose Paper Glaze mixed with water, added a lovely touch. The final piece was to add a sentiment. I didn’t want to cover up the leaves too much so I stamped ‘We have been thinking of you‘ on a piece of white card stock, with Black Hybrid ink. This was trimmed down to a skinny banner and adhered to the bottom row of leaves.

This month we also have a new Slim Line Rainbow stencil and if we know one thing about me, it’s that I do love a rainbow!

I used it in two different ways, and got some fab results! The first one was done with Moonstone Glimmer Paste from Tonic, over an ink blended background piece. It is a sparkly-licious combo!

On this card, I used another Sponsored By Coffee image. This one is coloured with Copics too, and cut out using the coordinating diecut.

Here I used the second sentiment in the stamp set, again stamped up with Ground Espresso Distress Oxide ink. I masked off the coffee bit on the sentiment and used the Coffee word die instead.

The second background was done right after the first one, and I didn’t clean off the Glitter Gel before, in the hopes of getting some of it onto my panel. This time the stencil was adhered, with the help of Pixie Spray, to water colour paper. Using clean water and a paint brush, I got the paper a bit wet before adding shimmery water colours to it.

The shimmery water colour I use is actually Ink On 3 Atelier Ink re-inkers with Liquid Pixie Dust mixed in. In a little 6-piece water colour palette I have these ready mixed and they just need a little spritz of water before use, and they are good to go. By adding the Liquid Pixie Dust into the colour, you get the most amazing shimmer!

When the background was all coloured in, I left it to dry with the stencil in place. This will help keep the actual pattern clear and the colours where you want them. The next day I peeled off the stencil and it was colourful, shimmery and sparkly!

To finish off this card I heat embossed lots of sentiments from Crafty Mail, in Gold Rich embossing powder from WOW! I trimmed these down and adhered quite a few to the background. With that, this card was done and so am I for today!

I have used compensated affiliate links in this post, mostly to Picket Fence Studios. I do receive the products free as part of my design team commitments, but I only do use what I love (and quite frankly, I love most stuff from PFS) as my mojo goes on walkabout when I try forcing myself to work with stuff that does not inspire me. These affiliate links do not cost you anything extra at all, but the company they are linked to might pay me a small commission as a thank you for directing you to them, IF you shop using these links. Thank you so much if you chose to support me this way, I really appreciate it a lot.

Thanks for stopping by, lots of love and happy crafting from Erica

World Card Making Day part 1!

Hi guys!
You read that right, this is only Part 1 of 2 today. This first one is part of the WOW! Embossing blog hop to celebrate World Card Making Day! You should have come here from the talented Verity, and the next stop of the hop is my sweet friend Daniel!


Comment along each of the Design Team member’s post for a chance to win a $25 gift card to either our UK or USA stores.(One comment per blog please.) You have until Wednesday, October 7th at 11:59PM British Summertime to leave your comments. Winners will be announced on Thursday, October 8th.

I do love me some heat embossing, that’s no secret! Card making as well. This hobby is so good for the soul and the creativity. The wallet, on the other hand, is in the corner crying most days, lol!

For this card I have used a couple of new to me stamps from Pink Fresh Studios, two of the new trios, Toteally Amazing and Summer Scoops, of embossing glitters and some matching ink colours.

With my trusted MISTI on hand, this was a breeze to make, even with all the different puzzle pieces of this stamp. This is the brilliant Pop-Out Nested Diamond and my idea was to basically use a different ink and glitter powder combination on each section.

I paired up Glided with Tattered Rose, Lemon Sorbet with Squeezed Lemonade, Orangeade with Carved Pumpkin, Razzleberry with Picked Raspberry, The Real Teal with Salty Ocean and Iced Teal with Peacock Feathers. Each colour is first stamped with the coloured ink, then with the Embossing Pad and finally sprinkled with the matching Embossing glitter. I heated the glitters with my Heat Tool from underneath to keep as much of the glitter on as possible.

Once the entire panel was done, I used a stitched rectangle die to trim it down to 5.5″x4.25″ and this I adhered to a card base. To finish off the card I also stamped up the big You and a sentiment from the Simply Sentiments-You stamp set. Both are done in black ink and I also heat embossed the You in clear embossing powder to make it pop a bit more.

It was quick work getting those two bits adhered to the card, after I fussy cut the You out, and with that the card was done! I made a video for this card too, and you can find that on my YouTube channel.

With that, I’m all done and it’s time for you to hop along the rest of the fabulous hop.

Thank you for stopping by, lots of love and happy crafting from Erica

The full line up of the hop is below. Make sure to leave comments on as many stops as possible to increase your chance of winning a $25 gift card to the WOW! shop.

WOW!

Tenia

Jenny

Karen

Amber

Jo

Jaine

Verity

Erica <——–You are here!

Daniel <———Next stop!

Dunja

Ashlee

Ericka

Rikka

History of Card Making Day: Cards have played an important role in social circles for hundreds of years, playing a role as a thoughtful gift all the way to a necessary part of proper etiquette. Consider, if you will, the calling card of the Victorian era, a term that has become so ubiquitous that the signature element of a bomb-maker or a criminal is said to be their ‘calling card’.

A small piece of paper bearing one’s name and often a decoration of some kind, the calling card (Also known as a visiting card) was presented to the servants of a household that it might be delivered to the masters of the house to announce visitors.

It was this era of propriety that also developed the concept of a dance card, a card specifically carried by women to fill out with the names of the men they intended to dance with that evening. After all, with so many interested parties it just made sense to keep track of them so that you could, in earnest, indicate that your dance card was full and thus politely decline an interested suitor.

Calling Cards, Dance Cards, Business Cards, Greeting Cards, RSVP Cards, there are a million and more types of cards and could there be anything more exciting than learning to make your own? Card Making Day encourages you to do just that.

You can find me on various social media platforms if you want to see more of my work

My blog (that’s right here)

Instagram

My YouTube channel

CaCaCraft on Facebook

Some products used are linked with compensated affiliate links in this post, the rest of them are purely for your convenience should you like to buy some of them for yourself. And why shouldn’t you treat yourself??

You Say Witch Like It’s A Bad Thing! | STAMPtember 2019

Hi guys!

Today’s card is made with one of the Simon Says Stamp STAMPtember set from last year, If The Hat Fits, combined with their Spider Web Background stamp. I’m not much into Halloween and scary stuff, that’s just not my jam at all. Making Halloween cards, however, I for some reason, love making!

I started out by stamping up two of the hats on Neenah card stock with Black Hybrid ink from Picket Fence Studios, as this is Copic friendly.

I used quite a few of the Cool Grey Copics to colour in the hat, but still getting some highlights and contrast to it. Both hats were done in the same colours and the accessories were done in “witchy” colours.

Thankfully for me, as I’m not a fan of fussy cutting, there are coordinating diecuts for this set too, and I used them to cut out the hats.

The background is the Spider Web Background stamp, heatembossed in Opaque Bright White on Eggplant card stock from Concord & 9th. For some reason, despite using an anti-static tool on the card stock first, there was a lot of stray powder all over it and it felt too fiddly to try cleaning that up. The effect was sort of a dusty spiderweb, which actually worked out pretty cool.

To make it look a bit spookier, and also to draw the eye in, I ink blended some Black Soot with a Life Changing Blender Brush around the edges. Doing this works really well with coloured card stock, if you want to add a more dimensional look to your background.

That little piece of acetate with the PostIt tape is a clever little tool I use to keep my fingers off my project, both to avoid finger prints on my ink blending and smudging the ink. It’s super inexpensive and works a treat. After doing the ink blending, I splattered some gold water colour on it and set that aside to dry.

I also heat embossed one of the funny sentiments, from If The Hat Fits, in white on black card stock. This piece I cut out with the Stitched Circle dies, and did another one in white card stock, in the next size up.

To finish off the card I adhered all these bits and pieces to the background with Lawn Fawn glue tube. For an extra pop, I added some Glossy Accents to the green ribbon hat and to the buckle and the moon, on the other hat.

The last finishing touch were some matte black and iridescent black sequins, which I adhered with more Glossy Accents.

With that, I’m all done! I hope you found some inspiration where with me today. If you did, I’d be ever so grateful if you would use the compensated affiliate links provided in this blog post. Using these do not cost you anything extra at all, the company the links are affiliate to, pay me a small commission directly as a thank you for directing you to them. These earnings, however small, help keep my little blog, YouTube channel and Instagram feed fun and fresh for you, so thank you if you use them! It means a lot to me.

Lots of love and happy crafting from Erica

You can find me on various social media platforms if you want to see more of my work

My blog (that’s right here)

Instagram

My YouTube channel

CaCaCraft on Facebook

MFT Stamps Sketch Challenge 501

Hi!

Today’s post is based on this week’s MFT Stamps Sketch Challenge #501 and I’ve not done one of these for a while, so I thought why not?

I really wanted to use the cute dragons from the BB Magical Dragons set. With that in mind, I stamped them up on Copic friendly card stock with the PFS Black Hybrid ink, set it with my WOW! heat tool and got to work with Copics. My first dragon was done in what I picture to be a natural colour for dragons: green!

My second dragon was done in more teal-like colours, maybe she’s a girl dragon? The tummies, horns, wings and back scales on both of them were done in lighter, but still matching colours.

There were two fire bursts stamped up too, so I did these in flame colours. Deep reds with some fiery yellow. I’m so glad this set comes with coordinating Dienamics as fussy cutting is not my jam.

The background I did with the Mini Cloud stencil, one of my favourite stencils ever. I wanted a really soft look, so I didn’t add any more ink to my Life Changing Blender Brushes, just used the blues left on them. It turned out fab!

One of my newest purchases is Sparkle Spray by Nuvo Tonic Studios, and I wanted to add some sparkle to the background with this. Buuuuut… I went a little overboard, which left the background COVERED in the sparkle spray. This one is Morning Fog, and wow! I think I will be adding a few more to my arsenal.

To finish off the card, I stamped up a couple of the sentiments from the BB Magical Dragons set with Black Hybrid ink. Then I adhered the dragons and the fire bursts with Lawn Fawn liquid glue, added a little bit of Wink Of Stella to the wings and horns, and with that, the card was done! I was originally only going to add one of the fire bursts but as I went overboard with the Sparkle Spray, and it kind of looked like ash in the air after the dragon had gone to town breathing fire, I added both.

Thanks so much for stopping by today, I hope you enjoyed this card and found some inspiration here with me. I have used some compensated affiliate links in this post, at no extra cost to you. If you shop via these links I get a small commission from the company directly. Any earnings I get from these go directly back into the running of my blog, YouTube and Instagram so thank you so much for supporting me by using these. I really appreciate it a lot!

Lots of love and happy crafting from Erica

You can find me on various social media platforms if you want to see more of my work

My blog (that’s right here)

Instagram

My YouTube channel

CaCaCraft on Facebook

Concord & 9th Feature Friday: Color Focus!

Hi guys!

Today’s post is another Concord & 9th Feature Friday, and this week we all had to pick two colours each to focus on. My two picks were Ballet Slipper and Cranberry. Which might come as a surprise given how much I’ve been loving my teal and aqua colour combos recently, but I really do love these two colours.

The Ballet Slipper pink is such a soft, romantic colour and for my project for it, I decided to go for a CAS look. Lots of white space and some gold splatters were the perfect accompaniment to keep the actual pink in focus. I used the Lace Leaf stamp and coordinating diecut and started out by stamping the shadowy bit with Ballet Slipper directly onto a white card base.

Slightly off-centre from this, I stamped the Lace Leaf. First with Ballet Slipper, and then on top of that, once more with the Embossing Pad from WOW! Embossing. I used Clear Gloss embossing powder to make the Leaf image stand out a little bit more but still keep the pink in focus.

I used the ‘Grateful’ word die, that is part of the Lace Leaf coordinating diecuts, and cut it out of white card stock four times. The top layer is cut out of a piece that had the shadowy bit of the stamp stamped up with Ballet Slipper on it. This is a fun way to make your word die a little more interesting.

To finish off the sentiment, I also heat embossed ‘for you’, from the stamp set in the bottom right corner. This is done in gold embossing powder. One last finishing touch was to splatter some water colour gold all over the background, and with that the card is done!

For my Cranberry project I have used both ink pad and cardstock, as well as my beloved Tall Type Alphabet dies and Coffee Blend Turnabout stamp.

First, I stamped up the Coffee Blend Turnabout stamp on a panel of Cranberry card stock, with Cranberry Ink! It looks so freaking fabulous with that perfect tone-on-tone colour. The MISTI and the Turnabout Jig makes turning so easy.

Using more Cranberry cardstock, I cut out the letters needed to spell out ‘I love you’ with the Tall Type Alphabet dies.

I also cut them out three times out of white card stock and layered these up with Lawn Fawn liquid glue adhesive. The O in the middle of ‘love’ is the heart from the die set.

The letters I placed on the card, using more liquid glue but it needed a little something else. It wasn’t quite right. The solution was to make the sentiment say ‘I love you more than coffee’, so I stamped up the ‘more than coffee’ from the Coffee Blend Turnabout stamp, on white card stock with Cranberry ink. Trimmed that down a little and adhered it to the ‘you’ part.

It still needed a little something else. At least I felt like it did. I mean, I am the queen of over-doing it so maybe not? However, I did add Glossy Accents to the coffee beans on the background and also to the heart diecut on the card.

Well, that’s it from me for today but don’t forget to check out all the other guest designers to see what colours they chose and what they came up with! As always, I have used compensated affiliate links in this blog post, most are to Concord & 9th. If you shop using these links, I get a small commission directly from the company, at no extra cost to you whatsoever. Thank you if you support me by shopping with these links. I really appreciate it!

Lots of love and happy crafting from Erica

Concord & 9th Feature Friday: Favorite Paper or Ink Technique

Hello, hello and happy Friday!

Today’s blog post is another instalment in the Concord & 9th Feature Friday series. This week we were challenged to show cards made using our favourite paper/cardstock or ink techniques. As most of you know by now, I do love me a colourful background. Yes, Siree, I do!

Ink blending is anther favourite of mine but for this post I am going to stick to mainly the card stock background one. To start with, I cut strips of the coloured cardstock into two different widths. Why not, eh, while you have your paper trimmer out??

The skinny cardstock strips, 0.6cm/0.25inches, I fanned out. To keep the pieces in place, I used PostIt tape, but low tack washi will work too. Add a little bit of adhesive to each strip, and add to a card base. I did put mine under my MISTI for a bit to make sure it dried flat and all the pieces adhered to the card base. Once the glue is dry, trim off the excess with sharp scissors.

Using the wider cardstock strips, these are about 1,25cm/0.5inches, I separated them into 2 piles based on colours that would work well together. These were then adhered to a card base each, and the excess trimmed off. If you use a lot of coloured card stock you can get a HUGE card stock bundle, with 12 sheets of each colour. If you prefer to try a small selection, get the Assorted Cardstock bundle, where you get 2 sheets of each. Then you can buy bigger single packs of the colours you end up using a lot.

The card with the skinny strips was finished with a simple sentiment from Hey Bestie, cut out with the coordinating diecut. The stamp is done with a mix of inks to create that marbled look. I used Buttercup, Sprout, Parsley and Aqua Sky. Of course I had to, HAD TO, add a generous sprinkle of sequins.

I love the simplicity of this card and the colourful background is my fave out of the three.

The next one I tackled was the darker one of the two backgrounds, and I used the gorgeous Swirls die on it to give it some texture. For the sentiment, I kept it simple again and stamped up ‘Hey Bestie, I love how we just get each other’ in Dove on white card stock. This is cut out using the small hexagon die in the Hexagon Label dies set. These two come in a Hey Bestie bundle too.

I did add some black and silver thread behind the sentiment, which is popped up with some foam tape, and that was it. Oh, and I did poke out all the little holes from the die, rather than keep them in. I like the little white polka dots added to the background.

The final card has a sentiment, and little details, added to it from the Crafty Turnabout stamp and coordinating die set. This, of course, also comes as a Crafty Bundle, if you know you want both.

All the crafty details are cut out of the coloured cardstock , except for the blades of the scissors and the painbrush binder, which is silver glitter card stock. The sentiment is stamped up with Mushroom and the COLOR bit is done with a colour each: Sprout, Oceanside, Midnight, Honeysuckle and Cranberry.

The sentiment block, the scissors and the paintbrush are popped up with foam tape and the rest of the details are adhered with Lawn Fawn glue tube adhesive. A little bit of white Posca pen were the last little details on this one.

I love that sentiment, and it’s so perfect for us crafty people, isn’t it? A handmade card in the mail is like a ray of sunshine on a rainy day.

Right, as mentioned in the beginning, I do also LOVE ink blending. It’s my jam! The first time I tried ink blending with these inks, I did not get very good results… BUUUUUT, I realised I had used the wrong kind of paper. So naturally, I tried again, and ooooh, what a difference!

This is Strathmore Bristol Smooth, and I got not very good results on Strathmore Bristol Vellum. The packaging looks very similar but there is a BIG difference in the paper. The Smooth, is in fact, very smooth and the ink just glides on it. On the Vellum kind, I got a blotchy result and not very vivid colours. So take an extra minute to check the paper you are buying is the right kind, it will make a world of a difference!

The inks I used are Sea Glass, Aqua Sky and Oceanside and they are ink blended using Life Changing Blender Brushes from Picket Fence Studios. I also added a little bit of gold splatter on it, because why not, eh? This is one of my other favourite things to do: Ink blending and adding texture by either splattering water or metallic water colours on top. I loved this combo so much, I made several backgrounds with them.

Okey-dokey, that’s it from me for today! I hope you found a ton of inspiration here and will try some of these techniques for yourself, if you haven’t already done so.

Lots of love and happy crafting from Erica

Compensated affiliate links are used throughout this post, as always they do not cost you anything extra at all if you shop through these links. Any earnings I get from these go straight back into the running of my blog, YouTube and instagram to keep the content fun and fresh for you. Thank you so much in advance if you choose to support me by using these links. I really appreciate it!

You can find me on various social media platforms if you want to see more of my work

My blog (that’s right here)

Instagram

My YouTube channel

CaCaCraft on Facebook

Picket Fence Studios June Release!

Hello, hello!

It’s the 14th, which means a new release is available from Picket Fence Studios! You can find the entire release HERE if you can’t wait to see what awesomeness is now for sale in the shop.

I have two cards to show you today, both made with the After The Storm stamp set. Both are coloured with Copic markers, but in true Erica style, both are different. I started out by stamping up the images I wanted to use with Hybrid Black Ink, and then I set it a little by using my WOW! Heat tool on it.

I wanted to make the clouds dark, ominous and look like they were ready to unleash some thunder on my first card. This look was achieved by mixing Cool Greys and some blues, as can be seen on my little tester piece above. I also have a video for this over on my YouTube channel if you want to see it more in-depth.

Once the clouds were done, I used some rainbow colours to colour in the… erm… rainbow. Like, duh. Of course I used rainbow colours! What else?? The markers I used can be seen in the photo above.

To match the rainbow on the image, I wanted to add colour to the word ‘rainbow’ in the sentiment too. With the help of my Mini MISTI, some PostIt Tape and the Atelier Inks from Ink On 3 this was a breeze!

From left to right: Marilyn Red, Marigold Orange, Bee Sting Yellow, Goddess Green, Peacock Blue and My Jam Purple. In other words, the exact colour order as the rainbow itself. Pretty neat little details, right?

To add more drama to the card, I cut out a mask and placed over the image, then I ink blended some leftover Chipped Sapphire ink onto the background. The ink that was left on my brush from another project, was just enough to add some depth. I didn’t need to get the ink pad out again. Cool, huh?

Because I’m addicted to shimmery things, I had to add some gold splatters to the card too. This I did by mixing up some Golden Rose Paper Glaze with water and splattering over the background. I removed the mask first though, as I wanted the gold all over.

This works so well! Paper Glaze really is such a versatile product! The last thing I needed to do was add the sentiment strip and the card was done.

Time to move on to card no2!

For this card I used Cool Greys again, but started with C5. On card no1 I used C7 as the darkest colour. I also created lots of texture on the clouds on this one by dabbing C00 LOTS all over the finished coloured clouds.

This rainbow got more depth and detail added to it, but using two shades of each colour. I also used the same ones, and a few extra, for the umbrella. The wellies in the image I did in a dark teal as I have a pair in that colour.

The bench was coloured in with browns, and I added a little bit of a shadow under it too. Because the sentiment was already stamped up, once the colouring was done, the card was done.

Easy peasy! I’m getting better at leaving white space and not feeling the need to fill in every single little gap with colour. Which one is your favourite? I must admin that I do love the gold sparkle on the first one and the dramatic clouds, but I like the colours used on the second one too.

Well, that’s it from me for today, but I will be back tomorrow with more cards and inspiration! If you can’t wait to shop the new release, I’d be so grateful if you would consider using the compensated affiliate links provided in this blog post. They do not cost you anything extra at all, if you do use them, the company it’s affiliated with, Picket Fence Studios for the most part in this blog post, pays me a commission directly. Anything I make from these, go directly into the running of my blog, YouTube channel and Instagram fresh and fun for you.

Thanks again for stopping by! Lots of love and happy crafting from Erica

You can find me on various social media platforms if you want to see more of my work

My blog (that’s right here)

Instagram

My YouTube channel

CaCaCraft on Facebook