Boo!
Welcome back to CaCaCraft and Happy Halloween to those who celebrate! Here in Poland it’s called All Hallows Eve and is all about honouring your dead. They do this by lighting up the cemeteries with candles on every single grave and apparently it’s quite the sight so I am going to go by our local one tonight to have a look. I must admit that I am not a big fan of Halloween and scary stuff in general, I’m more of a rom-com, pink fluffy clouds and unicorns gal myself. Many years ago, I was mentally scarred by watching IT and the first Resident Evil movie. I still haven’t quite recovered! Zombies are a big no-no for me, and so are clowns. *shudders in horror and looks over shoulder to make sure there aren’t any here*
Ghosts on the other hand I find quite fascinating, I like the idea of our loved ones having a connection to the living world after they pass on. Evil, scary ones not so much (still a scaredy-cat over here!) but the ones who want to make sure we know they are ok in the after-life, yes.
Oh and cute ones like the ones in My Favorite Things stamp set Fab-BOO-lous Friends are definitely a big fat yes! I tried these stamps at a friend of mine’s house during our last crafty day together before moving away from Denmark and I fell in love on the spot. I got home and ordered my own right away! Sadly I don’t have the coordinating dies for them but that I am hoping will be rectified soon. Christmas IS coming up, right?? (If The Man reads this, please check wishlist for wifey)
This little ghost I coloured using Copic markers, C1, C2 and Colorless Blender. I used both the C markers all over the ghost and then dotted my Colorless Blender all over it to make him speckled sort of. Kind of like his “ghost clothes” were dirty? If that makes sense…? It was also very difficult to photograph it well enough to actually show you properly but here ya go:

For my background I got some dark grey card stock out, this time I used Lawn Fawn Storm Cloud. If I had had a spider web stencil on hand I would have used that but since I don’t (memo to self: find one and add to wishlist) I decided to try out a new stencil I got from Neat & Tangled called Landscape Duo Stencils. Sure, sure, not very Halloween-y but I thought I’d add some Distress Oxide ink blending on it in Halloween type colours. I started with Iced Spruce and then shifted the stencil around before adding Wilted Violet.

Initially I had planned on using some Black Soot too but decided against that in the end. When I do ink blending I use an old, very scratched up, Big Shot cutting plate. It’s sturdy enough to keep the project flat but is too scratched to use as a cutting plate anymore. It leaves too many marks on the paper I cut and I don’t like that but this way I’m not wasting it. Clever, huh? Craft waste is almost up there with food waste in my book.
After I was done with the ink blending I thought it would look nice with some white spatters on it. Instead of using plain white water colours for this, I went with ‘White Gold’ from the Gansai Tambi Starry Colors I’m quite messy when I splatter and I try to remember to cover up anything I don’t want splattered (my iPad keyboard is very shimmery thanks to forgetting this one time)

And whilst this felt like a solid idea, I should have waited until AFTER I stamped my sentiment ‘You’ve been BOOED!’ from the stamp set Booed also from Neat and Tangled. The shimmery white is showing through in some places and the sentiment doesn’t look as solid as I would have liked, even after adding clear embossing powder over it. I used that Black Soot Distress Oxide I got out earlier and stamped it twice using my MINI MISTI (which really is the most incredible stamping tool invented, ever) but still the shimmer showed through so lesson learnt, I guess. Shimmer after, not before stamping sentiments. Again, not the best photo but hopefully you get the picture.

My background panel I cut out using a lovely scalloped die from Winnie & Walter, it’s part of a set called Essentials: Noelle’s cutaways. I adhered it with double sided sticky foam sheet, trimmed to size, to a card base made with Lawn Fawn Black Licorice card stock. I thought it needed a little something else and sequins didn’t quite feel Halloween to me so instead I added some cute little spider webs that I cut out using the coordinating Booed die from Neat & Tangled. I trimmed the cutouts a little to make them fit my card and then added in a little bit of extra spiderweb too.
The little ghost was adhered with a bit of foam tape to raise him up and make him look like he’s floating/hoovering, because that’s what ghosts do. And with that, the card was done.
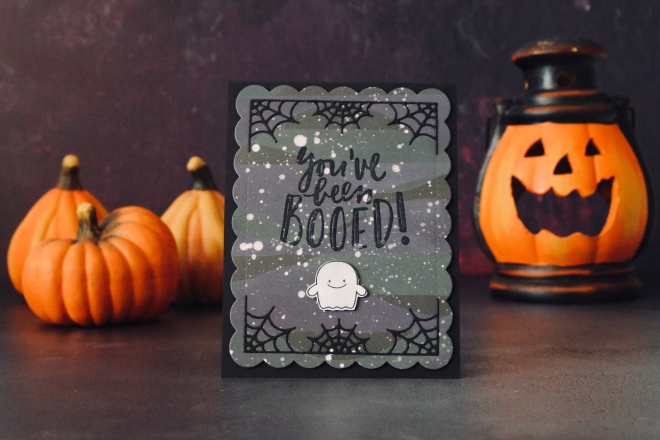
Now, just because I could and it’s very fun, I played around with some filters and stuff. The photo above has a filter on it called ‘Dramatic’ which I thought was both apropos as I have been known to be a biiiiiiit of a drama queen at times and it added a dramatic flair to the photo. The one below has one called ‘Noir’ added to it and whoa, THAT added some drama for sure! I know the actual card doesn’t show up very well but it’s rather scary looking with that pumpkin stalking it in the background. My scary-levels are probably pretty low compared to most people though.

Almost everything I have used for this card I’ve posted links to for easy shopping, in case you need one or five of them (#enableralert) but I don’t have any affiliate links or anything, this is just to make things easier for you to find what I have used. Just in case… I might have mentioned that Christmas is coming soon?
Take care and see you all soon!

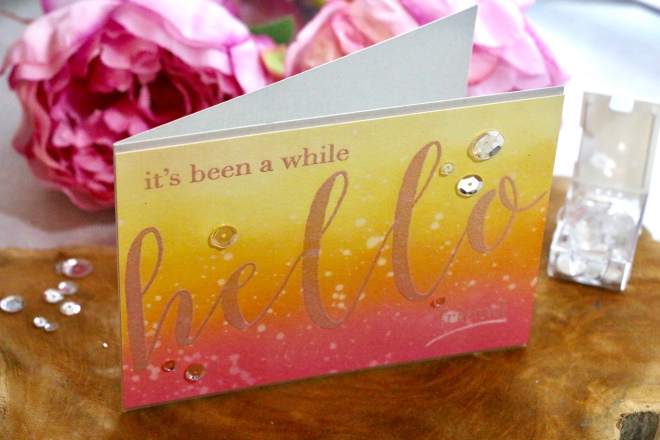
 Now, this is a heavily coffee inspired mood board so you’d think it’s right up my alley considering what a coffee addict/snob I am. Funnily enough, I just saw the soft colours like yellows and pinks… nuts, isn’t it? Well, the month isn’t over, I might actually make another card using this mood board.