

Hello, hello!
It’s the 14th, which seems to come along faster and faster once we pass July. Or is that just me? Well, time travel or not, it is release day from Picket Fence Studios and this month it’s all about the slim line stencils AND our new design team members! We are celebrating with a blog hop to introduce them and this month’s release in on fell swoop.

A blog hop wouldn’t be complete without a giveaway, and there are TWO $50 gift vouchers to the Picket Fence Studios shop up for grabs! All you have to do is leave a comment, and the more stops you leave comments on, the better your chance to win! Winners will be announced on the Picket Fence Studios blog on Monday the 21st. The full blog hop lineup is below:
YOUR NEXT STOP——-> Ilina Crouse
I do have a video on my YouTube channel showing the stencils and these finished backgrounds. You can find that VIDEO HERE.
There are five slim line stencils and I did my usual thing where I started playing, and then couldn’t stop! I had so many ideas to try out and some worked better than others, and in the end I had thirteen backgrounds! I’ve used a generous amount of Pixie Spray on all of the stencils to ensure crisp, clean lines.

The ones I am probably the least happy with are these two, below. I tried different ways to use the Slim Line Radial Stencil. On one I did a grey copic background first, then ink blended some Distress Oxides over it with the stencil. It didn’t work as well as I hoped but gave a grungy, dark look which will work well for Halloween cards as the stencil could be seen as spider web. Inks used for both are Mermaid Lagoon, Hickory Smoke and Black Soot.

On the second one I used the left over ink on my Life Changing Blender Brushes to create a less spooky look, by using a white card base. If you stop back in tomorrow, I will show you what I did with these backgrounds. Even though I wasn’t overly happy with them, I made them work!
Another way I used the Slim Line Radial Stencil was to make a sunset/lava heat look, by only using yellows, oranges and red Distress Oxide inks. I started with Squeezed Lemonade in the middle, next was Wild Honey, Carved Pumpkin, Abandoned Coral and Barn Door. It’s so easy getting the smooth coverage and blending with the Life Changing Blender Brushes.

After lifting the stencil off the first project, I spritzed it with water and placed another panel on top to create a soft water colour look with the leftover ink.
Then, of course, I had to do a rainbow colour wheel. Because why not, right?? This Radial Stencil was just begging to be colourful. I used a couple of sheets of acetate and PostIt Tape to mask off the areas I didn’t want to get ink on. Using Distress Oxide inks again, I used from 12 o’clock and clock wise: Squeezed Lemonade, Wild Honey, Carved Pumpkin, Abandoned Coral, Barn Door, Picked Raspberry, Wilted Violet, Chipped Sapphire, Salty Ocean, Peacock Feathers, Mowed Lawn and Twisted Citron.

I also used two of the new Paper Glaze colours with this stencil! The colours used for both these are Artemisia Silver and Boysenberry Violet. One is done on white card stock and the other one on Black Satin card stock from Tonic. One of my bottles of Pixie Spray was running out and it ended up coming out very thick, which strangely ended up looking like thick spiderweb on the stencils. That made the Paper Glaze go a bit messy in certain spots.

Next up was the Slim Line Leaf Stencil! I used Twisted Citron and Mowed Lawn on both these, but in different ways. To create the shine, I used Texture Paste Gloss from Ranger.

On the first one, I ink blended the inks on the whole panel, the used the Leaf stencil and added the paste, to create a shiny pattern.

On the second one, I mixed the Paste with the inks to colour it, and then used that on a white piece of card stock. This would also look fab using the green Paper Glazes.

The Slim Line Floral Stencil is so dramatic and I really wanted to channel that drama, so I used the same Black Satin card stock from Tonic and Boysenberry Violet Paper Glaze. It looks FANTASTIC!!

Next up, we have Slim Line Broken Fence Stencil. With this one, I used a pre-ink blended background I made a little while ago. Inks used are Mowed Lawn, Twisted Citron, Squeezed Lemonade, Wild Honey, Abandoned Coral, Picked Raspberry, Wilted Violet, Salty Ocean and Peacock Feathers. OF COURSE it’s done with Life Changing Blender Brushes.

After cutting down a panel, the same size as the stencil, I used Black Pansy, Artemesia Silver and Snowdrop White on top of the stencil and blended the colours from black to white, with the silver in the middle.

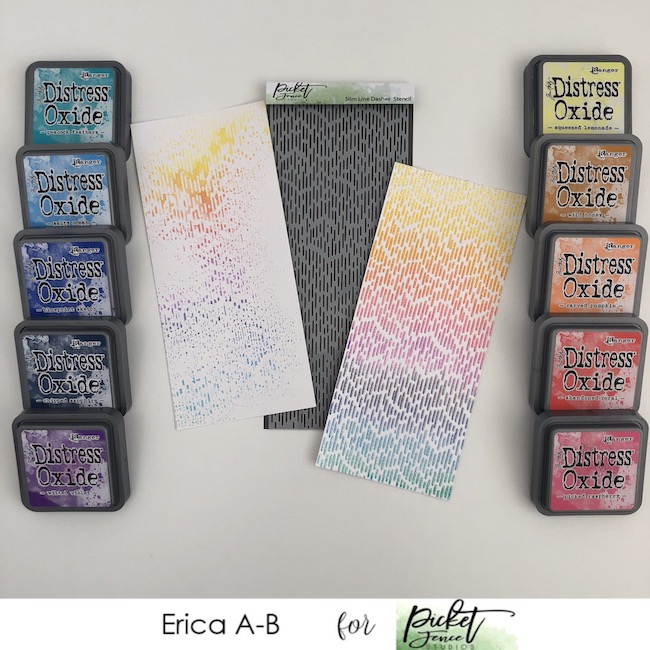
Last, but certainly not least, the Slim Line Dashes Stencil! With this stencil, I did a similar thing to the red Radial backgrounds. I ink blended on one panel first (with the colours in the photo, look above for links) then removed that before I spritzed the stencil with water and placed another panel on top to pick up the leftover ink.
We do have another rainbow, surprise, surprise! However, to take this up a notch, I placed the Dashes stencil back over the pattern, after the spritzing, and added Iridescent Glitz Glitter Gel from Gina K on top! It came out sparkly like a unicorn fart!!

So, whilst I haven’t actually finished any cards with these, I wanted to show the many, MANY possibilities with these stencils. A stencil really is a smart investment as you can do so many different techniques with them!
That’s it from me for today, I hope you enjoyed this very colourful post and found some inspiration here, and along the rest of the blog hop. If you did, and consider treating yourself to a few little things, I would be so grateful if you’d use my compensated affiliate links, in this post. They do not cost you any extra at all, and the company it’s affiliated with will give me a small commission as a thank you for directing you to them.
Lots of love and happy crafting from Erica
You can find me on various social media platforms if you want to see more of my work
My blog (that’s right here)

I love your different effects with the stencils and look forward to seeing your cards.
LikeLiked by 1 person
So excited to see all the new slim line items!
LikeLiked by 1 person
Beautiful cards and card starts! I’m very excited for the stencils. I just made my first slimline and I’m addicted!! Thank you!
LikeLiked by 1 person
All beautiful, but especially like the first one, colors perfect. Loved florals & leaf too. Others are fantastic, but other 3 stole my heart!
LikeLiked by 1 person
Erica – these are all fantastic! I love your creativity!!!!!
LikeLiked by 1 person
Great job of showcasing the new stencils. I had wanted 1 now I think you have expanding my list. 🙂 Gail T.
LikeLiked by 1 person
Love these especially the radiating one!
LikeLiked by 1 person
Love how you have played with those stencils – I have the urge to play with colours!
LikeLiked by 1 person
Love that you used the glaze over the stencil. The rainbow colors with the black are fantastic!
LikeLiked by 1 person
Thank you for the “tutorials” you shared! Great idea and love the looks you created for us.
LikeLiked by 1 person
Wonderful card inspiration using this fun release!
LikeLiked by 1 person
They are so awesome!
LikeLiked by 1 person
Fabulous cards!
LikeLiked by 1 person
Thanks for sharing the different techniques you can do with a stencil.
LikeLiked by 1 person
These are all amazing!
LikeLiked by 1 person
Loving all of these pretty backgrounds! Great color combos! Awesome stencil designs!
LikeLiked by 1 person
I totally agree, stencils are a brilliant investment and I love all the different colours and techniques you did with yours Erica.. The panels are stunning, and I’ve no doubt the final cards will be too!
LikeLiked by 1 person
I like the showing of the color differences. The black and purple is my favorite.
LikeLiked by 1 person
Gorgeous cards!
You were really busy creating!
Thanks for the inspiration.
LikeLiked by 1 person
I love how you played with these stencils and created all these wonderful card based.
LikeLiked by 1 person
Thanks for all the information about how you created these cards. Love your use of stencils.
LikeLiked by 1 person
Thanks for sharing your play time with us, and what you felt worked or didn’t work! My favorites of your masterpieces are the radial stencil on the black satin cardstock, the radial stencil kissed onto the white cardstock, and the paper glaze over the floral stencil on the black satin cardstock. I think I’m going to be getting some of that cardstock and paper glaze.
LikeLiked by 1 person
WOW just WOW! That dashes slimline stencil is super intriguing, I really love that effect, yup it’s my favorite, but there are so many to choose fro !
LikeLiked by 1 person
Thanks for sharing all of your backgrounds. I definitely got some inspiration and ideas to try, or not try.
LikeLiked by 1 person
Fabulous cards using slimline stencils! The first long stencils I’ve seen. Brilliant!
LikeLiked by 1 person