#MERAKIBLOOMS Release! It’s blooming marvellous!

Hi and welcome to a blooming big blog post. Pun intended. It’s probably not going to be that long, but I couldn’t resist the word play. It’s release day from Crafty Meraki and it’s a bloom… ok, ok, once is enough, lol. It’s a layering stencil with coordinating diecuts, and stand-alone hot foil plates release. I have had so much fun with this and have some clear faves, it has to be said.

My first favourite is the gorgeous Damask Layering Stencils. Oh, it’s just so lovely!! I have two cards to show you, and I’d love to hear which one is your favourite out of the two. I think I know which mine is but what do you think?

I used Pinkfresh inks for both of the cards, but different colour combinations. The coordinating Damask diecut makes it a breeze to cut these out, and layer up for that delicious dimension. Laura Bassen isn’t wrong when she says dimension is life!

For the backgrounds I have used the Diamond Dazzle hot foil plate. It QUICKLY went straight to the top spot out of all the new hot foil plates. For the yellow card I used Champagne foil, and for the pastel card I used Rainbow foil.

Both of the floral clusters have some gold splatters on them too, for that extra sparkle and panache! I also used sentiments for both of them from the Good Vibes stamp set. They are heat embossed in gold on slim banners to let the flowers shine and take centre stage. Although that hot foiling is rather dazzling, isn’t it?

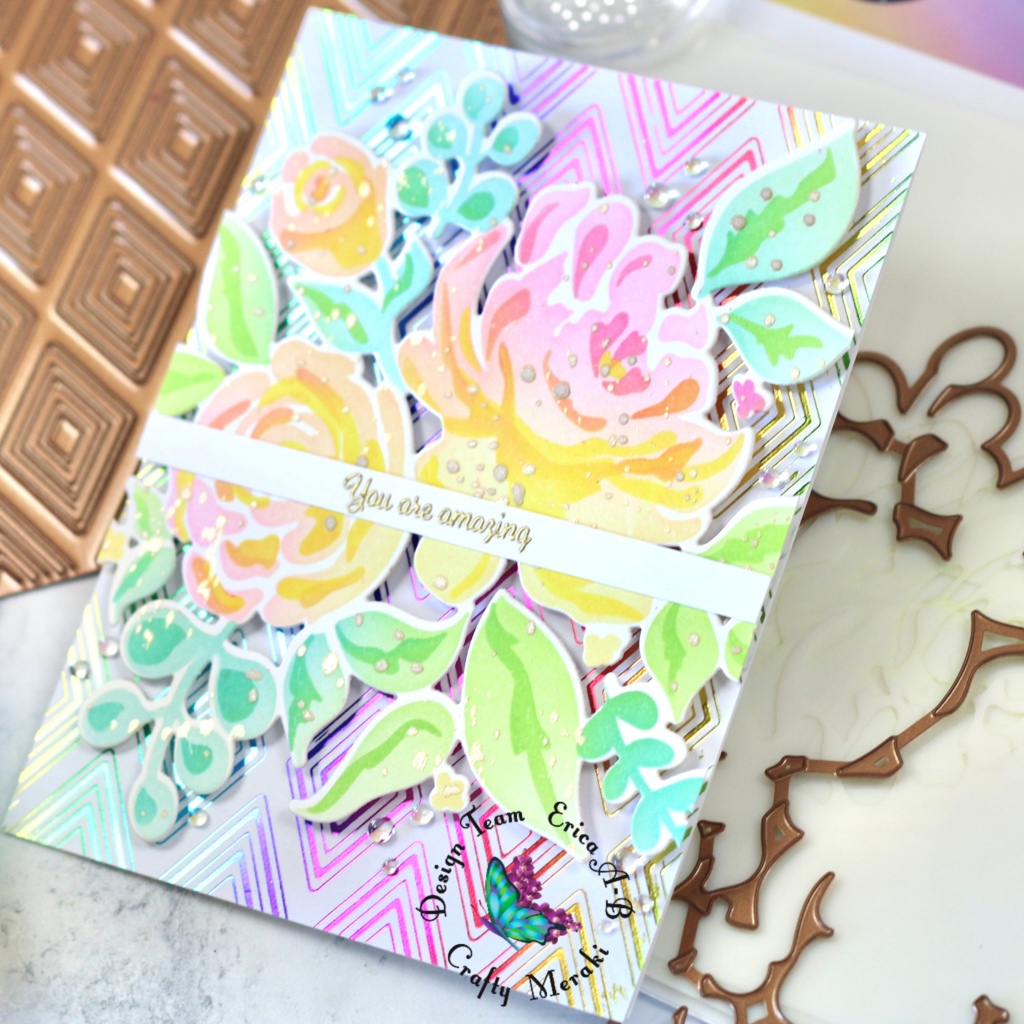
There is a video coming for these two on the Crafty Meraki YouTube channel tomorrow, if you want to see the card making in action!

Next up we have more Diamond Dazzle hot foiling, this time Lavender Petal foil on matte black card stock. It looks STUNNING! If I may say so myself.

Here I have done some ink blending with Distress Oxides on the Lavender Whimsy layering stencil set, which is not my go to ink for ink blending layering stencils but I figured I’d give it a go. This set also has a coordinating diecut!

I’m not exaggerating when I saw the Diamond Dazzle hot foil plate is my favourite. I used it for a fourth card too! Yes, I did! This time with Champagne foil on the matte black card stock. It looks incredible and is such a classic combination!

On this card I have added a Protea Paradise flower, and this time I went back to my trusted Pinkfresh inks. The pinks really make it pop! The Protea Paradise coordinating diecut makes it a breeze to cut out, and I’m so thankful for the coordinating diecuts as I do not have the patience or the skills to fussy cut and make it look good.

Next up it was time so move on to something different from the Diamond Dazzle, no matter how much I love it. Some other product needs some love too, right?

If you like butterflies you will have some fab products to chose from in this release. There is the Timeless Elegance hot foil plate, which I actually had some design input into too! That’s pretty special and exciting. Here I have foiled it with Speckled Aura foil, which you can find in this 4 Roll Variety Pack, you also get Moondust, Prism and Fuchsia Flower in this set.

There are also two butterfly layering diecut sets to chose from, the Emperor Wings layering dies, as seen above and the Luna Layering Dies, as seen below.

On this card I have also used the Blooming Halo layering stencils and the coordinating diecut. I went for pastels for this card, and it’s again all Pinkfresh inks. I also used the Parisienne A2 cover plate to add texture to the whole shebang.

Finally I have a card with the Loopy Hearts hot foil plate. I made this one a shaker card but cutting out a heart shape out of the Rainbow foiled panel, and then filling it with the limited edition Dew Drops gems. Because it wasn’t sparkly enough as it was, lol!!

The sentiment and the heart diecut are both from the Affluent Heart hot foil and diecut set.

The Limited Edition Dew Drops are drop dead gorgeous, and are the only bling I have used on these cards. As the name suggests, these are only available while stocks lasts so if you want them, I’d highly recommend you get them sooner rather than later. You can also take 10% off your Crafty Meraki order with the code ERICA10 at checkout. It’s not a one time code, you can use it again and again too.

That’s it from me for today, but I hope you have enjoyed this post and seen something you like. I have linked all the products used to the Crafty Meraki shop, with compensated affiliate links at ZERO extra cost to you. This is how I earn a little bit of money to help with the cost of running a blog and all the crafting shenanigans. Thank you so much for your support! Also, don’t forget the discount code too! 10% off means 10% more goodies.

Lots of love and happy crafting from Erica

Alex Syberia Design YouTube hop, giveaway and LOTS of cards!

Hi and welcome back!

This is a quick post to let you know I’m still here celebrating the Sunkissed Memories release from Alex Syberia Design, this time with a YouTube hop!

I used the lovely Chrysanthemum stamp and coordinating diecut for these cards, and I used lots of beautiful inks from Pinkfresh to create these big blooms. I did learn a very messy lesson with one of my ink pads too. My fingers are still stained, lol!

There is a giveaway over on YouTube too, as well as Instagram, AND a blog hop! There are so many prizes to be won, and you have until June 18th to enter. Winners will be announced on the Alex Syberia blog on June 19th.

Products used in the video, listed below, with compensated affiliate links at no extra cost to you. Thank you for supporting me by shopping with these links!

Alex Syberia Design
For You word diecut
Chrysanthemum stamp
Chrysanthemum diecut
Sunrays stencil
Fancy Cover Die

Pinkfresh Studio
Lemon Whip
Sunshine
Sweet Mustard
Marigold
Fresh Pear
Grassy Knoll
Key Lime
Olive
Ballet Slipper
Sparkling Rose
Bubble Gum
Raspberry Bliss
Coral Reef
Passion Fruit
Berrylicious
Candy Apple
Peach Fuzz
Apricot
Clementine
Persimmon

The Rabbit Hole Design
2 pack Blender Brushes

Concord & 9th shop
Matte Gold Foil Paper

Hero Arts shop
Compact Cutter
Compact Cutter plates set of 3

Thank you so much for stopping by today!
Lots of love and happy crafting from Erica

Alex Syberia Designs “Sunkissed Memories” June Release Blog Hop and Giveaway

Hi and welcome back to my blog!

Today I’m so excited to be hopping along with Alex Syberia Designs for their Sunkissed Memories collection! The next stop on the hop is Hannelie Bester, and if you came here from Emelie Hessler you are on the right track. You can find the whole line up plus all the details on the Alex Syberia release blog post.

It wouldn’t be a celebration without a giveaway, now would it? This one does not disappoint either!

Alex Syberia Designs is giving away two £15 gift cards to the ASD store and one full release bundle, valued at Â£400 ($495) in total. Alex Syberia Designs will pick the three winners from the comments left on each designer’s blog post in this hop before midnight BST on June 18th 2023. The winners will be announced on the ASD Release Blog Hop post on June 19th 2023.

Now for my cards. I was immediately drawn to the Tulips Treasure set, and I got stuck on those. I have made six cards, so far, all using the same lovely set. There are four products for this set: a 6″x8″ stamp , coordinating diecuts, hot foil plates and layering stencils.

First off I got my Glimmer Hot Foil system out, as well as Champagne and Matte Gold foils. I *might* (read definitely) went a bit crazy and made loads and loads of them. With all of these ready, I grabbed lots of inks from Concord & 9th to add colour to them using the layering stencils.

I used lots of pinks, and greens for this first flower. Once the ink blending was done, I used the coordinating diecut to cut it out.

The background is also done with the greens, and on top of this I splattered some gold watercolour. I love the detail this adds, and I do this often.

The second card is done with the same colours, but the tulip bunch image this time. This background is again done with greens, but I added details with the Seaside Swirls stencil as well as gold watercolour AND Black Soot Distress Oxide spray splatters.

The sentiments for both cards are the same one, from the Tulip Treasure stamp set. One is done with Inkon3 Blackout Detail ink and one is done with Dragonfruit ink, from Concord & 9th. These were then cut out with the coordinating diecut, as well as stacked for dimension.

The foil is so hard to photograph, but I hope you get the gist of how shiny and lovely this is.

My other cards are done by stamping the single stem tulip image, from the Tulip Treasure set, with black ink, and then ink blended with an array of colours from Concord & 9th.

Each one of these was finished off with a different sentiment from the Tulip Treasure stamp set, stamped directly on top of the image.

On this card I have used Nectar, Grapefruit and Sorbet for the petals, and Lemongrass, Avocado and Artichoke for the leaves and stem.

I have also used a few different embellishments from Crafty Meraki and Pinkfresh Studio, to make sure that each card was unique. The above card has Ebony Opal Gems from Crafty Meraki. These are some of my favorites!

The below card is using the same colours, as the above one, but instead of Artichoke ink, I used Parsley for the stem.

On this card I used a different sentiment, and Metallic Pearls Matte Gold embellishments from Pinkfresh Studio.

The third card was done with pinks, again from Concord & 9th. Pink Lemonade, Sweet Pea and Dragonfruit for the petals, and Sprout (for the first two layers) and Parsley (for the final layer) for the leaves and stem.

This one was also finished off with Ebony Opal Gems from Crafty Meraki. The shiny black of these embellishments is stunning.

All three of these cards are mounted on white card bases, after being trimmed down a little bit.

My last card (and a gold star to you if you are still hanging in here!) is heat embossed with Opaque Bright White embossing powder from WOW! Embossing, after being ink blended with the same pinks as the above card. I did add a bit of Lemongrass on the stem layer for this one, to make it slightly different from the first pink card.

I ink blended this one day, and let dry overnight, before I heat embossed the outline image the following day. While I had my heat tool out, I also heat embossed sentiments from the Sunkissed Memories stamp set in Rich Gold embossing powder, and cut these out with the coordinating diecuts.

I also splattered this card with gold watercolour as well as added some Magenta Glitter Drops from Pinkfresh Studio.

I also have a YouTube video for these cards, you can find it over on my YouTube channel, or click the thumbnail below.

That’s it from me for today, I hope you have enjoyed this post and that you will enjoy the rest of the hop! I have used some compensated affiliate link in this post, at no extra cost to you. Thank you so much for the support if you shop using these links, I really appreciate it!

Lots of love and happy crafting from Erica

Hero Arts Summer Catalog Release blog hop with the Global Team!

Hi and welcome back to another Hero Arts Summer Catalog Release blog hop! This time I’m hopping with the Global Team and I am also again hot foiling and diecutting letters. Can we all say one-trick-pony??

In fairness, I have actually gotten two cards out of one piece of foil, as I also used the negative foil with the Solid Hot Foil Plate from Pinkfresh Studio. That thing is freaking genius!

The hot foil plate I used is the Large Circle Confetti one, and I adore it! Dots of any kind are versatile, I think. I have now made four cards with this plate, and I am not stopping.

For these I used Spellbinders Rainbow foil, on Matte Gold Foil paper from Concord & 9th, and the negative foil was also done on the same paper. It looks absolutely FABULOUS, but oh man… foiling is so hard to photograph!!

The first card was finished off by spelling out ‘let’s celebrate’ with letters cut out with the Luggage Lowercase Alpha dies. I naturally could not make it easier for myself here, by going for a solid black card stock. Oh no. I HAD to use black glitter card stock from the Basic Glitter pack.

For the second card I went a little smaller on the sentiment, but used the Luggage Lowercase Alpha dies again, to spell out ‘friend’.

The sentiment strips are from the Encouragement Sentiment stamp, and cut out with the coordinating diecut. Super simple, but effective.

My other two cards are also two-for-one with the same hot foil plate, only in black, white and gold, which is a timeless classic colour combo. This foil is the Speckled Aura, and it’s absolutely amazing.

For these I used an older Stamp & Cut set, which I love! This is Happy Thanks Stamp & Cut XL, and it’s so versatile.

I love stacking the diecut words to create some dimension. On these I have also dabbed some embossing ink and sprinkled Rich Gold embossing powder, for a bit of extra sparkle!

All the extra sentiments are heat embossed in Rich Gold too, to keep it cohesive.

I’m not going to keep you any longer, and the next stop on the hop is my friend in real life, Karen Boyce! Don’t forget leave a comment here before hopping along though, as Hero Arts is giving away a $50 gift card to a lucky winner! That winner will be drawn from the comments left on the stops, before June 4th, and announced on the Hero Arts blog!

Lots of love and happy crafting from Erica

PS I have used some compensated affiliate links in this post, which means that if you shop using these links, I get a small commission from the company it’s linked to as a thank you for directing you to them. This never, ever increases your cost, ever, but the income I get from this helps pay for blog hosting and all that boring stuff that goes into the behind-the-scenes stuff. Thank you for the support, I really appreciate it!

PSS Don’t forget that there is another Stamp-Along coming soon, and it’s on mixed media with a great lineup of teachers!!

Hero Arts Summer Catalog Blog Hop

Hi and welcome back to my neglected little blog!

Today I am delighted to take part of the Hero Arts Summer Catalog release blog hop, showing off some of the yummy new release goodies. You can find the whole catalog HERE.

As mentioned, this is a blog hop and you should have come here from my dear friend Daniel West and the next stop is the ever so fabulous Jaycee Gaspar. You can also find the entire lineup over on the Hero Arts blog post.

There is also a fabulous giveaway to celebrate the release. Hero Arts will be giving away two $50 gift cards, drawn from the comments left along the hop. Comment on all the blogs for more chances to win! You have until Sunday, May 28 at 11:59pm to enter. The winners will be announced on the Hero Arts blog soon after.

Right, so I have made a few cards with the goodies I got, and let’s get to those right now. My first card was made with the lovely Peony Hot Foil Plate, and I foiled it with Matte Gold which looks stunning.

I added a little bit of colour by ink blending a little bit of Taffy and Key Lime Fizz Reactive Inks, with a lot of masking and puzzling. The ink blending I left quite soft.

I framed this by diecutting the biggest part of the Journaling Photo Frame Infinity Dies, and stacked two of these for a bit of depth. I also finished the card off with the Together Stamp & Cut, by diecutting the Together word and stacked that four times. On white card stock I stamped ‘is the perfect place to be‘ with Black Intense-ified Ink and trimmed it down.

For my second card I also used the Journalling Photo Frame Infinity Dies, but a smaller size. I made a little shadow box of sorts, and created a rainbow by cutting out strips of card stock with the Weaving Fancy Die and ink blending them with Reactive Inks.

I used Lemon Drop, Creamsicle, Taffy, Thistle, Splash, Pool Party and Key Lime Fizz and a bunch of ink blending tools. I have one for each colour, to avoid colour contamination.

The photo frame I stacked four times, with the rainbow in-between layers, and then backed this with some white glitter card stock, from the Glitter Paper Basics pack.

While I had that pack out, I used the black one too, with the Luggage Lowercase Alphabet dies to cut out lots and lots of letters.

I have mixed two different stamp sets for this card, plus the letters to say ‘hey, life is tough, but you’re tougher. We can do anything’ as I made this for a friend going through a tough time right now. The ‘we can do anything’ is from the Together Stamp & Cut set, and the ‘life is tough, but you’re tougher’ is from the Encouragement Sentiment Stamp Set, and cut out with the Sentiment Strips Fancy Dies.

This panel was adhered to a card base, as it was only 5.25″x4″ sized, to give that lovely framed look. As it wasn’t framed enough, lol!

So I had all those extra letters and I couldn’t let them go to waste. These I used on a background I made with the Stacked Circle Stencil and more of the Reactive Inks. It came out super fun, and I splattered some gold watercolour on top for a shimmery fun.

The letters I had leftover from the previous card, I used on this to spell ‘you are fabulous’. I also used the Encouragement Sentiment stamp set, and let me tell you something about this set. It’s a one and done stamp set, you get ALL of the sentiments stamped in one go. If you get the Sentiment Strips Fancy Die, you can also cut ALL of these sentiments out in one go! *mind blown*

I picked a sentiment that worked with the diecut sentiment and boom, the card was done. The thing that took the longest was probably glueing down the letters and making sure they got on straight. It’s nerve-wracking and oh boy, I was sweating!

That’s it for today, but I really hope you enjoyed this post and found some inspiration here with me. I have linked all the products I have used for these with affiliate links, which NEVER cost you anything extra ever. If you shop using these links, I get a small commission directly from Hero Arts, as a thank you for directing you to them. This is the way I earn a little income, and this goes directly back into the behind-the-scenes stuff like web hosting, VPN, equipment and all the extra bits and bobs that goes into card making, filming and editing content. Thank you so much for supporting me by shopping my affiliate link, I really appreciate it more than I can ever express!

Lots of love and happy crafting from Erica

Alex Syberia Designs “Time To Choose Magic” April Release Blog Hop and Giveaway

Hello, hello!!

Today I’m super excited to be hopping along with Alex Syberia Designs to celebrate the April ‘Time to Choose Magic’ Release! It’s a really good one and I have some fun projects to share with you, but first I wanted to make sure I covered the amazing giveaway that is part of the release celebrations!

Alex Syberia Designs is giving away the full release bundle, valued at £397 ($493) in total, to one very lucky winner! The winner will be announced on the ASD Release Blog Hop post on May 1st.

Alex Syberia Designs will pick the winner to receive the prize from the comments left on each designer’s blog on the blog hop list below, so the more you hop and comment, the better your chances of winning this amazing and awesome prize!

Blog Hop Order:
Alex Syberia Designs
Jennifer McGuire
Laura Bassen
Alberto
Ashlee
Bobbi
Brenda
Caly Person
Cheryl
Emelie
Erica <—— YOU ARE HERE!
Jessica Frost <—–NEXT STOP!
Lidya
Lien Leysen
Mindy Eggen
Natalia
Nicoletta
Rachel Alvarado
Raquel
Sandi Maciver
Sylvie

Right, with all that out of the way, let’s focus on my projects, shall we? I went straight for the Quirky Rainbow diecut set, and cut the arches out of lots of gorgeous Concord & 9th coloured card stock.

The rainbows were then adhered to the card base directly, and without mixing the colours up, to create a fun textured patterned paper. I finished it off with a black and white Large Hello word diecut on top, and that’s it!

The next card also has the Quirky Rainbow diecut set and the Large Hello diecut set, but with a sparkly twist. The rainbows are cut out of an ink blended panel, that I heat embossed with WOW! Embossing Halo. It makes the prettiest glitter card stock ever!

The background is made by dry-embossing the Glowing Geometry Hot Foil plate, and then I adhered the glittery rainbow and the hello to it. Super simple, yet it packs a punch!

For these two cards I used two small diecut sets as the main focus, yet they are certainly not boring. Plus they are fun to make too!

Making use of ALL THE CARD STOCK SCRAPS, because craft waste is right up there with food waste, I cut out about 3 million little hearts. It took many, many episodes of my latest guilty Netflix pleasure.

These I then glued down, one by one, onto a white card base. That also took absolutely ages, but I had a vision and was NOT disappointed by the results!!

As I didn’t want to cover up that fab background too much, I kept it really simple when it came to finishing the card. I cut out ‘HEY YOU’ using the Foxtrot Alphabet, in Dove C&9 coloured card stock. The only thing I wish I had not done is add the white strip behind the letters. I thought it might help them stand out, but I’m not sure I like it.

I did adhere the letters wonkily, to give it a whimsical look, and again, I think it would have looked better without the white strip behind it. However, I wasn’t about to try removing it. Pretty sure it would have ripped the hearts off too and I couldn’t bring myself to risk that.

I also made a YouTube video and you can find that RIGHT HERE, or click on the thumbnail below.

That’s it from me for today, but don’t forget to check out the rest of the hop and on Saturday there will be an Instagram hop with even more inspiration!!

Lots of love and happy crafting from Erica

Pinkfresh March Challenge card | Layers!!

Today’s card is an entry to the monthly challenge hosted by Pinkfresh Studio. The theme for this month is layers and I do love me some layers!! I have mixed and matched some of my fave products, to add colour and texture to this card.

The flower is created with the Blooming Peonies layering stencils, and I skipped using the coordinating outline stamp, to keep the look soft.

The colours I chose are not the ones from the inspiration board. I went for coral pinks and teals, with a touch of yellow, instead. Coral Reef, Passion Fruit and Berrylicious, plus a bit of Sweet Mustard for the middle of the flower and Aquamarine and Tidal Pond for the leaves.

This panel was then diecut with the Simply Diamonds cover plate. This is one of my most loved and most used cover plates from Pinkfresh.

I find it so versatile and lovely, and I reach for it time and time again. After diecutting the panel, I put a piece of Press’n’Seal on top to keep all the pieces in place to make sure that they all stayed where they are supposed to be. Lots of foam tape was added to the cutouts, and none to the frame part.

The effect is really fun as it is, but I took it a step further by adding a frame of vellum to the card as well. This softened the lower part of the pattern, adding another depth to the layers.

To finish off the card I used the Nested Circles Hot Foil and coordinating diecuts to add a sparkly circle to help frame the big bloom. The foil is Speckled Prism and it’s amazing! I also used a pre-foiled and stacked Sentiment Suite Happy Birthday, this one is foiled in Moondust.

The last touch was adding a few Glitter Drops. I was toying with the idea of adding Aqua ones but decided to go with Champagne instead. It was a tough choice though, because the Aqua are so gorgeous.

Well, that’s my card finished! If you want to join in the challenge too, check out the Pinkfresh Studio Monthly Challenge for all the details, deadline and where you can link up your projects!

Thank you for stopping by today, I hope you have enjoyed this post and if you want to see a reel of it, check out my Instagram page.

You can click on the links in this post and it will take you to the products I have used, and if you shop by clicking on them, I get a small commission from the company directly at no extra cost to you! Thank you for shopping with my affiliate links!

Lots of love and happy crafting from Erica

Hero Arts Global Team Spring Catalog Blog Hop!

Hi everyone!

Today I’m hopping along with the Hero Arts Global Team to celebrate the Spring Catalog release! I have combined the February My Monthly Hero kit with some of the goodies from previous releases, as well as some of the Spring Catalog goodies.

I did make a video too, and it’s a loooooong one as I ended up with seven cards! I’m hoping to have that up as soon as possible, if you don’t want to miss it, make sure to subscribe to my YouTube channel and click on the bell button to get notifications when I upload new videos.

We’ll be giving away a $50 gift card. drawn from the comments left along the hop. Comment on all the blogs for more chances to win! You have until Sunday, February 26 at 11:59pm to enter. The winners will be announced on the Hero Arts blog.

My first card is made with the components of the classic My Monthly Hero kit. The classic kit, at the time of writing this post is still available. The premium, seen on the right, is unfortunately already sold out. If you don’t want to miss out on any of the kits, make sure to SUBSCRIBE, as once the kits are sold out, they are gone.

MY MONTHLY HERO PREMIUM KIT INCLUDES (Premium elements in bold):

  • Clear Stamp Set, 3″ x 4″
  • Butterfly Window Fancy Die
  • 9 Butterfly Fancy Dies with 9 Frame Cuts
  • 4 Color Layering Stencils, 5.25″ x 6.5″
  • Butterfly Garden Palette Reactive Ink Pad
  • Small Ink Blending Brush
  • 4 Sheets of Butterfly Hero Transfers, 6″ x 8″
  • Fuchsia & Gold Luster Duo Spray
  • 1 Sheet each of Stardream Coral, Azalea, Lagoon, and Amethyst, 5.5″ x 8.5″
  • 2 Sheets each of Iris and Mustard Cardstock, 5.5″ x 8.5″

I’ve ink blended the colours from the ink pad, fabulously named Butterfly Garden Palette Reactive Ink Pad (which will hopefully be available to buy separately at some point) over the layering stencils. It takes some finessing to not mix the colours on your brush, but just take your time and go slow. Also, the Small blender brush make this easier. I used my Medium ones, and it was a bit tricky, I’m not going to lie.

On the second stencil I ink blended Licorice in a light hand, to add details to the butterflies. When I had done all four layers, I used the Butterfly Window Fancy Die to cut it out.

I trimmed down on of the sheets of Stardream Coral card stock that come in the kit to a 5.5″x4.25″. This I prepped with the Cottontail Embossing Tool as I wanted to heat emboss the Happy Birthday, from the kit stamp set, in white. With the cut out panel as a guide for sentiment placement, I stamped it with my WOW embossing pad and then used Opaque Bright White embossing powder on top. After setting this with my heat tool, I layered this panel and the diecut panel on top of each other.

A few of the butterflies have been opened up to create a 3D effect. I also added a few little jewels to finish it off.

My second card is super simple! The background is heat embossed, also in Opaque Bright White, only this is with the Fluttering Butterflies Bold Print stamp. The original sized MISTI is a must for me when I do the bold prints.

On top of this I have splattered a little bit of gold, rather than colour in the butterflies. I didn’t want to to over the top with colour… *I swear it really is Erica typing this*… as I had a bright idea for the sentiment.

When I first opened the ink pad I wanted to try the colours, as you do. I simply dabbed it onto a piece of card stock and it looked so fab I had to use it for something! This is where the fun Amazing Fancy Die comes in, as it was pretty much the perfect size for the ink swatch.

I also used a sentiment from the coordinating stamp set, on a slim banner, to make it say ‘Just a little note to say you are amazing’. The shadow part of the diecut is layered up four times to create dimension, and then I added a few jewels to this one too.

The subtle white on white background is lovely as until you look closer, it’s not overly obvious that there is more to this card than you first think.

I will definitely use this background again, and next time I will colour it! Once I get the neon water colours I will go full on Lisa Frank wannabe with this background, LOL! How luscious do they look???

From left to right we have Neon Bright Green, Neon Bright Chartreuse, Neon Bright Yellow, Neon Bright Sunshine, Neon Bright Orange, Neon Bright Red, Neon Bright Pink and Neon Bright Purple.

 *ADD TO CART* Amiright, or amiright??

Ok, that’s it from me for today but don’t forget to check out the rest of the hop!
The amazing Global Team will for sure knock your socks off, it’s such a bunch of talented and kind people. Don’t forget that the more you hop and comment, the bigger your chance of winning that $50 gift card!
Hero Arts
Anna Mahtani
Arjita Singh
Erica (that’s me)
Jen Kray
Karen Boyce
Lisa Tilson
Lounon
Michelle Lupton

As always, I have used some compensated affiliate links in this post, at absolutely NO EXTRA cost to you. If you shop using these links, I will get a small commission from the company directly. Thank you so much if you shop using my links, I really appreciate the support and encouragement I get from these.

Lots of love and happy crafting from Erica

Hero Arts Global Team blog hop and giveaway!!

Hi and welcome back to my blog!

Today is a special day! The 2023 Hero Arts Global Team is being announced and I’m super happy to be part of it, with some of my real-life friends on there too!! It’s very exciting.

Giveaway: We will giveaway a $50 gift card to the Hero Arts website, drawn from among all the comments left across the blog hop. Please comment by Sunday, February 5 at 11:59pm PT.

As this is a hop you can find links to all the team members right here
Hero Arts
Anna
Arjita
Erica (That’s me)
Karen
Jen
Lisa
Michelle
Lounon

Now that all that exciting stuff is out of the way, I’m going to show a few cards I made with this month’s My Monthly Hero kit and the add-ons.

You might already have seen some of these cards, as I shared a photo of all four in my blog post taking part in the release blog hop.

Here you will be able to see some close-ups of the other two cards, and the first one has so much white space I nearly had to sit down!

White space is something I really struggle with, but it makes it slightly easier doing white-on-white with a cover plate, like the Heart Flourish Cover Plate.

Sentiment wise I have used some of the gorgeous stamps from the You’re Mine Bundle, with their coordinating diecuts! I did add the double heart and lips, cut out of Cherry card stock. On top of these I added a little bit of Crystal Clear Lacquer Pen for a glossy finish.

For my final card I have hot foiled the Hearts Hot Foil background with Matte Gold foil on white card stock. This I trimmed down a little and adhered to a panel cut out of Peony card stock, so that the pink would create a little frame.

I created three heart shaped balloons using some of the dies from the main kit. These are cut out of Azalea card stock, and it’s a STUNNING colour! The sentiment is again from the You’re Mine Bundle, with the sentiments stamped up on white card stock with Licorice ink and the diecut out.

Well, that’s it from me for today but I really hope you have enjoyed this post and the hop! Don’t forget to leave a comment on this post, and the rest of the stops, by Feb 5th. The winner of the $50 Hero Arts gift card will be announced soon after!

Thank you so much for stopping by! If you click on any of the links in this post, and buy a little something-something for yourself, I might get a small commission from Hero Arts as a thank you for directing you to them. I say ‘might’ as it’s technology and it hates me…

Lots of love and happy crafting from Erica

#MERAKIHUGS Crafty Meraki New Release, video hop and giveaway!!

Hi and welcome back to my blog!

I’m popping in today to let you know there is a YouTube hop going on to celebrate the first Crafty Meraki release of 2023!

There is a bunch of adorable new products in this release, and I have had a lot of fun with them. If you want to skip to the new release, you can CHECK THEM OUT HERE.

If you want to skip directly to the video hop, and I don’t blame you if you do, you can FIND MY VIDEO HERE. There is a very generous giveaway over there too, there are TWO $100 gift card to the Crafty Meraki up for grabs for TWO WINNERS! Yes, that’s right, there are two! You can find the instructions on how to enter and when winners will be announced in the description box below the video.

In my video I have used the super fun Capture My Heart 3D diecut, and made a whole load of boxes with it. I had to make a rainbow of them, in fact. I do have some tips and trick on how to make the boxes in my video, so make sure you check it out.

To create these I have used coloured cardstock from both Concord & 9th and Lawn Fawn, the full list of colours are listed in the description box below my YouTube video.

I have also used the Diamond In The Rough hot foil plate, with lots of different foils, including Black, Matte Gold, Speckled Aura and Lavender Petal, as well as using the Solid Hot Foil Plate to foil the negatives. It’s kind of addictive once you get started with foiling. I have the Spellbinders Glimmer Hot Foil system, which works great with my Platinum 6 diecutting machine.

One of the things I really like doing is mixing new and old products, to show how well they work together.

For this first card I have used two negative foiled panels to make a card. With the Slimline Thanks tag diecut, I used the word die to cut out the Thanks out of one panel, on which I had used the Diamond In The Rough hot foil plate with Speckled Aura foil, and then layered it up to fit into the pattern of the Solid Hot Foiled negative. It gives a really cool, almost optical illusion look!

I finished it off with Ivory Opal gems, and backed on black card stock, and a white card base.

As I had cut this out of another panel, I decided to use that one too, because crafty waste is the worst! This time I used the Thanks diecut with white card stock, and layered it up three times. Between the fourth, and final layer, I tucked in some Canopy Leaf diecuts cut out of satin gold card stock.

If you want to see more work with the Crafty Meraki products, make sure you follow me on Instagram as I share regular reels and posts there with lots of fun projects.

If you want to shop any Crafty Meraki goodies, you can take 10% off your order with the code ERICA10 at checkout!

Thanks for stopping by today and I hope you have enjoyed this post, and that you get the chance to check out the video too.

Lots of love and happy crafting from Erica