Welcome to the “Happy Harvest Hop from Kat Scrappiness & Ink on 3!” We are thrilled you could join us on this blog & Instagram hop celebration! We will be sharing darling fall cards featuring Kat Scrappiness amazing dies and sprinkles and Ink On 3’s fabulous inks and darling fall stamps. Come hop with us for inspiration and of course prizes!
The hop is from November 5th at 10am CST and will end on November 8th at midnight. We will have 4 x $15 winners!! 2 from randomly chosen blog posts and 2 from randomly chosen Instagrams so the more you comment the better chance you have.
To participate in the hop giveaway, simply leave a comment on each blog post, follow each DT on Instagram, comment and tag your friends. The more you comment the more chances of winning.
The winners will be announced on the Ink on 3 and Kat Scrappiness blogs & Instagrams on November 10th. You will need to contact us to claim your prize. You can subscribe to our blogs for a notification email on any new blog posts. You will have 7 days to claim your prize.
Thank you for hopping with us and supporting our small businesses!
It is a NO STAMPING card, if you can believe it!! I don’t do those very often, no Siree. I started by using the die on five different pieces of coloured card stock. Because it’s a fall theme, I kept it to yellows, oranges and raspberry pink. I have used Lawn Fawn card stock in Sticky Note, Sunflower, Fake Tan, Canned Pumpkin and Raspberry.
With a bit of cutting and glueing, I layered these up, slightly smaller than the previous frame, so that they overlap and create a very dimensional panel.
To finish off the card, once I had glued the leaf frame to the shimmery background, I cut out the word ‘thanks’ from the Pumpkin Patch coordinating dies.
These letters are cut out of gold glitter card stock, and then adhered to the leaves, rather than the background itself. Doing it this way makes it look like the letters are floating and is a bit different from what I usually do.
Thank you so much for stopping by today, enjoy the rest of the hop and don’t forget to leave a comment here for a chance to win those goodies!
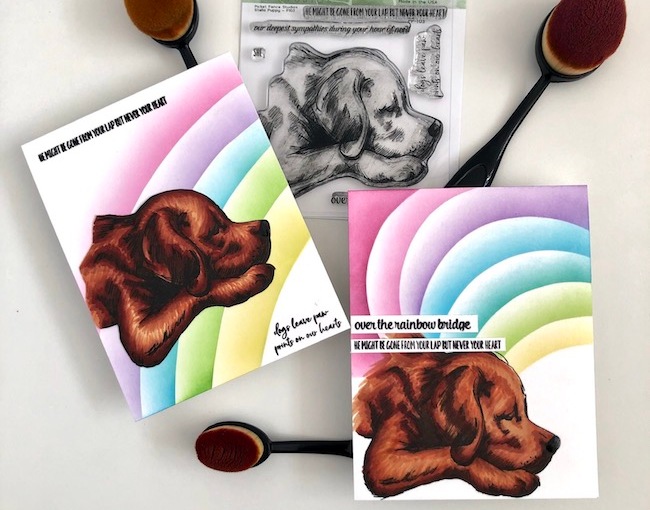
Where are my fellow crazy dog people at? In this month’s Picket Fence Studio release there is a super cute puppy stamp called Stella Puppy.
It looks so much like my sweet Lab boy Hercules, who we lost back in 2016 after a very short, but ferocious health issue battle. Less than six weeks after that, we lost our remaining Lab, called Molly, in a tragic accident. The cards I got from friends after we lost them meant the world to me, because losing a fur baby, never mind two, is one of the most gut wrenching things you can ever go through.
I’ve made two card, doing my thing where they are similar but slightly different. On the first card I stamped the Stella Puppy up with my MISTI and Black Hybrid ink directly onto a card base of Neenah card stock. After setting the ink with my WOW! Embossing heat tool, I got to work with Copics. I don’t have a photo of the first one, but here is the second one I did.
I wanted to add a rainbow on the background but I don’t have a rainbow stencil *insert shocked gasps and wide-eyed looks here* I know, it’s shocking. So, what to do? Well, I made my own! First I cut out a mask and added over most of the doggie, then I used a small bowl to cut out a curved shape out of card stock. This I used as a stencil/mask and ink blended Ink On 3 Atelier Inks in Bee Sting Yellow, Goddess Green, Peacock Blue, My Jam Purple and Marilyn Red with Life Changing Blender Brushes.
My brushes are a little bit over-saturated and need a spa day, and I should have used a new mask for each colour, as they blended into each other BUT it did also give me an extra teal colour between green and blue. The last bit, in the top left corner, I should have skipped because I feel like it got too dark, but oh well.
On white card stock I stamped up some sentiments from the Stella Puppy set with Black Hybrid ink. These I trimmed down as much as I could and then added over some areas where I wasn’t happy the colouring and ink blending had overlapped.
The final touch was to add some Glossy Accents to the little nose and set it aside to dry.
On my second card, for which there is a video on my YouTube channel, I tried applying what I learnt from the first card. With some success and some more issues. Card making is never straightforward in my craft room, lol!
For this, I decided to stamp up the Stella Puppy on a separate piece of Copic friendly card stock, with my Mini MISTI with the Black Hybrid Ink, colour it in and then fussy cut it out. I used slightly different colour Copics on this one and I think the depth is better, than the first one, so that was good. You can see the difference in the photo above.
Second, I used a sheet of acetate to make my “stencil”, instead of card stock. The reasoning for this is that with acetate I can just wipe off the ink, and have less contamination. Good start. Less good execution. I used a, what I thought was, permanent marker to draw the shape of the curve of the rainbow. Well, it was less permanent and more smudgy than I realised, which led to a slightly dirty looking yellow bit. I trimmed off the part with the marker on it, and carried on.
I used the same Atelier Inks on this one, in the same order, after wiping my Life Changing Blender Brushes on kitchen towels. I also used a lighter hand with the inks.
With the negative part of the stencil/mask I was able to add more green to the background, without mixing in the blue. This is better explained in the video, but I didn’t add enough green or moved the stencil/mask too far when I did the blue, which left a gap. By covering up the blue with the negative bit, I was able to add the green without contaminating the blue. Pretty smart, huh?
There is another sweet pet stamp in the release called Your Friend Dear. I’ve done the same thing with this stamp: basically the same layout, but different looks.
This was the one I started with, and I actually stopped midway because I was not very happy with the colouring of the dog. I couldn’t make it work!
In order to get me out of that funk, I stamped it up again and tried another colour combination, this time with Warm Greys. This worked better and I finished off the card with a very colourful girl, and a simple sentiment from Levels Of Friendship. And the Glossy Accent again.
With this one being a success, and also my meh-ness about the first one having died down a little, I thought I’d give it another go. I’m very glad I did because I did actually manage to turn it around!
To make sure this one was different than the first one, with all that white space, I cut a mask out and placed over the image. Over this I used the Fancy Kaleidoscope stencil and Distress Oxide inks in Wild Honey, Worn Lipstick and a hint of Abandoned Coral. They created this gorgeous glow around the image and I love how it turned out!
The final touch for this card was to stamp up the sentiment that comes with Your Friend Dear, in Black Hybrid ink and with that, it was all done. The last two cards are not in it, but there is a video for one of the rainbow puppy cards on my YouTube channel.
The August release from Picket Fence Studio is now available and if you shop any of these links, which are compensated affiliate links to various companies, I will get a small commission directly from the company it’s affiliated with. It won’t cost you anything extra at all, but the potential earnings from these links will keep my blog, YouTube and Instagram fresh and fun. Thank you so much if you choose to support me this way.
Lots of love and happy crafting from Erica
You can find me on various social media platforms if you want to see more of my work
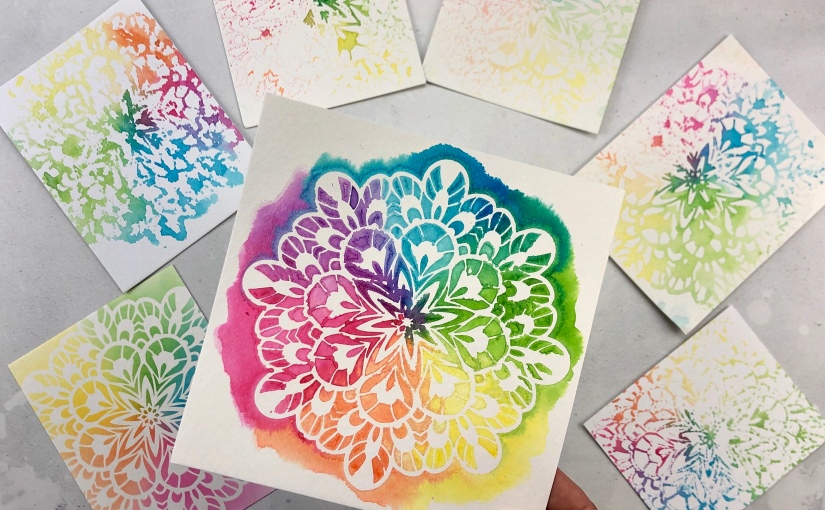
Today I am back with LOTS of cards using the brand new Fancy Kaleidoscope stencil from Picket Fence Studios‘s June release. I do love a good stencil, and it’s possibly I went a tad overboard here but it just took off. I did ink blending, water colouring, ink smooshing and all sorts went on. Let’s get to it, shall we?
I did do a video too, which you can find over on my YouTube channel. I did forgot to film some of the bits, of course, like a total idiot. Oh well.
The clean up kitchen roll piece is gorgeous enough on it’s own.
While I was cleaning up after the colouring, I thought, why not try a few things? My first attempt was adding more colour to the stencil and dabbing water colour card stock on top. This turned out fab but there was still colour left on it so I dabbed another piece on it, and this one turned out soft and pretty too. There was STILL colour left so I kept going! I ended up with four pieces in total, as well as a smaller one.
With all these backgrounds done, it was time to make them into cards! The ink blended piece was quickly finished off with a sentiment from After The Storm stamped up with Black Hybrid Ink. I then went in with my Embossing Pad and added Glisten Changers embossing powder(this is a premixed powder with one part clear embossing powder to one part Glisten Changer powder) on top.
This one is one half of the big piece from the beginning. I cut it in half and made two cards out of them. One I adhered to a piece of black card stock, only slightly bigger than the background piece, to frame it. Also to coordinate with the Best word die, that’s also partly cut out of black card stock.
The other half was adhered directly to a white card base. In hindsight, I should have done the black backing card stock too. It just frames the background so well. The sentiments are both from BFF Girl Gang, stamped up with Black Hybrid Ink on white card stock and trimmed down to slim strips.
One final card was done on a background piece done with the Atelier re-inkers as water colours. Here I used the stencil and Paper Glaze in Snowdrop White. The sentiment is from Charles The Chameleon.
Well, that’s it from me but amazing how many different cards you can get out of just one stencil, right? This one, Fancy Kaleidoscope, has quickly jumped into my faves!
Thanks for stopping by today, I hope you found some inspiration here and will try one of these techniques for yourself.
Lots of love and happy crafting from Erica
You can find me on various social media platforms if you want to see more of my work
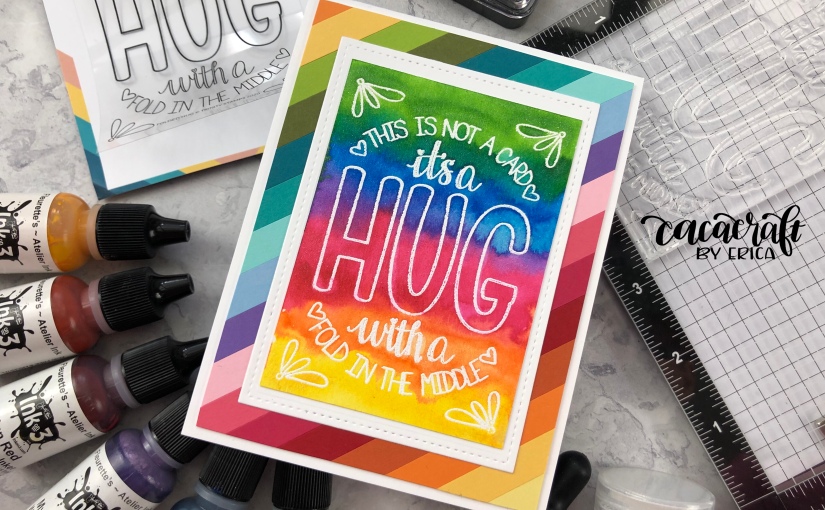
Today I’m popping in with a quick card and video on my YouTube channel of a card that took me less than twenty minutes to make!
I used a new-to-me stamp from Trinity Stamps, called Folded Hugs. It has a sweet message and gorgeous font.
Perfect for quick cards to send to your friends in these weird times. Plus Trinity Stamps is a small, family owned business so we definitely want to support them during this pandemic, where every little sale counts.
Once I had done a bright rainbow wash over the heat embossed image, I helped the drying process by using my heat tool on it. Both the front and the back.
With this done, it was time for my usual card-putting-together-faffing process. I toyed with several different colours of card stock, cut out in different sizes of Lawn FawnStitched Rectangle dies and some of my ready-made rainbow backgrounds. These are done with Lawn Fawn card stock, cut into slim strips and adhered to 5.5″x4.25″ panels. I have quite a few of these already made!
Once I settled on the layout, I put the whole thing together and that was it! So easy and so fast.
I have used compensated affiliate links in this post, so if you use any of these to treat yourself to a little something-something, I get a small commission directly from the company the link is affiliated to. The links to Trinity are not affiliate though, I’m just a fan and know Taniesa in real life.
Well, that’s it from me for today. I hope you will get a chance to stop by my YouTube channel and check out the video.
Lots of love and happy crafting from Erica
You can find me on various social media platforms if you want to see more of my work
Happy New Year and Happy Release Day from Picket Fence Studios! I’m currently in Phoenix, AZ, at Creativation and this month’s release is a little bit later than usual for this reason. The release is being introduced at Creativation so if you are here, come by the Picket Fence booth and say hi. I will also be doing the Make And Take in the Stamping Village, if you miss me in the Picket Fence or Ink On 3 booths.
This first release of 2020 is ginormous, as in GINORMOUS!! Over on my YouTube channel I will be showing off all the stuff and then make a couple of cards. As you do.
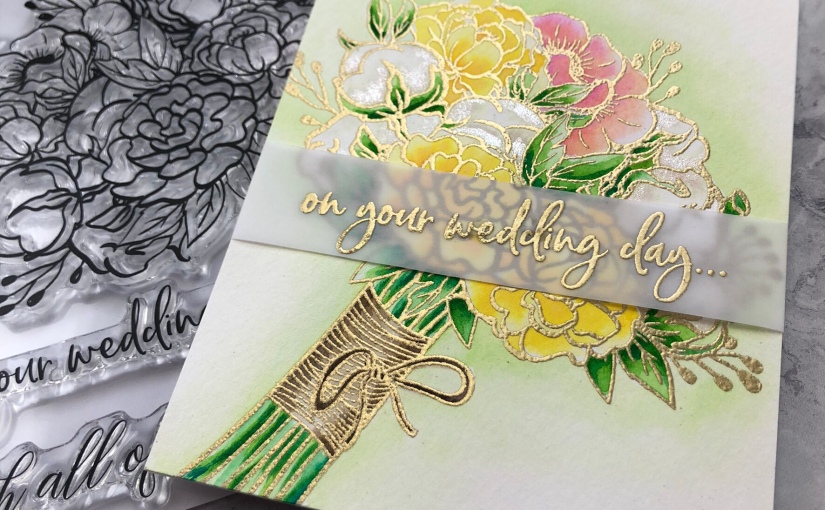
The cards I made for today’s post are made with the Barberton Daisy and A Bride’s Bouquet. Both are water coloured, but with different mediums, and came out total opposite.
Once that was set with the heat gun, it was then coloured in using InkOn3 Atelier Ink re-inkers and one ink pad. I don’t have the Twiggy Brown re-inker yet so I used the ink pad to get the brown needed for the string around the bouquet and for the cotton buds to get some shape. The main colours are Bee Sting Yellow, Goddess Green and Peacock Blue. The green and blue I added together to get more depth and detail to the greenery.
I tried going for a soft, elegant look but, in true Erica-style, managed to mess it up at the last minute by adding too much Marilyn Red and Marigold Orange to some of the flowers. I tried dabbing it off but it’s still a bit too colourful for what I had in mind. Oh well, I will just have to try again!
To soften the look and add a spring-time feel, I have also added a soft green shadow around the bouquet. The final bit of ‘colouring’ was to add a touch of Liquid Pixie Dust on the cotton buds. It’s a wedding bouquet after all, the name A Bride’s Bouquet makes any guessing work totally redundant, lol.
The second card, with the Barberton Daisy stamp, is wild and colourful! The idea was to make something that definitely doesn’t exist in nature and I’d say I’ve achieved it, lol!
I stamped up the Barberton Daisy with Black Hybrid Ink on Canson XL water colour paper. I used the MISTI to make sure I got a good solid imprint and then coloured in the image using Daniel Smith water colours.
When the Daisy was colourful enough, I decided to splatter it with dark grey paint. Just to really drive home the abstract look I was after for this one. It’s one of those creations I’m not sure about if I’m totally honest. The finished result is actually wilder than I pictured it! Crazy, right?
I heat embossed the sentiment ‘You are an absolutely positively amazing human being’ in Opaque Bright White embossing powder from WOW! Embossing on black Licorice card stock from Lawn Fawn. I trimmed the strip down and glued it down flat with the glue tube, also from Lawn Fawn. I love that stuff!
Well, that’s it from me for today but I will be back tomorrow with more cards from this release!
If you want to check out the full release and perhaps pick up a thing or seven for yourself, THIS LINK will take you directly to Picket Fence Studios. I have used compensated affable links in this post, which means I get a small commission from the company associated with that affiliate link, if you shop using these. Affiliate links never add any cost to you, ever, but the revenue they bring me helps run my blog and YouTube channel. You also help me strengthen my collaboration with the companies the affiliate links are associated with, and that’s really great for me. Thank you so much in advance if you use mine when shopping!
I also have a video up on my YouTube channel, in case you missed that. CLICK HERE to go there.
Thanks for stopping by, lots of love and happy crafting from Erica
You can find me on various social media platforms if you want to see more of my work