

Hello, hello!
Today’s post is one of the stops on the fabulous blog hop celebrating Studio Katia’s 2nd anniversary! You should have come here from Amy Rysavy’s blog but no matter where you have come from, WELCOME! The full list of the hop will be at the bottom of this post as well as on the Studio Katia blog, in case you get lost on the way.

This new release is full of fabulous things, you are not gonna want to miss out!! Don’t forget to hop along and comment on each blog for a chance to win!
BLOG HOP GIVEAWAY info: Studio Katia is giving away TWO $100 CAD gift certificates on each day of the Hop, winners will be chosen from the comments left on all blogs of the Hop! Two winners will be chosen from each day, from all the comments left on all the blogs and announced on the Studio Katia blog on Sunday 3rd of June so make sure to comment before Saturday 2nd!
Now all that is out of the way, let’s get to the crafting: In true Erica style I have gone a bit mad with my projects but I had so much fun with these stamps, dies and embellishments I just couldn’t stop myself! In order to keep this rather short and sweet, I’ve shown all the cards here with a quick description of what I’ve used for each one and then I’ve written up separate blog posts for them, which you could always come back to later if you are interested in the step-by-steps. You can find all the supplies I’ve used for these cards at Studio Katia, Altenew and Scrapbook.com

Cards number one, two and three are all made with the new Birthday Greetings stamp set. The first few steps are practically the same: I took a sheet of acetate, drew up a grid on it as guidance, which I then placed in my MISTI over an A2 sized card front. Using the cheat sheet as a guide, I placed lots of the stamps from the set in one of the boxes.
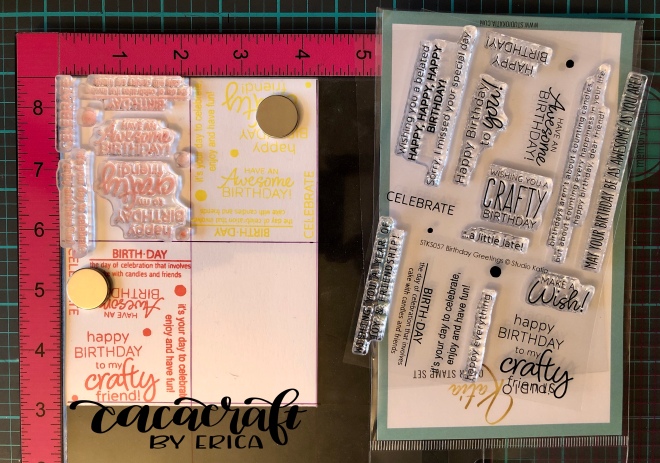
The first card is done with black card stock and the sentiments heatembossed with Altenew’s Golden Peach and Antique Gold embossing powders. The panel is first dusted with a anti-static tool and the first section stamped with VersaMark ink, then after turning it around in the MISTI, I stamped it again.

A liberal dusting of embossing powder and setting with the heat gun later, it was time to move the stamps and go it all again. Once all set and cooled down, the panel was adhered to a card base and a generous sprinkling of Crystal Rainbow Confetti later, adhered with Multi Media Matte, card no1 was done.

The second card was done in the same fashion, only on Strathmore Bristol Vellum card stock and with white embossing powder. To add some colour to it I rubbed some Distress Oxide ink pads over it to add LOTS of ink and then blended them together with a blending tool. The colours I have used are Twisted Citron, Cracked Pistashio, Peacock Feathers, Mermaid Lagoon and Blueprint Sketch.

The March Mermaid gems were just the perfect embellishments for this card, the colours couldn’t have been better matched! I added lots of different sized ones and finished it off with the sentiment ‘May your birthday be as awesome as you are!’ heatembossed in white on a strip of black card stock.

Card no3 is done almost the same as the first two, only this one is stamped with Distress Oxide inks directly onto a white card base, using Squeezed Lemonade, Carved Pumpkin, Worn Lipstick and Abandoned Coral.

This one also got a very generous helping of Satin Rainbow Confetti embellishments to make it look like confetti raining down. I picked out pieces to match the ink colours and adhered them with Multi Media Matte adhesive again. Card no3 was done. This was the quickest on out of the three for sure.

If you want to read more about the makings of these cards with the Birthday Greeting stamp set, includind some step-by-step and more photos, CLICK HERE.

For my next card, I’ve gone floral! Those who know me, knows I love flowers and florals of all kinds so this Lovely Blooms stamp set was right up my street.

I used Canson XL watercolour card stock for this one and trimmed it down to an A2 size, 5.5”x4.24”. It’s stamped with Memento Tuxedo Black ink and heatembossed with Ranger Ink clear embossing powder over it. Using my Zig Clean Color markers, I coloured the flowers in with BRIGHT and vivid colours.

The background needed a little something and as I’m in a serious relationship with Ombré at the moment, I did a black ombré look for it. Even with all that drama added, I felt it needed something else so I splattered gold paint all over it. To finish it off, I heat embossed ‘Celebrate ….a little late!’ In Altenew Antique Gold embossing powder on a slim strip of black card stock, adhered it to the card with some foam tape and then added the whole thing to a card base.

My second floral card is pretty much the opposite of the first one. I heat embossed this one also but I used Wow! Gold Pearl embossing powder for the Lovely Bloom stamp itself, which I had placed in the upper right corner.

These I coloured in using Daniel Smith watercolours, both with H2O water brushes and normal watercolour brushes. I was very inspired by a birthday card I received earlier in the month, I loved the colours on it and used that as a mood board for inspiration.
A simple ‘birthday wishes’ sentiment, from Blooming Bunch, was heat embossed in the same Wow! Gold Pearl embossing powder in the bottom left corner and the card was finished off with a few Majestic Confetti embellishments.

For more in-depth details about these two cards, CLICK HERE.
My last card is inspired by the card I made for last years anniversary blog hop. I love how that one turned out and I actually still have it. That’s it just below.

This years shaker card features the absolutely stunning Japanese Peony stamp, the new standalone diecut Scalloped Window, as well as some of the new embellishments in the shaker compartment. The flower I had already coloured in, using Zig Clean Color markers, hence the vibrant colours. I also made a few extra leaves. I have a time-lapse video of the colouring of the flower on my Instagram page, CLICK HERE to watch it.

To create the rest of the card I cut out the Scalloped Window at the bottom of an A2 panel, adhered some acetate to the back of it, cut some foam tape to size and diecut that to create the shaker compartment. I added Chunky Confetti Glitter, Light Blue Stars and Sparkling Sea Confetti to it and sealed it with a piece of watercolour card stock I had swirled some very diluted silvery blue paint on. The idea was to make it look like a water filled vase.
I also splattered some black Gansai Tambi paint and gold from the Starry Color palette on the front to add even more interest. Once that was dry, I added the flower and the leaves using foam tape. Ta-da!

For more about this card, including step-by-step instructions and photos, CLICK HERE.
I hope you have found some inspiration here and have enjoyed my many, many projects sorry (but #SorryNotSorry really) about that but when inspiration strikes I just run with it! Blame Studio Katia for making fabulous stuff, lol!
I have used compensated affiliate links in this post, to Studio Katia amongst others, at no extra cost to you. Thank you so much in advance if you choose to support me, my little blog and my big crafting journey in this way! I really, really appreciate it.
Thanks for stopping by and happy shopping, crafting and inspiration!
Lots of love from Erica
The next stop of this hop is the amazing Laura Volpes!
Here is the full list of the blog hop, in case you get lost!

WOW! When you embark on your ‘true Erica style’ of ‘going mad’ with products, we are guaranteed show-stopping, breath-taken-away performances, as evidenced here by the amazing cards you’ve designed! The sentiment trio: only genius! Your florals: stunning! The shaker vase: innovative! Marveling at your talents and thrilled that you share them with us!
~carol
LikeLike
Oh my gosh, Carol! Your comment has made my whole day!! Wow, thank you so much for all the love, you have no idea how much it means to me to hear all this ❤️❤️❤️
LikeLike
All your cards are so pretty!!
LikeLike
Thank you so much, Sabrina! I’m so glad you like them!
LikeLike
Love the card. All the work that have gone in to make it, Beautiful end x
LikeLike
Thank you so much, Maria!
LikeLike
ALL of your cards are gorgeous! Thanks so much for sharing your beautiful work with us. I am simply amazed at your work.
LikeLike
Thank you so much for your kind words, Connie! It really means the world to me when I get comments like yours, so thanks again!
LikeLike
Wow! Love all your cards! Really like how you used all the sentiments of the set on the first cards. And your coloring of the flowers is awesome!
LikeLike
I’m so glad to hear you like them all! I was worried I had gone too mad with so many. Thanks again for stopping by and leaving me some love, I really appreciate it!
LikeLike
I love your use of the sentiments! The case shaker card is awesome!
LikeLike
Thank you so much, for both of the lovely compliments!
LikeLike
wow wow wow!!!! those cards are BEAUTIFUL!! and i read all 3 of the other posts lol. my family is Scandanavian – i recognize the color palette. beautiful
LikeLike
Oh wow, thank you so much, Cindyellen!! I’m so glad you like them all and thank you for leaving such a wonderful comment, I really appreciate it!
LikeLike
Wow those are gorgeous cards!!!!
LikeLike
Thank you so much, I’m so glad you like them!
LikeLike
Your cards are stunning ! I love the first cards using the sentiments for a crafty friend, they are really awesome with all the variations you’ve created.
LikeLike
Oh thank you, Isabelle! I’m so glad you like them all!
LikeLike
SO CLEVER! And I love the bright colors! Great cards!
LikeLike
Thank you so much, Meghan! I’m so glad you like the cards and that you stopped by to tell me, I really appreciate it!
LikeLike
WOW! You were incredibly productive! 😊
But I absolutely love how you made vases I to shaker windows…..so amazingly unique!!! ❤
LikeLike
Thank you so much, Karen! I’m so glad you like the cards and my vase idea! I love the look myself and to hear someone else does, is always fab!
LikeLike
Wow, I love your color choices, so bold and beautiful.
LikeLike
Thank you, Kim! I’m so glad you like them!
LikeLike
STUNNING CARDS!
LikeLike
Thank you so much!!!
LikeLike
Great cards, love all the variations.
LikeLike
Thank you so much, Sharon! I was worried I had gone too mad with too many cards, lol!
LikeLike
Your cards are just lovely, but the sentiment one really stands out! What a great design. Congrats SK on 2 years.
LikeLike
Thank you so much! And to think I nearly took them out as I had so many cards for the hop!
LikeLike
I don’t know if I can express with the right word just how gorgeous your floral cards are!!! I also think it was a fab idea putting all the sentiments on the background of the first card. I wouldn’t have thought of that.
LikeLike
Thank you so much, Teri! I’m so glad you like them and that you think I thought outside of the box with the sentiment cards. I really appreciate hearing you like the idea!
LikeLike
These are all amazing. I really enjoyed the coloring you did on the lovely blooms. And the gems really added the right touch of sparkle.
LikeLike
Thank you so much, Michelle! I love colouring flower stamps so I’m glad to hear you like looking at them!
LikeLike
Such a lovely card! Thank you for the inspiration!
LikeLike
Thank you, and thank you for stopping by!
LikeLike
SQUEAL!! LOVE LOVE LOVE your BEAUTIFUL Cards!! SUCH AWESOME Designs!! THANKS SO MUCH for sharing and hope you have a FABULOUS Memorial Day WEEKEND!!
LikeLike
Thank you so much for your amazing comment! I’m so glad you like the cards and stopped by to tell me.
We don’t have Memorial Day here in Europe, we do a Remembrance Sunday in November, but thank you!
LikeLike
awww ! your “words” cards are so perfect ! What a wonderful idea !! I do love them so much ! Congrats 🙂
LikeLike
Thank you so much, Lisa! I’m so glad you like them, and to think I nearly took them out of the blog post as I had so many cards…! I’m so happy I didn’t now.
LikeLike
Your card with the word background is my favorite!
LikeLike
Oh wow, thank you, Kim! And to think I nearly took them out of the hop as I had so many cards already..!
LikeLike
Wow what a variety of cards and each one so unique and beautiful! I lust love the deep colors in your florals.
LikeLike
Thank you so much, Sharon! I’m so glad you like them, thank you for telling me too, I really appreciate it!
LikeLike
Great display of these new designs! Thanks for all the inspiration you put into the cards!
LikeLike
Thank you so much,Jen! I’m so glad you like them and think it was inspirational, that is music to my ears!
LikeLike
I love them all. Your cards are just amazing. What a great variation!
LikeLike
Thank you so much, Wendy! I’m so glad you like them all!
LikeLike
Very pretty floral cards and love how you used the birthday greetings on the cards.
LikeLike
Thank you so much, Sue! I’m so glad you like the cards, and thank you for stopping by to tell me! It means a lot!
LikeLike
I am absolutely in love with the blues and greens on your first card. So bright and beautiful! What a cool way to get the most out of all those sentiment stamps, too!
LikeLike
Thank you! I’m so glad you like that card, it’s probably my fave out of the three too.
LikeLike
Such fun and creative word cards! Your floral cards are gorgeous, especially the gradient black background.
LikeLike
Thank you so much, Dana! I’m so glad you took the time to tell me, I really appreciate it a lot!
LikeLike
The all over sentiments cards would be such fun to receive – what a clever way to use a lot of the same themed stamps. Love that gold and golden peach color combo. Your “Lovely Blooms” cards are gorgeous, especially the black ombre’ background – the bright flower colors really pop! So much inspiration in your post! Thank you for sharing all the techniques and your awesome talent.
LikeLike
Oh wow, thank you so much for leaving such a wonderful comment! It’s so nice to hear you think my blog post is inspiring, that’s music to my ears!
LikeLike
Wow! Wow! Wow! I’m totally in love for your stunning cards!!! Too cool!!!
LikeLike
Beautiful cards! The flowers are so rich and vibrant!
LikeLike
Amazing, WOW, you defiantly had fun working on all these, they are amazing, ever single on of them. So filled with colour and details. I can understand your love of the sparkles, so many colours with such pretty looks and shine x
LikeLike
You are SO super creative to use the sentiment set to create such a unique background!! I love the metallic shimmer against the black background that card is just the perfect amount of simplicity with attention to detail! Thank you so much for sharing with us!
LikeLike
WOW…WOW…WOW!!!! I am seriously blown away by your talent and creativity. Your cards are all stunning, amazing and gorgeous. Your choice of colours are all amazing.
LikeLike
So many fabulous creations, Erica!!! Love the backgrounds you created with all of those fun sentiment stamps!!! And your flower cards are absolutely gorgeous!!
LikeLike
Oh what a fun way to use the sentiment stamp set!!! Your shaker is awesome!!
LikeLiked by 1 person
Thank you so much, Laurie! I’m so glad you like the cards, thank you for stopping by and leaving me some love, I really appreciate it!
LikeLike
Just amazing flowers!!
LikeLiked by 1 person
Thank you so much, Tara! I’m so glad you like them as I had a great time colouring them in!
LikeLike
All your cards are lovely. I really like the graphic style cards.
LikeLiked by 1 person
Thank you so much, Cassandra! I’m so glad you like them!
LikeLike
Beautiful cards! Love the way you used the sentiments on the first two and the florals are gorgeous. So Stunning!
LikeLiked by 1 person
Thank you so much, Ericka! I’m so glad you like them and stopped by to leave me some love, I really appreciate it!
LikeLike
Gahhh, Erica!!! All of these cards are gorgeous!!! I’m loving checking everyone’s cards out 🙂
LikeLiked by 1 person
Thank you so much, Ilda!! It’s comments like yours that make all the hard work behind the scenes worth it all ❤️
LikeLike
Your cards are beautiful! I really like the embossed sentiment card. It’s cute and different.
LikeLiked by 1 person
Thank you so much, Amy! I’m so glad you like them and stopped by to leave me some love, I really appreciate it a lot!
LikeLike
Your cards are amazing! The sentiment only cards are such a cool idea. I especially like the black one with the peach and gold embossing on it. Your florals are gorgeous! I love the vibrant colors and the shell “vase” is so pretty!
LikeLiked by 1 person
Oh, thank you, Cathy! I’m so glad you like them all!
LikeLike
Woww!! Gorgeous set of cards!! The floral ones are just stunning! And the sentiment ones are super cool! Love all of these ❤
LikeLiked by 1 person
Thank you so much, Karthikha! It’s so heartwarming to get comments like yours, I really appreciate it a lot!
LikeLike
Beautiful cards, thank you for the inspiration!
LikeLiked by 1 person
Thank you for the love!
LikeLike
So many spectacular cards! I really like your first card design. I’m quite smitten with the peach embossing on black. Thanks for sharing your creativity.
LikeLiked by 1 person
Thank you, Deb! I’m so glad I could provide some inspiration! Thanks for stopping by and leaving me some love, I really appreciate it!
LikeLike
You have been a busy gal! Love your word cards & the florals just blew me away! Awesome coloring!!
LikeLike
What a fantastic selection of eye-candy for us! You were truly inspired by this release. I can’t begin to say what is my favorite, although I tend to like things off-center, so I might choose The off-center floral.
LikeLiked by 1 person
Wow, you made a ton of gorgeous cards! I love how you are able to get so many uses from one stamp set.
LikeLiked by 1 person
your cards are all so beautiful!!! I love the flower cluster and the way you colored the flowers is amazing. The other cards with the sentiments are just something else, love them all 🙂
LikeLiked by 1 person
Wow stunning cards…love the use of all the sentiments on the first text card and the beautiful floral card with the grey black background!
LikeLiked by 1 person
Beautiful cards. 🙂 I love your coloring.
LikeLiked by 1 person