

Hi guys!
I just have to say I’m absolutely B-L-O-W-N away by the response to my last blog post, my contribution to the 2018 Stamping for Autism Awareness movement that my dear friend Veronica put together with the help of some very generous sponsors and talented designers.

I’m simply overwhelmed by all the encouraging comments, kind words and little stories people have shared. Absolutely amazing! You guys rock! If you haven’t seen it, click here to check it out. Also, hop along if you haven’t done so already but be prepared to be amazed!
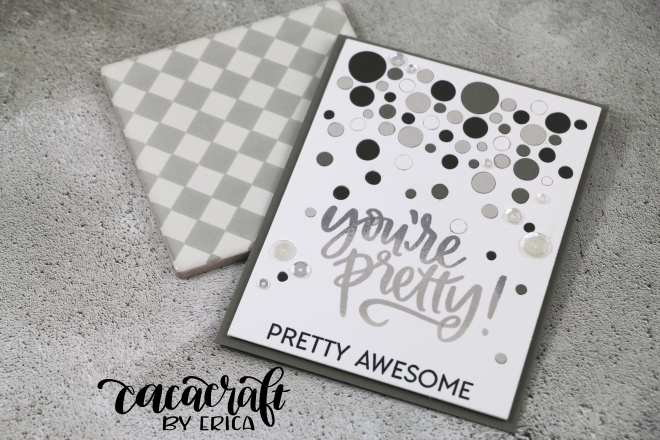
One of the cards I made for the hop was this one, made with Neat & Tangled’s Falling Circles Cover Plate, lots of different shades of grey card stock as well as white and of course Neat & Tangled’s You’re Pretty stamp set. And a sequin or eight..
I loved the way it looked so much I actually made another THREE! Yep. I am not known for being able to rein it in easily once I get on a roll. I experimented with glitter, metallic, matte and smooth card stock and also a way to get those circles into place quickly without too much fiddling. I actually came up with a pretty fast way too!

The first card I made with white and gold glitter card stock. I do think white and gold is such a classy and elegant combination and I love how this came out. To begin with I ran a white piece of card stock through my BigShot with the Falling Circles Cover Die and then another time with gold glitter card stock. I added a piece of double-sided adhesive foam sheet, cut to size, to the back of the white panel after poking out all the loose pieces, then I added the glittery gold circles by placing the whole panel on top of the white one and pressing down on each circle. Easy peasy!! Done in seconds!
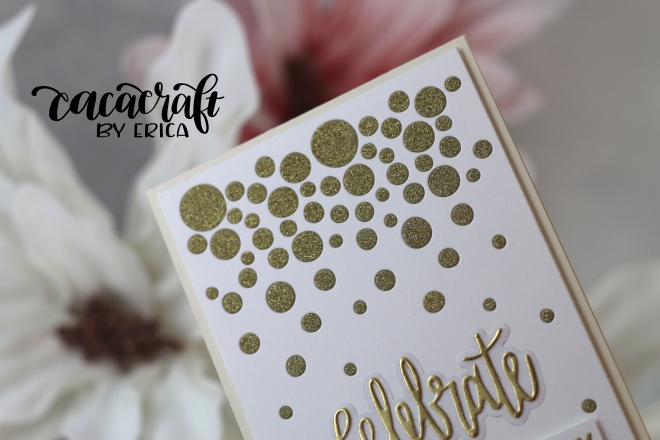
I finished off the card by adding the panel to a cream card base, Lawn Fawn card stock in Vanilla Malt, and adding a sentiment that reads ‘Celebrate, it’s your birthday’. The celebrate bit is done with Neat & Tangled’s ‘Celebrate’ diecut, the ‘shadow’ part in vellum and the word die in MFT Brushed Gold card stock.

The rest of the sentiment, ‘it’s your birthday’, from the Celebrate stamp set, is heatembossed in Altenew Antique Gold embossing powder on a strip of white card stock and added to the card with foam tape. I could have quite easily added some sequins to the card, I am a self-confessed sequin-addict after all, but you will be super impressed to hear I resisted the temptation!

The second card is made with the leftover piece from the first card, the glittery panel that was left over once I used the circles. I ran a piece of Tonic Studios Black Velvet card stock through the BigShot with the same Falling Circles Cover Die before doing my little trick again. That double sided foam sheet stuff is so addictive and useful! I love it!
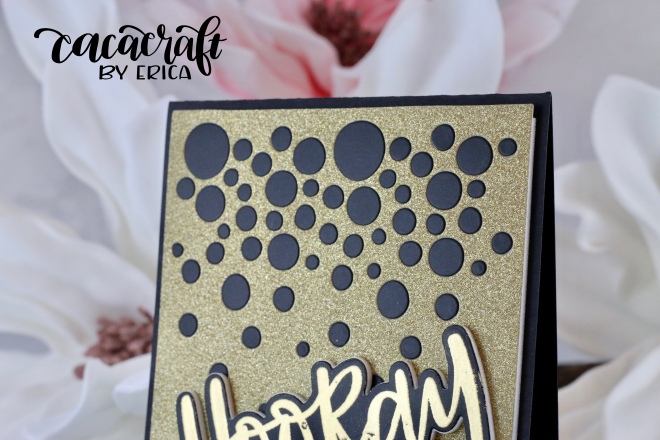
Getting the circles in was a piece of cake so that part took no time at all. Then it was time to think sentiment and card base. As much as I like white and gold together, I also adore black and gold so it seemed like a great idea to make a black card base (I used Lawn Fawn Licorice card stock for this) and keep all the other accents black too. On two separate pieces of the same Black Velvet card stock, I heat embossed ‘Hooray’ and ‘it’s your day’ from Neat & Tangled’s Hooray stamp set, with Altenew’s Antique Gold again. Using the coordinating diecut I cut out the Hooray and then another piece in foam sheet to layer them up. I may be a one-trick pony with this but I absolutely LOVE how this looks. I even like the little bit of white peeking out around it. It looks like an extra layer, which in my book is never a bad thing.
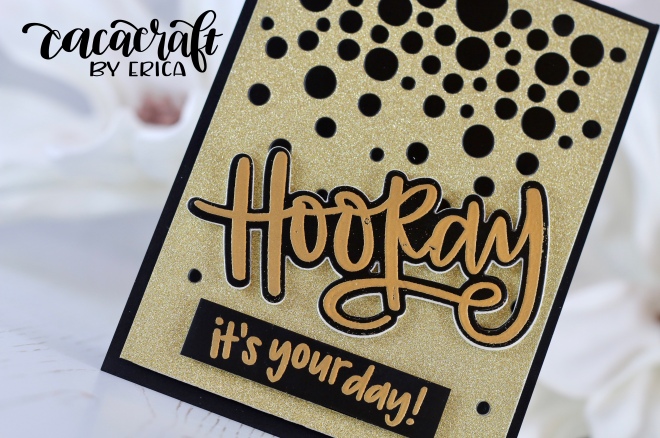
The ‘it’s your day’ part was just trimmed down and adhered to the card with foam tape. The Hooray bit was added to the card at an angle. I have no other reason here than ‘why not??’.

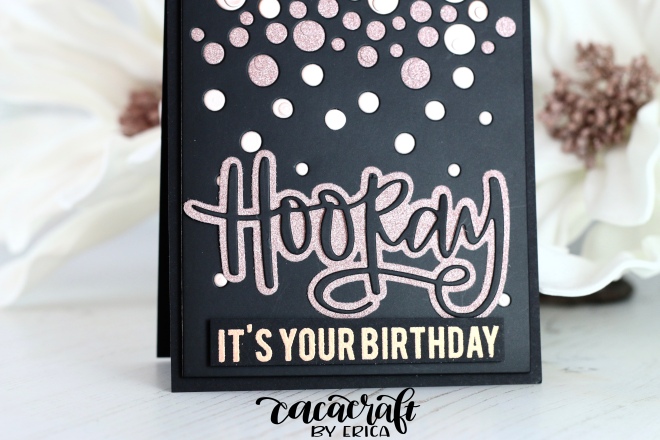
The third card was made with the Black Velvet left over piece. You can see the pattern here, can’t you? I was unable to walk away from it and not use it… it was a vicious, crafting circle, lol!
For this card I decided to try something quite different though and instead of using a single colour for the circles, I decided to do a pink ombré look using a mixture of brushed metallic(Tonic Studios Burnished Rose), glittery(DCWW 6×6 glimmer stack) and light pink shimmery card stock I found in my stash. Very out there!

In an attempt to break the “leftover cover plate vicious circle”, I cut strips of card stock and adding them as I went along, rather than doing one colour at a time. Imagine that, I would have ended up with another three pieces I wouldn’t be able to throw away…! I did end up with just some extra circles which I added to the bigger circles on the card to add some dimension… without using foam tape. I know, right?? Shocking turn of events!
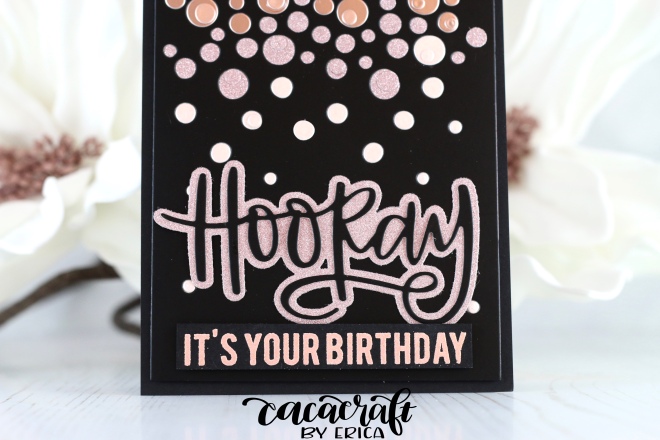
As this card is all black, apart from the circles, I cut out the shadow bit from the Hooray die cut from same pink glittery card stock as some of the circles and the word die out of the Black Velvet card stock to add some pizzazz. I think it really makes the black Hooray stand out. For this one, I didn’t do the foam backing though.
The rest of the sentiment, ‘its’ your birthday’, is heat embossed with Altenew Rose Gold embossing powder on black card stock and added to the card with foam tape.
It’s no secret I am a big fan of Neat & Tangled, just in case it wasn’t blatantly obvious, lol! Their new release is available later this week and it’s filled with adorable stamp sets and fun stencils and dies. Check out the sneak peeks if you haven’t already! Or don’t if you do not have any willpower this month.
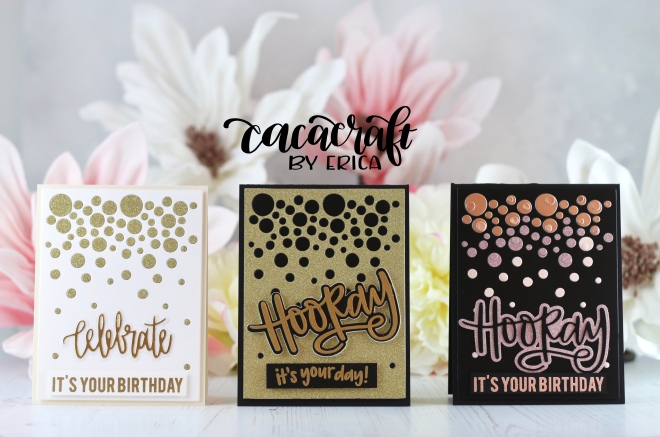
With this last picture of the cards lined up next to each other, I only have two last questions for you: which one is your favorite and what colour combination shall I do next??
Lots of love and happy crafting from Erica
As always, I have used some compensated affiliate links in this post ( to Tonic Studios, Neat & Tangled, MFT Stamps and Altenew) which means that I will get a small commission from the company directly if you click on one of these links and end up buying something. At NO extra cost to you whatsoever! Thank you so much if you choose to support my little crafting bubble and I, this way. I really do appreciate it a lot!
The other links in this post is just for your convenience as I love those products and have a reputation for being an enabler #SorryNotSorry about that!

All of your cards are so inspiring. Thank you for sharing.
LikeLiked by 1 person
Thank you for stopping by! I’m so glad to hear you think the cards are inspiring!
LikeLike
your 3 cards show well how crafting can be … endless possibilities and a never ending story 😉
My favorite is the white and gold one. Veeeery classy indeed !
LikeLiked by 1 person
Thank you so much, Lisa!
I did have to put my foot down with myself or I would probably still be in the craft room making cards…!! 😜
LikeLike
Very beautiful designs !!
[margessw(at)icloud(dot)com]
LikeLike
I love cover plates too! The inlaid look is just so beautiful! You make gorgeous classy cards!
LikeLiked by 1 person
Oh, thank you so much for this lovely comment, Pauletta. I’m so pleased you like the cards!
LikeLike