


Hi and welcome to CaCaCraft!
Today’s post is to celebrate the release of Artist Markers Set B and Set C from the awesome Altenew and I’m so excited to be part of it as a guest designer! I couldn’t quiet believe it when May got in touch and asked if I wanted to join in! Oh YES, that was pretty much a no-brainier and I’ve been floating on a little pink, fluffy cloud ever since! And today is The Day!
You should have arrived here from Therese Calvird but no matter how you got here, WELCOME! If you loose your way along the hop, there is a list at the bottom of this post and you can always go back to the Altenew Card Blog to find your spot again.


To celebrate this release, Altenew is giving away a $50 gift certificate to SIX lucky winners! Please leave a comment on the Altenew Card Blog and Altenew Scrapbook Blog by Monday, November 27th for a chance to win. Six winners will be announced on the Altenew Card Blog and Altenew Scrapbook Blog on Wednesday, November 29th.
GIVEAWAY: You can also win a $30 gift voucher to the Altenew shop by leaving a comment right here on my blog post by Tuesday, November 28th! Winner will be randomly chosen and announced very shortly after that so don’t forget to comment for your chance to win!
Now, it’s entirely possible that I got a little bit carried away in all the excitement. I’ve been on a bit of a card making frenzy since all my goodies arrived and I’ve got eight cards for you today. Yes, you read that right. Eight. I will try to keep each description short and sweet but for those of you who know me, you know that I can ramble on for ages and ages with my jibber-jabbering (that’s Erica talk for ‘talking lots’) but please, do hang in there!
Right, let’s not beat around the bush anymore. Let’s dive in: Card number one, two and three all came out of the same idea. I got my blue markers out, that will be SET C, and on an 8.5×11 inches piece of Neenah solar white card stock, I drew thick lines of each colour over and over. I love how alcohol based markers just blend into each other and it’s quite mezermising to watch them getting on paper.
The idea I had was to make a striped back ground for one card and then cut out letters using the Bold Alphabet Die to spell ‘pappa’ (Dad in Swedish) as well as ‘dad’ for my British father-in-law. I really struggle with masculine cards and to be honest, I have absolutely no clue as to why I decided to punish myself by making a few for this blog hop. I do love blue though, and swishing those markers around made me happy like a kid in a candy shop!
Once I was happy with the background piece I cut it down to 4.25×5.25 inches. I wanted a little bit of the black card base I decided to use to peek out on each side of the panel, and I adhered it using foam tape. The Bold Alphabet Die makes a quick job of cutting out the letters I needed, I used shiny gold card stock as well as doubled sided adhesive foam, to raise the letters up and create dimension. The letters were adhered to the card and on a slim strip of black card stock I heat embossed the sentiment ‘You are amazing’ (from the set Amazing You) with the exclamation mark masked off, using Platinum Crisp Embossing Powder . The strip was added to the card with some foam tape and a few matte gold sequins were added with Glossy Accents.

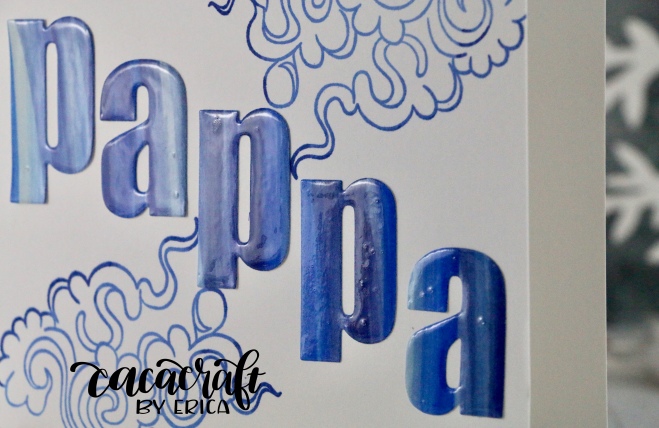
For card number two I used the Bold Alphabet Die again to cut out another ‘Pappa’. These I added diagonally to a white card base, that I had previously stamped the swirly cloud from the You Are stamp set using Glacier Cave Oval Inks to create a mixed blue look. I also added ‘you are the best’ to the top of the card using Sapphire blue ink.
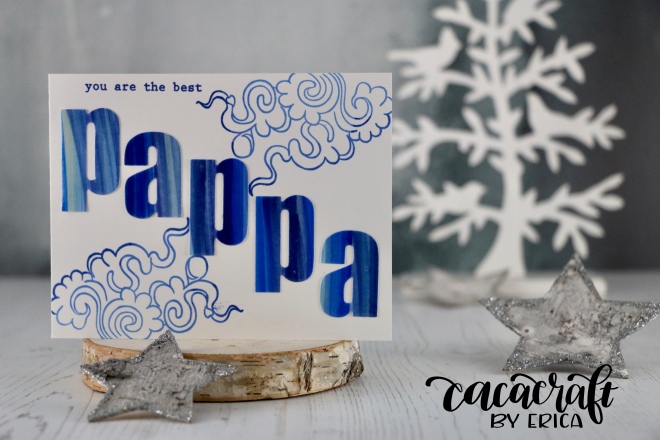
To make the blues on the letter pop a bit more I filled them in with Glossy Accents and set aside to dry. Sadly I smudged the bottom cloud a little but decided to leave it as it is, rather than try to fix it. Sometimes you just gotta cut your losses, right? You can see it in the first picture but in the second one, I sneakily put my watermark over the boo-boo.
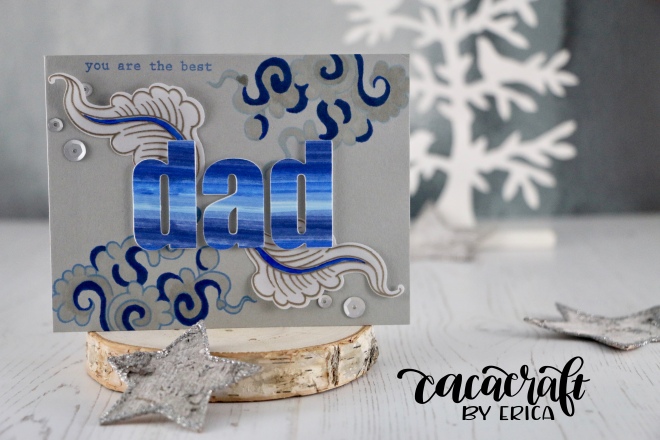
Card number three is very similar to card number two, done with the You Are stamp set, except the card base is a light grey and I used Caribbean Sky for one of the clouds and Persian Blue (from the Glacier Cave Dye Inks Set ) for the other one. I also used my markers, at first just the greys (this would be the ones from SET B ) to fill in the clouds a little bit, but it looked too flat so I added some blue too (that would be from SET C)
The ‘dad’ letters for this card were adhered to the card using foam to raise them up and underneath them I added two swirly bits from the You Are stamp set which I had heatembossed on vellum using Platinum Crisp Embossing Powder and cut out using the coordinating dies . These also got a little bit of blue added to them and the card got finished off with a few matte gunmetal grey sequins.
Anyone who knows me knows that I love flowers and not just like ‘like them a lot’, oh no. I L-O-V-E them! I’m a trained florist and although I don’t work these days, I happily would if it meant being around flowers all day. Flower stamps hold a special place in my heart and it would be rather weird if I didn’t use a few for this blog hop, right?? Well, without further ado, here is my next card:
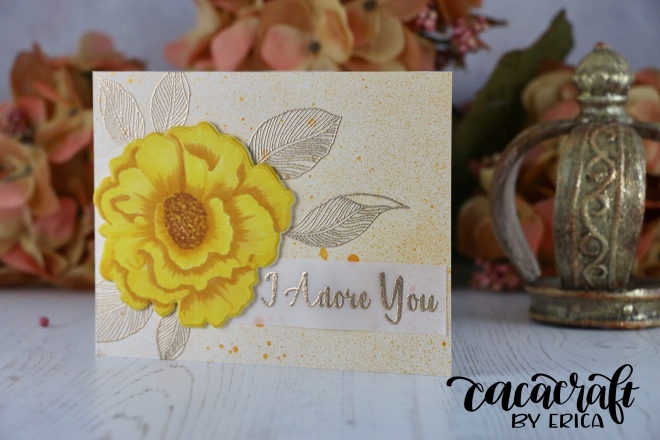
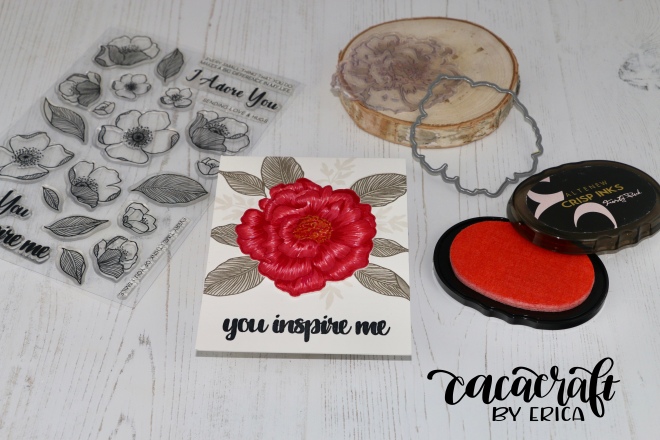
For this card I used Camellia Build-A-Flower stamp set and coordinating die, as well as some leaves from Adore You, Rose Gold Crisp Embossing Powder and Warm Sunshine Metallic Shimmer Ink Spray
I started by spritzing my background panel with Warm Sunshine Metallic Shimmer Ink Spray and then setting that aside to dry whilst working on the flower. My no-line colouring isn’t the best but I really wanted to try it using the Camellia Build-A-Flower stamp set and the yellow markers from SET B. To begin with, I stamped the outline stamp of the flower using Warm Sunshine Oval Ink and then got to work. For the colouring I used a flicking technique with the markers.
Using the coordinating die I cut both the flower out and a piece of foam to raise the flower up on the card and set these aside whilst I carried on working on the background. The leaves I chose to use are from the Adore You set. I used the cut out flower as a guide to place the leaves on the shimmery background panel and then stamped them all using Embossing Ink and heat embossed them using Rose Gold Crisp Embossing Powder . I also stamped the sentiment ‘I adore you’ on a strip of vellum and heat embossed that in the same Rose Gold Crisp Embossing Powder.
Putting the card together took no-time at all at this point as all the components were done. I didn’t get the vellum strip completely flat on the card but all in all, I really like how this came out. I will definitely be adding more Metallic Shimmer Ink Sprays to my stash!
On my next card I have used the same stamps as the last one, but on this one I stamped the leaves from Adore You in Morning Frost Dye Ink ink first and then filled them in using the grey markers from SET B. Then I placed the card back in the MISTI, sprinkled it with my anti-static powder tool, stamped the leaves with Embossing Ink and then heatembossed them using Platinum Crisp Embossing Powder. I also added a few little leafy branches using the base layer of the leaves from the Ranunculus Build-A-Flower stamp set with Morning Frost Dye Ink ink.
The sentiment I stamped in Jet Black Dye Ink and then used Crystal Clear Embossing Powder on top to make it stand out a bit better.
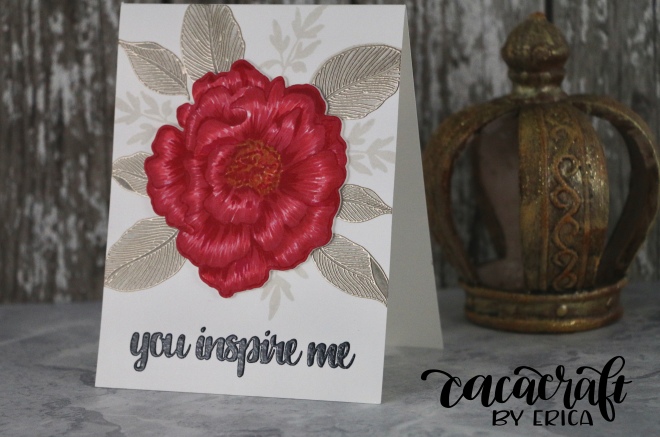
The flower itself I stamped up with Coral Berry Dye Ink ink and coloured it in using red markers from SET C as well as some of the darker yellows from for the middle. Instead of going for a smooth look, I used a flicking technique to create lots of highlights and lowlights. This is my favorite way to colour in flowers.
To finish the card off I cut out another bit of foam to raise the flower up from the card base and that was it.
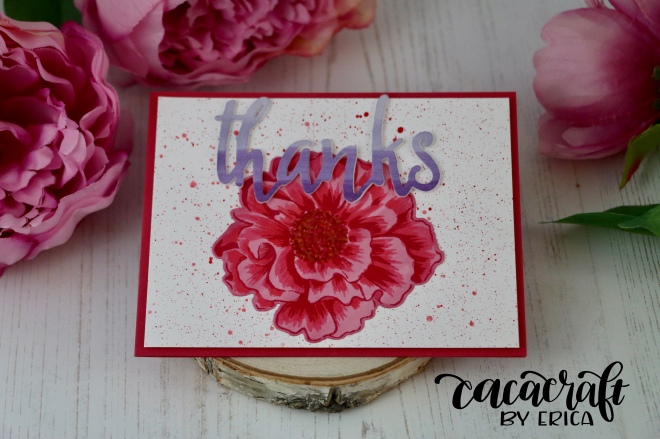
This next card is quite quick, it might not look it but it really is. I spritzed a little Frosty Pink Metallic Shimmer Ink Spray and Coral Berry Metallic Shimmer Ink Spray on a piece of water colour card stock and set aside to dry. You can use your heat gun to speed up the drying process if you are in a hurry.
I stamped up the Camellia Build-A-Flower outline stamp using Coral Berry Oval Ink and then I used the lightest of my red markers from SET C all over the image. With the two darkest markers I added some shading to the petals. This is super easy as you don’t have to figure out where to do it, just use the outlines as a guide and hey, presto!
In the middle I used both the darkest red and the two darkest yellow markers in a dotting fashion to create a natural look.
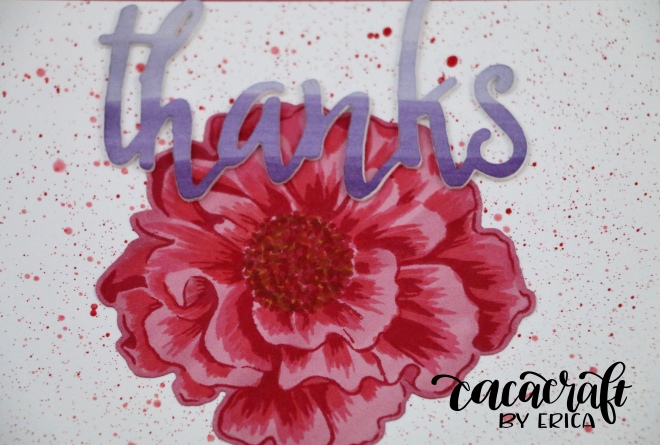
I cut out the flower using the coordinating die and quickly assembled the card. I used a card stock in as close to Coral Berry as I could find and trimmed down the spritzed glimmer panel a little bit to make sure it showed on all sides. This is of course added using foam tape. I love that stuff!
Sentiment wise I wanted to keep it simple but effective. I quickly used the purple markers (from SET B) to create an ombré effect on a scrap piece of card stock and then I die cut the word THANKS using This die. I added this to the card with more foam tape to raise it up and that was it!
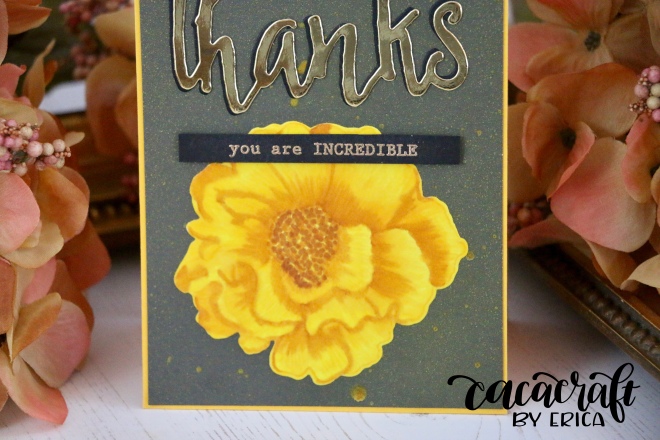
This card is done in a similar fashion, only yellow. On a piece of dark grey card stock I spritzed Warm Sunshine Metallic Shimmer Ink Spray and set aside to dry. The flower is done in a no-line colouring technique and I used Warm Sunshine Oval Ink before colouring it in with the yellow markers from SET B. On this flower I tried blending the colours a bit more than I did on my first yellow card, without loosing the depth and texture of the petals. I definitely need more practice when it comes to this technique.
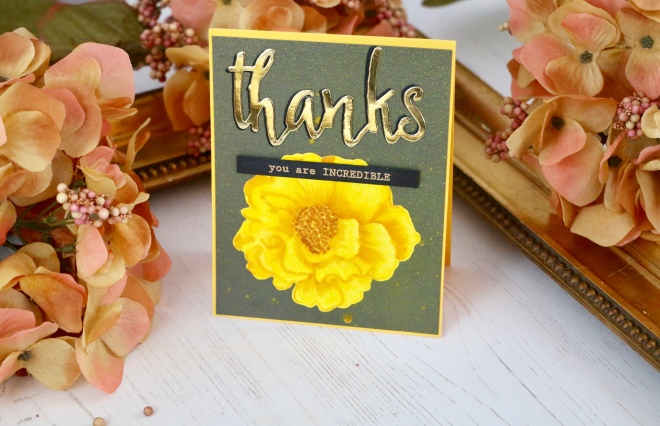
This one is also a ‘thanks’ card but this time I used shiny gold card stock with the Thanks die and layered it with a black one to create a shadow. I also stamped and heatembossed ‘You are incredible’ on a slim piece of back card stock using Embossing ink and Rose Gold Crisp Embossing Powder . This little strip I added with foam tape to the panel and the whole shebang went on a dark yellow card base.
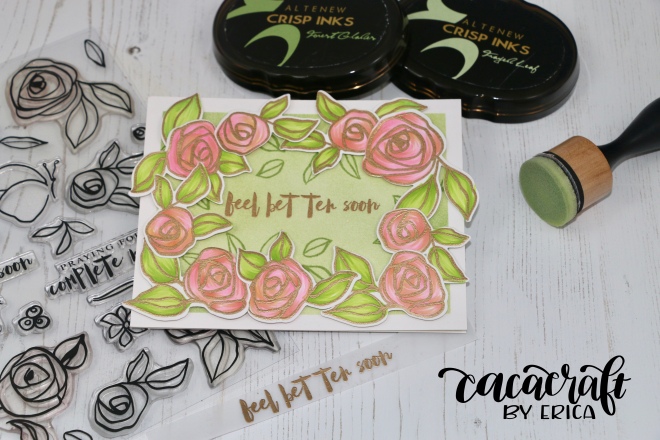
My last card (and this really is the last one, I promise!) I use the lovely Bamboo Rose stamp set to make a ‘get well’ card. Using my MINI MISTI I stamped two sets of the flowers with Morning Frost Dye Ink and then using the Four Scoops markers from SET C I coloured them in quite loosely. For the leaves I used the green Artist Markers from SET A.These I ordered as soon as I was asked to take part in this blog hop as I have a very serious and chronic case of Full Set Syndrome. It’s awfully contagious and there is no known cure, apart from getting the full set of whatever it is that gave you the FSS to begin with. I’m serious!
When I was happy with the colouring I dusted the pieces of card stock with my anti-static tool, popped them back into the MISTI to be stamped with Embossing Ink and sprinkled with Rose Gold Crisp Embossing Powder. I melted it with my heat gun and set them aside to cool down a bit before cutting the flowers out using the Coordinating die cut.

For my background I decided to use a couple of green inks (Frayed Leaf Dye ink and Forest Glade Dye Ink) to do some ink blending. I had a bit of a disaster with this though, my first attempt ended up having to be scrapped as I did the ink blending first and no matter how much I dusted it with my anti-static powder tool after, the embossing powder I wanted to use for the sentiment stuck to the entire panel! The only thing I could do what reverse course and start again and this time do the sentiment first, so that’s what I did. I used the same Rose Gold Crisp Embossing Powder for the sentiment to keep it cohesive. Once that had cooled down I used the inks I had chosen and blended them until I had a nice green background. A spur of the moment decision had me adding a few leaves in Forest Glade Dye Ink on top of the ink blending to frame the sentiment a little bit more.
The die cut flowers I arranged in a rectangular shaped wreath around the sentiment and adhered them to the card using foam tape to raise them up and create that lovely layered look. Once that was done, the whole panel was adhered to a white card base and that was that!
Right, if you have made it all the way to this point, you pretty much deserve a standing ovation! I did warn you that I have gone completely mad and made lots of cards due to all the excitement, there was simply no stopping me once I got going… #sorrynotsorry my people!
Now the next person in the hop is Vicky Papaioannou and just for your reference, here is the full blog hop list:
Altenew Card Blog
Kathy Racoosin
Laura Bassen
Mindy Baxter
May Sukyong Park
Agnieszka Malyszek
Lydia Evans
Tammy Tutterow
Lilith Eeckels
Suzy Plantamura
Nicole Picadura
Jessica Frost-Ballas
Enza Gudor
Sveta Fotinia
Erum Tasneem
Altenew Scrapbook Blog
Kelly Latevola
TaeEun Yoo
Kymona Tracey
Yoonsun Hur
Kristina Pokazaniev
Therese Calvird
Erica A-B <——— You are here!!
Vicky Papaioannou
Svitlana Shayevich
Nina-Marie Trapani
Virginia Lu
Thank you so much for stopping by today and I hope I have inspired you to try these markers (and all the other goodies I have used) as I had an absolute blast making these cards. Don’t forget to leave a comment here on my blog as well as on the Altenew blogs for your chance to win a gift voucher to the Altenew shop!
That’s it from me today!
Happy crafting and hopping from
Erica

Wow, such an array of colors and styles of cards, beautiful!
LikeLike
Thank you so much for your kind words, Janet! I really, really appreciate them!
LikeLike
All of these are special, but the Feel Better Soon is my favorite!
LikeLike
Thank you so much, Barbara!! I am glad I put that one in now as I thought I had made too many and nearly took it out!
LikeLike
The flowers are beautiful but I love the first couple with
the blues. My favorite color and they look fantastic
in those cards.
thanks for sharing.
LikeLike
Blue is my favorite colour for myself and in real life 💙 It was great fun experimenting! Flowers are usually my go-to colouring thing, it’s my little happy place but I’m glad my thinking-outside-of-the-box thing got so well received, thank you for that!!
LikeLike
Fantastic cards ! All the colors are beautiful and your technique is incredible. And you have plenty imagination, really great creations.
LikeLike
Oh my gosh, Isabelle! You are going to make me cry happy tears! Thank you so, so much for your kind words, they mean so much to me!
LikeLike
YWow, your cards are amazing!! The coloring is so realistic!
LikeLike
Thank you so, so much Kim! It means the world to me to hear you say that!
LikeLike
Really pretty cards!! The get well card is so pretty and creative –
LikeLike
I’m so glad you like them, Jennifer! Thank you so much for leaving such a lovely comment for me!
LikeLike
Wonderful cards – so bold and vibrant.
LikeLike
Thank you so much, Iris!! I’m so glad you like them!
LikeLike
Just so pretty! Thank you for the inspiration!
LikeLike
Thank you so much for your lovely and supportive comment!
LikeLike
Wow! What a treasure trove of cards! Very nice florals and great card’s for fathers.
LikeLike
Thank you so much, Linda! I’m very happy to hear you like the cards as I was so nervous!
LikeLike
Beautiful cards! Love that ‘feel better soon’ card!
LikeLike
Thank you so much, Denise!
LikeLike
Awesome collection of cards. My favourite is the red camellia with the silver leaves – beautiful. Really like the blokey blue and grey too. I so hear you about FSS, definitely no cure other than to never buy a single item from a set – but you know like that is ever gonna happen!!
LikeLike
Thank you so much for your kind words, Linda! And how in the world would we EVER be able to say no to crafty stuff? It’s definitely never going to happen 🤣
LikeLike
You really did get excited, all those cards were fantastic, the colours, the blending, the designs chosen, fantastic, & the dad,pappa cards were so amazing, you said you struggle with male cards I find this not to be true they are so good, I am going to have a go at them in the future once I get the marker sets.x
LikeLike
Thank you so much for your wonderful comment, Andrea! You put a big, huge smile on my face with it!
LikeLike
I am loving these new markers from Altenew. How fabulous to be asked to present for them.
LikeLike
I know, it is a dream come true to be asked by one of my fave companies to be a guest designer!
LikeLike
Stunning cards. Thanks for the inspiration.
LikeLike
Thank you for the lovely compliment!
LikeLike
Wow! Love your masculine cards and also one for everyone! Beautiful work!
LikeLike
Thank you so much! I’m so glad to hear you like my masculine cards as I always struggle with them!
LikeLike
Congratulations! You are the randomly drawn winner of my giveaway!!! Please check my latest blog post on how to claim your prize!
LikeLike
Beautiful cards! That first one is my favorite. So bold!
LikeLike
Thank you so much, Miriam!! That means a lot coming from you! *fan girl squeal*
LikeLike
Fantastic cards. I enjoy in all of theme.
LikeLike
Thank you so much, Marjeta!
LikeLike
Beautiful cards. Love the colors
LikeLike
Thank you so much, LaDonna! I am so glad to hear you love them!
LikeLike
Wow, what a bunch of stunning cards you made. Thanks for the inspiring masculine cards and the gorgeous flower cards. It was not a punishment at all to read the enthusiastic descriptions.
LikeLike
You are so kind to say that, Henriëtte! I was a bit worried the post was too long. Thank you also for the kind words about the cards! I really appreciate them!
LikeLike
wonderful cards..I esp. love the masculine ones.
LikeLike
Thank you so much, Mary-Anne! I’m so pleased to hear you love the masculine ones as those are definitely not my forte!
LikeLike
Wow, gorgeous cards! Your blue stripes are really striking and just perfect for some masculine cards, and I adore your Camellias!
LikeLike
Thank you so much, Marianne! It brightens my day to read comments such as yours on my post! Thanks again!
LikeLike
Great masculine cards! They’re all fantastic!
LikeLike
Thank you so much, Susan! I’m so glad to hear you think so!
LikeLike
It is so great to see options for men. While I too love flowers, the men in my life don’t. What a great way to create for them and get inspired for the rest of us. Thank you for these beautiful cards.
LikeLike
Dawn, men just don’t appreciate flowers the way we do, who knows what’s wrong with them?? 🤷♀️ (Just joking!) Although I generally struggle with masculine cards, these came together pretty quick and painless. I’m so glad to hear you found them inspiring!
LikeLike
What a great set of cards!
LikeLike
Thank you so much, Lee!
LikeLike
Wow !! That’s a great variety of cards, all absolutely beautiful !!
margessw@icloud.com
LikeLike
Thank you so much, Marge! I’m so glad to hear you like them!
LikeLiked by 1 person
You created so many beautiful cards. The designs and coloring are wonderful.
LikeLike
Thank you so much for that kind comment, Tracy! I’m so glad you think so!
LikeLike
Beautiful markers colors and fantastic cards
LikeLike
Thank you so much, Nanna!
LikeLike
These are seriously THE nicest cards I’ve seen so far. I’m so pleased you entered the ALTENEW blog hop as I wouldn’t of found you and your talent. Thankyou for sharing. These cards would look like hot or if you put them in a frame. Gorgeous.
LikeLike
Oh my gosh, you have NO IDEA how much that means to me!! Thank you, thank you, thank you!!!
LikeLike
Well Erica, one cannot judge you for making 8 cards, with all of those goodies, I would go nuts myself and most likely, I might have just locked myself in my craft room until I could not do no more…Lol Masculine cards are challenging for me too but you have certainly i spired me to no end. These re all awesome cards, well done.
LikeLike
Lol, I’m so glad to hear you say that as I was very seriously contemplating putting another two cards in the blog post…! I did indeed go absolutely nuts with the crafting and it’s not stopped since either, I have a few cards ready to be written up as blog posts and then sent out to people. Thank you for saying I have inspired you, it’s so awesome hearing that!
LikeLike
Gorgeous cards! Love this!!!💞
Thanks for sharing ☺️
God bless!
LikeLike
Thank you so much, Regina!! I’m so glad to hear you think so!
LikeLike
Amazing cards. Thanks for sharing!
LikeLike
Thank you so much for stopping by and leaving a comment, Linda! I’m glad you like the cards!
LikeLike
What an amazing work ethic you have! You colouring really brings the florals to life. I love the blue background on the first card, the marker strokes don’t look harsh at all. The final Bamboo roses card is stunning. So soft and elegant. Thanks for all the inspiration.
LikeLike
Thank you so much for your lovely comment! I’m so glad you like the cards!
LikeLike
So many fantastic cards Erica! Thanks so much for sharing!
LikeLike
Thank you so much for stopping by and leaving such a nice comment, Stacey!
LikeLike
Wow unique backgrounds. Your flower cards are just beautiful!!!
LikeLike
Thank you so much for saying that, Denise! I really appreciate it!
LikeLike
Fabulous projects. Love how you colored the letters and backgrounds on the Pappa cards. TFS
LikeLike
Thank you so much, Teresa! I’m so glad you like them!
LikeLike